SLIDER

rhubarb buns

31 Oct 2022


I recently spent 2 weeks in my hometown of Brisbane. While I was there, I decided to learn how to roll kanellebullar or Swedish cinnamon buns properly. I watched loads of videos and I now know at least 9 different ways of shaping them. I decided to try a new to me shaping method to form these rhubarb buns.


The recipe is a hybrid of sorts, using my favourite bun dough, with an almond filling (inspired by this recipethen topped with a rhubarb compote and some flaked almonds. Traditionally the buns should be flavoured with cardamom but as I am not a fan of that spice in sweet goods I omitted it completely from the recipe. If you want help with the rolling and folding, please refer to the video linked above.


Here's the recipe for you which makes 12 buns. For all my recipes I use a 250ml cup and a 20 ml tablespoon, unsalted butter and 60g eggs. My oven is a conventional gas oven so if your oven is fan forced you may need to reduce the oven temperature by 20°C.

Rhubarb buns - makes 12
Dough
1 tsp dried yeast
135 mls 
lukewarm milk
30g honey
1 tsp vanilla extract
room temperature egg
2 cups (300g) plain flour 
½ tsp salt
75g room temperature unsalted butter, cut into small pieces
 
Rhubarb compote
225g rhubarb 
40-50g caster sugar
1 strip orange rind
2 tbs orange juice
1 cinnamon stick 
1 tsp tapioca, corn or potato starch

Filling
75g room temperature unsalted butter
1 tsp vanilla extract
75g caster sugar
55g almond meal
Pinch salt

Topping
1 egg, beaten 
25g flaked almonds

Method 

Grease a large bowl. Combine the milk, honey and vanilla in a large liquid measuring cup. Stir in the yeast and leave covered for 10 minutes or until frothy, then add the egg and mix until combined.

Place the flour and salt in the bowl of a stand mixer fitted with a paddle, and mix on low to combine. Add the egg mixture and mix on low to combine. With the mixer on low, add the butter, one piece at a time. When all the butter has been added, increase the speed to medium and beat the butter into the dough, until all the little butter pieces are incorporated, 1 minute. Transfer the dough to the prepared bowl. The dough will be very sticky and you will need a spatula to scrape the dough into the bowl.

Cover the bowl with plastic wrap and let rise for 30 minutes. Place your fingers or a spatula underneath the dough and gently pull the dough up and fold it back over itself. Turn the bowl and repeat this folding again. Continue 6 to 8 more times, until all the dough has been folded over on itself. Re-cover the bowl with plastic and let rise for 30 minutes. Repeat this series of folding 3 more times, for a rise time of 2 hours and a total of 4 foldings. Tightly cover the bowl with plastic wrap and refrigerate overnight or up to 72 hours.

Rhubarb compote 
Cut the rhubarb into centimetre-thick pieces. I
n a small saucepan combine the rhubarb with the sugar, orange rind, juice and cinnamon stick and cook for about 10 minutes or until the rhubarb has softened. Add 1 tsp of tapioca starch and cook until the mixture has thickened a little. Let the rhubarb cool completely before using. My rhubarb was very tart, so I needed to add a little more sugar to the compote.

Filling
Place all the ingredients into a small food processor and whiz to form a smooth paste. Set to one side. 

Assembly
Line 2 baking trays with baking paper. Take the dough from the fridge then turn 
the dough out onto a lightly floured bench. Knead the dough a few times to activate the gluten.

Roll the dough out to approximately 30 x 40 cm rectangle. Spread the filling over the dough then fold the long sides of the dough over so that there are three layers. Flatten slightly with a rolling pin to seal the edges. Return the dough to the fridge for 15 minutes to firm up the dough.

Cut the dough horizontally into 12 twelve strips then stretch, twist and form each strip into a loose knot. Place the knots on the prepared baking trays. Cover with a clean tea towel or plastic wrap and let rise until doubled in size and puffy.


Preheat the oven to 220°C, conventional. Press down the centre of each bun and spoon in some of the rhubarb compote. Brush the buns with the egg wash and sprinkle with the flaked almonds. Place the tray of buns on the centre rack of the oven and bake for 12-14 minutes or until risen and well browned. Leave to cool for a few minutes before cooling on a wire rack. Repeat with the second tray.


I love buns and I just love rhubarb so I had high hopes for these rhubarb buns and I was not disappointed. They were delicious! Now I have to try out a few more of those shaping techniques so expect more buns in the future.

See you all again next week with some more baking from my kitchen.

Bye for now,

Jillian


PRINT RECIPE

one bowl apricot and olive oil cake

23 Oct 2022


My love for baking remains undimmed but this year life has been getting in the way. As I've been time poor, elaborate bakes have gone out the window and instead I've been making lots of simple cakes. I am looking to fancy things up a notch for Xmas 2022 though, so expect piles of meringue and lashings of mascarpone and cream!


Nothing could be more simple than a one bowl cake and I turned to Aran Goyoaga for today's cake. It's a simple little number that I glammed up with the addition of lemon syrup which was drizzled over the just baked cake. It's a way of adding extra flavour and ensuring the cake stays moist.


I've been in Brisbane for the past few weeks semi-coping with Dad's unpredictable oven which seems to cook everything at 200
°C irrespective of the dial, so the cake was ready in only 45 minutes rather than suggested hour.

Here's the recipe for you, inspired by this recipe from Aranwhich makes a 17cm cake. For all my recipes I use a 250 ml cup and a 20 ml tablespoon, unsalted butter and 60g eggs. My oven is a conventional gas oven so if your oven is fan forced you may need to reduce the oven temperature by 20°C.


One bowl apricot and olive oil cake
Ingredients 
75g (⅓ cup) caster sugar
2 tsp grated lemon rind
⅔ cup (100g) plain flour
⅓ cup (35g) almond meal
¾ tsp baking powder
¼ tsp bicarb soda
Pinch salt
¼ cup (60mls) olive oil
¼ cup (60mls) milk
1 egg
1½ tsp vanilla
5 apricots, halved

Syrup
1 tbs caster sugar
2 tsp water
40 mls lemon juice
 
To serve
1 tbs chopped pistachios
Icing sugar

Method
Preheat the oven to 180°C, conventional. Grease, flour and line the base of a 17cm cake tin with baking paper.
 

In a large bowl, mix the sugar and zest together. Work the zest into the sugar rubbing between fingers. Whisk in the flour, almond meal, baking powder, bicarb soda and salt. Whisk in the olive oil, milk, egg and vanilla. 


Pour the batter into the prepared cake pan. Top the batter with the apricot halves, cut side up, overlapping them slightly. Bake the cake for 45-50 minutes, or until golden brown and a toothpick inserted in the centre comes out clean. 

Right towards the end of the cake’s cooking time, combine the sugar and water in a small saucepan and bring to a simmer, cooking until the sugar has dissolved then stir through the lemon juice. 


Remove the cake from the oven and place on a cooling rack. Spoon the lemon and sugar mixture over the warm cake then let the cake cool in the pan for 10 - 15 minutes or until cool
 enough to handle. Turn the cake out; remove the baking paper from the base of the cake then invert the cake onto the cooling rack and cool completely before serving with the chopped pistachios and a dusting of icing sugar.


Not overly sweet, simple to make and a cake that improves on keeping. See you all again next week with some more baking from my kitchen. 

Bye for now, 

Jillian 


PRINT RECIPE

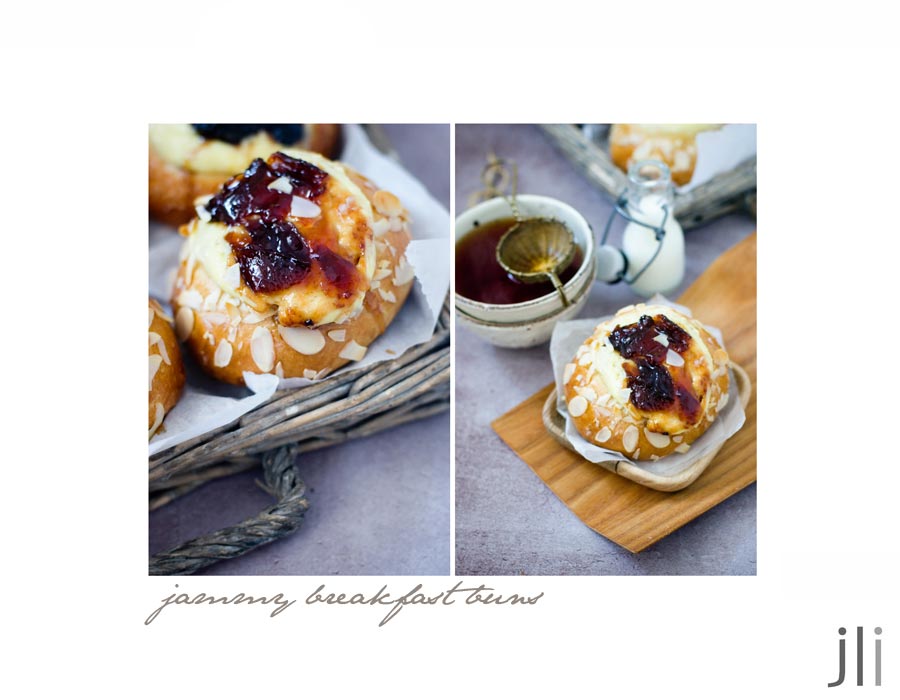
jammy breakfast buns

17 Oct 2022


I bought a copy of Julia Busuttil Nishimura's new book 'Around the Table' which I gave to a friend for her birthday. I looked through the book before I wrapped it and it's filled with beautiful recipes. I don't have my own copy but on a recent flight to Brisbane I was able to download an extract from the book. These jammy breakfast buns caught my eye and as soon as I was back in my own kitchen, I made a small batch. 


I adapted the recipe a little to use what I had in my kitchen. I had some ricotta cheese which I used instead of cream cheese then I filled the buns with plum jam and some cherry jam I found lurking in the back of the cupboard. Instead of apricot jam alone I used a few apricot halves which I then topped with a spoonful of jam. The buns rose a great deal in the oven and were huge so next time I'd probably make them a little bit smaller. 


Here’s Julia's original recipe for you, which makes 10 buns. For all my recipes I use a 250ml cup and a 20 ml tablespoon, unsalted butter and 60g eggs. My oven is a conventional gas oven so if your oven is fan forced you may need to reduce the oven temperature by 20°C.


Jammy breakfast buns - makes 10
400g plain flour, plus extra for dusting
10g active dried yeast
100g caster sugar
1 teaspoon fine salt
1 teaspoon ground cinnamon
150ml full-cream milk
4 eggs (3 for dough, 1 for egg wash)
1 teaspoon vanilla extract
165g unsalted butter, softened
150g jam of your choice
Demerara sugar or flaked almonds, for sprinkling

Cream cheese filling
200g full-fat cream cheese, at room temperature
1 egg yolk
60g caster sugar
zest of 1 lemon

Method
In the bowl of a stand mixer fitted with the dough hook attachment, combine the flour, yeast, sugar, salt and cinnamon. Warm the milk in a small saucepan (to about 38°C on an instant-read thermometer), then add it to the dry mixture along with the three eggs and the vanilla extract. Mix the dough on medium–low speed for about 15 minutes, scraping down the side of the bowl every 4–5 minutes. It should be still quite soft, but not overly sticky now. Add the butter, a tablespoon at a time, mixing well between each addition. This will take about 8 minutes. Mix the dough for a further 4–5 minutes, until the dough is shiny, elastic and coming away from the side of the bowl.

Stop the mixer and lift up the arm. Take a little piece of the dough and stretch it out between your hands. You should be able to stretch it without tearing until it’s almost transparent enough to let light in. This is called the windowpane method and it’s a good way to see if enough gluten has developed in the dough. Continue mixing and checking until you can create a ‘windowpane’ successfully. Transfer the dough to a lightly buttered large bowl and fold the dough in on itself a few times to create a smooth ball. Cover and set aside to rise in a warm place for 1 hour or until doubled in size.

Knock back the dough, then transfer to a work surface, dusted with a little flour if necessary. Divide the dough into ten pieces, about 100 g each. Working with one piece at a time, roll the dough into balls by tucking the edges into the centre, then turning over and rolling on the work surface with your hand in a circular motion. Avoid using too much flour, as the friction of the dough on the work surface is necessary to create a smooth ball. Arrange the balls between two trays lined with baking paper, leaving adequate room for them to rise and spread. Cover loosely with a clean tea towel and allow to rise for a second time in a warm spot for 1 hour or until puffy. After 30 minutes, preheat the oven to 180°C.


Filling
In a small bowl, whisk the cream cheese together with the egg yolk, caster sugar and lemon zest. Make a deep indentation in the centre of the buns with your fingers. Fill the buns with a tablespoon each of the cream cheese filling, followed by a dollop of your chosen jam.


Whisk the remaining egg with 1 teaspoon of water, then brush the buns with the egg wash and sprinkle over some demerara sugar or flaked almonds. I like to do some with sugar and some with almonds, for variation. Transfer the trays to the oven and bake for 16–18 minutes, until the buns are golden and well-risen. They are best served as soon as they have cooled down.


I had one of the buns straight from the oven and it was absolutely delicious but they were still good the next day, reheated for a few seconds in the microwave.

See you all again next week with some more baking from my kitchen.

Bye for now,

Jillian
PRINT RECIPE

blood orange bundt cake

2 Oct 2022


Helen Goh recently featured her favourite orange cake recipe on InstagramAs you know I love all things blood orange, so I found the recipe online then adapted Helen's recipe a little to create this blood orange bundt cake which I topped with a blood orange flavoured glace icing and a few strands of candied blood orange rind.


The recipe uses a whole orange which is boiled then pureed. Of course you can boil the orange in a saucepan for an hour + but I speed up the process in the microwave. 

Here's the recipe for you which makes a small bundt or a 17cm cake. For all my recipes I use a 250ml cup, a 20ml tablespoon, unsalted butter and 60g eggs. My oven is a conventional oven so if you have a fan-forced oven you may need to reduce the temperature by 20°C. 

 
Blood orange bundt cake
Ingredients
1 blood orange
170g plain flour
1¼ tsp baking powder
¼ tsp bicarb soda
pinch salt
100g unsalted butter, at room temperature
150g caster sugar
2 large eggs, at room temperature
60ml milk
40ml blood orange juice

Icing
10g unsalted butter, melted
90g (1/2 cup) icing sugar, sifted
Pinch salt
1-2 tbsp blood orange juice 
Optional - orange rind, fresh or candied to decorate

Method
Pierce the skin of the orange in a few places then put the orange in a microwave safe bowl with 1 tsp of water. Lightly cover the bowl, then microwave on high for 4 minutes or until the orange is completely soft (use a small knife with a sharp point to check; it should penetrate the orange without too much resistance).

When cool enough to handle, cut the orange into roughly 8 pieces, removing any seeds. Place the orange pieces in a food processor and process to a fine puree, then scrape into a small bowl. My orange yielded 135g of puree. You can do this step up to 3 days ahead; store the puree in the fridge until it's needed or it can be frozen. 
 
Preheat the oven to 180°C conventional. Grease and flour a small bundt pan and set to one side. 
 
Sift the flour, baking powder, baking soda and salt into a medium bowl. Combine the butter and sugar in the bowl of a stand mixer and beat with the paddle attachment on medium speed for about 3-5 minutes (the mixture won't be entirely creamy since there's proportionally more sugar than butter). Add the eggs, one at a time, beating well between each addition. Add the orange puree and mix on low speed for a few seconds to combine, then add one third of the flour mix, followed by half of the milk.

Maintaining a low speed, mix for a few seconds, then repeat with another third of the flour and the remaining milk. Remove the bowl from the mixer and fold through the remaining third of the flour with a spatula before folding through the orange juice. 


Spoon the batter into the prepared cake tin and place in the oven. Bake for about 45 minutes, or until a skewer inserted into the middle of the cake comes out clean. Remove from oven and place on a wire rack to cool for 15 minutes and then turn the cake out to cool completely. 


Icing
In a small bowl, combine the butter, icing sugar and salt and sufficient orange juice to make a thick icing. Place a piece of greaseproof paper under the cake rack, and then drizzle the icing over the cooled cake. Let the icing set for a few minutes before decorating with some citrus peel. When the icing has set, transfer the cake to a serving plate.


As you would expect from a Helen Goh, the cake was delightful, perfumed with orange with a fine crumb and was a big hit at work.

See you all again next week with some more baking from my kitchen. 

Bye for now, Jillian
PRINT RECIPE

plum ricotta and almond cake


Sometimes I know in advance what I'm going bake; sometimes inspiration strikes at the last moment. This cake came about because I had a tub of of ricotta perilously close to it's expiry date. I looked through my books, then online for a ricotta cake recipe. 


I found a Julia Busuttil Nishimura recipe for a plum, ricotta and almond cake but decided I'd make an apple and blackberry version because it's not plum season here. A quick trip to the fruit shop revealed no blackberries either so I looked through the freezer and found 3 frozen plums I'd put away last plum season and voila I had all the ingredients I needed for this plum, ricotta and almond cake.

As the original cake was quite large and I only had a few plums, I changed the proportions to make a smaller cake. Here's the recipe for you which makes a 17cm cake. If you'd like to make a larger cake refer to the original recipe by Julia Busuttil Nishimura. For all my recipes I use a 250ml cup, a 20ml tablespoon, unsalted butter and 60g eggs. My oven is a conventional oven so if you have a fan-forced oven you may need to reduce the temperature by 20°C.

Plum ricotta and almond cake
Ingredients
3 plums
3 tsp raw sugar
75g unsalted butter, softened
110g caster sugar
1 tsp vanilla extract
1 tsp grated lemon rind
2 eggs
75g fresh full-fat ricotta
110g almond meal
50g self-raising flour sifted with a pinch of salt
20g whole natural almonds, roughly chopped
Double cream, to serve
 

Method
Preheat the oven to 180⁰C conventional. Grease, flour and line the base of a round 17cm cake tin with baking paper. Halve the plums, remove the stones and cut each half into slices around 5 mm thick. Sprinkle the plums with 2 tsp of raw sugar and set aside. 


Place the butter, caster sugar, vanilla and lemon rind in a bowl and beat until pale and fluffy using hand beaters or a wooden spoon. Add the eggs, one at a time, beating between each addition. Add in the ricotta and continue to mix. The batter will look a little curdled at this point. Finally gently stir through the almond meal and flour by hand and mix until just combined. Spoon into the prepared tin and smooth the top of the batter. 


Arrange the plums on top of the batter then sprinkle over the remaining raw sugar, avoiding the very edge of the cake as it tends to burn as the cake cooks. Scatter the chopped almonds around the edge of the cake. Place the cake on the centre rack and bake in the preheated oven for 1 hour or until a skewer comes out clean, when tested.


Allow to cool briefly in the tin, before loosening the cake with a knife and removing the outer ring of the springform pan. Allow the cake to finish cooling on a wire rack then remove the baking paper before serving. Serve with double cream or labne.

So easy to make and so delicious.
See you all again next week with some more baking from my kitchen.

Bye for now,

Jillian


PRINT RECIPE
© DELICIOUS BITES • Theme by Maira G.