SLIDER

apple and cinnamon scrolls

26 Jun 2023

I do love a scroll and looking back through my archives, I've made apple and cinnamon scrolls before. Judging by the photos, they weren't much of a success as they barely rose. Well, I'm pleased to say that my bread making skills have improved out of sight since that time. During my long service leave in 2021, spent almost entirely in lockdown, I spent many, many hours in my kitchen baking bread, once I could get my hands on some flour that is.

For the scrolls, I used my version of Sarah Keiffer's cinnamon roll recipe. As it's a multi-step process, I made overnight rolls. I made the dough on Friday night, then prepared the cinnamon filling recipe and the apple the following day. I assembled the rolls in the afternoon and left the rolls on the bench top to rise as it's pretty cold here in Sydney. Very early on Sunday morning I glazed and baked the now risen rolls which I slathered with vanilla flavoured cream cheese icing while still warm from the oven. I'm sure you can guess what I had for my breakfast on Sunday


Here's the recipe for you which makes 8 - 10 scrolls, depending how big you like your scrolls. 
For all my recipes I use a 250 ml cup, a 20 ml tablespoon, unsalted butter and 60g eggs. My oven is a conventional gas oven so if your oven is fan forced you may need to reduce the oven temperature by 20°C. These scrolls are best served the day they're made but they can be frozen. As soon as they're cool, store in plastic bags, freeze and defrost when needed.

Apple cinnamon scrolls
Dough
125 mls milk, lukewarm
30g honey
1 tsp vanilla extract
1 tsp yeast
1 egg at room temperature
2 cups (300g) plain flour 
½ tsp salt
75g room temperature unsalted butter, cut into small pieces
Melted butter, milk or cream for glazing the buns

Apple Filling
2 Granny smith apples, peeled, cored and diced into 1 cm pieces
1 tsp (5g) unsalted butter
Juice of half a lemon

Cinnamon filling
50g room temperature unsalted butter, 
100g brown sugar
3 tsp cinnamon
1 tbs almond meal
1 tsp maple or golden syrup
Pinch salt

Cream cheese icing
40g room temperature unsalted butter  
50g room temperature cream cheese,
½ tsp vanilla bean paste
Pinch salt
1 cup (150g) icing sugar, sifted
 
Method
Grease a large bowl. Combine the lukewarm milk, honey, the vanilla and the yeast in a large liquid measuring cup. Set aside for 5-10 minutes or until foamy, then stir in the egg.

In the bowl of a stand mixer fitted with a paddle, mix the flour and salt and stir on low to combine. Add the egg mixture and mix on low to combine. With the mixer on low, add the butter, one piece at a time. When all the butter has been added, increase the speed to medium and beat the butter into the dough, until all the little butter pieces are incorporated, about 1 minute. Transfer the dough to the prepared bowl. The dough will be very sticky and you will need a spatula to scrape the dough into the bowl.

Cover the bowl with plastic wrap and let rise for 30 minutes. Place your fingers or a spatula underneath the dough and gently pull the dough up and fold it back over itself. Turn the bowl and repeat this folding again. Continue 6 to 8 more times, until all the dough has been folded over on itself. Re-cover the bowl with plastic and let rise for 30 minutes. Repeat this series of folding 3 more times, for a rise time of 2 hours and a total of 4 foldings. Tightly cover the bowl with plastic wrap and refrigerate overnight or up to 72 hours.

Apple filling
Place all the ingredients into a microwave safe bowl. Cover and cook the apples on high for 3 minutes or until softened but still holding their shape. Set aside to cool. You can also cook the apples in a frying pan on the stovetop on a medium heat. 

Cinnamon Filling
Combine all the ingredients in a small bowl and mix to a smooth paste. Set aside.

Shape the dough
Flour a work surface and knead the dough 10 to 12 times to activate the gluten. Shape the dough into a ball, cover the top lightly with flour, and cover with a tea towel and let come to room temperature. 

Grease and line a 26cm round pan or a baking pan with baking paper and set to one side. On a lightly floured work surface roll out the dough to a 40 cm × 30 cm rectangle. Spread the cinnamon filling evenly over the dough, right up to the edges. Scatter over the cooked apples then starting at a longer edge, roll the dough into a log shape to create a spiral.


Use a sharp knife to cut into approximately 3 cm wide slices and then tuck the loose ends of the roll underneath. Place the buns, spiral side up, onto the prepared tray. Cover the pan loosely with plastic wrap and let the dough rise until doubled, 1 to 1 1⁄2 hours. Remove the plastic then brush the buns with melted butter, milk or cream and bake in the preheated 180°C, conventional oven for 30 minutes on the centre rack or until golden and risen. While the rolls are baking, prepare the icing. 


For the icing
Place the butter, cream cheese, the vanilla and salt into a medium size bowl. Using a hand beater, mix on medium until smooth and creamy. Add the icing sugar and mix on low until combined. Scrape down the sides of the bowl and mix on medium until the icing is light and fluffy, 3 to 4 minutes. 

When the rolls are ready, transfer the pan to a wire rack and let cool for 5 minutes. Using an offset spatula or table knife, apply a thin layer of the cream cheese icing, using about one-third of the mixture. Let the rolls cool for another 15 to 20 minutes then top with the rest of the icing and serve. 


If you’d like to make overnight rolls then prepare the rolls (roll out dough, fill them, roll them up, cut them, and put them in the prepared pan) then cover them loosely with plastic and refrigerate for up to 18 hours. When ready to bake, preheat the oven, and let the rolls sit at room temperature (still covered in plastic) until puffy. Bake as directed (they might take slightly longer to bake). 


So how were the scrolls? I made 9 large scrolls and a tiny one with the trimmings, which I chose not to ice. The tiny scroll was tasty, but the iced scrolls were out of this world. They were absolutely delicious, so I'll definitely be making them again.

See you all again next week for some more baking from my kitchen.

Bye for now,

Jillian
PRINT RECIPE

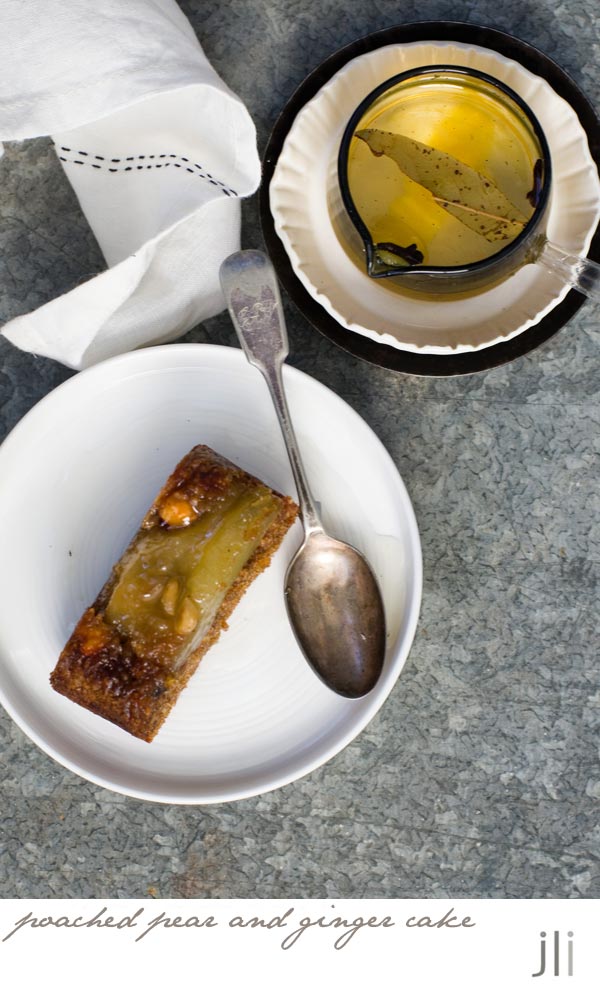
poached pear ginger and hazelnut cake

25 Jun 2023


It's winter in Sydney so the fruit selection in the fruit shop is pretty limited, just apples, pears, citrus fruit and expensive berries. Pears were on special at my local fruit shop, so I bought a few and looked through my recipe books for pear recipes.


I actually found I had loads of options but settled on a Flour and Stone Pear, Ginger and Hazelnut Cake recipe. I poached 3 small pears but they didn't all fit into my 17cm round tin, so I used a small loaf tin instead. I also didn't have all the ingredients on hand, so I had to make a few swaps such as golden syrup for treacle and crystallised ginger for stem ginger.  


Here's the recipe for you which makes a small loaf cake. For all my recipes I use a 250ml cup and a 20 ml tablespoon, unsalted butter and 60g eggs. My oven is a conventional gas oven so if your oven is fan forced you may need to reduce the oven temperature by 20°C. 

Flour and Stone Poached Pear and Ginger Cake – makes a small loaf cake
Poached pears
500 mls water
250g sugar
1 cinnamon quill
1 fresh or dried bay leaf
1 strips of lemon peel
2 star anise
2 cloves
3 small pears

Hazelnuts
75g toasted hazelnuts

Cake batter
60g unsalted butter, softened
50g brown sugar
25g treacle/golden syrup
1 egg, lightly beaten
40g sour cream
50g plain flour
½ tsp baking powder
1/4 tsp bicarbonate of soda
pinch salt
½ tsp ground cinnamon
1/8 tsp ground nutmeg  
1½ tsp ground ginger
25g finely
chopped crystalized ginger, or stem ginger 

Poached pears
Combine the water, sugar, cinnamon, star anise, cloves, bay leaf and lemon peel in a large saucepan. Bring to the boil, then reduce the heat to low and allow the syrup to simmer while you prepare the pears.

Peel the pears, then cut them in half and remove the cores. Pop the pears into the syrup, then cover and simmer for 20-30 minutes or until they are tender. The poaching time can vary, depending on the ripeness of the pears you have chosen, so test by piercing one of the pears with the tip of a paring knife. You want a little resistance because they will be cooked again when they go into the cake. Allow the pears to cool in the syrup and store them in the fridge for up to 4 days before you bake the cake.


Preheat the oven to 160°C fan/180°C, conventional. Line a small loaf tin with a sling of buttered baking paper, dust with flour and set aside.
 
Hazelnuts
Coarsely chop a tablespoon of hazelnuts to scatter over the base of the tin before baking. Place the remaining hazelnuts into a food processor and process until you have finer crumbs to put in the batter.


Cake
Using an electric mixer fitted with the paddle attachment, cream the butter, sugar and golden syrup on medium speed for about 3 minutes or until pale and fluffy.

Give the egg a light beat with a fork, then gradually add to the fluffy butter. Scrape down the sides of the bowl with a spatula every now and then if the egg is not incorporating with the butter. Add the sour cream and beat again to combine.
Sift the flour, baking powder, salt, and spices together and fold them through the butter mixture, then fold in the chopped ginger and remaining ground hazelnuts to complete the batter. 

Drain the pears on paper towel or a tea towel to remove any excess liquid and arrange them, cut side down, in the tin. The syrup can be frozen for next time you need to poach pears. 
Spoon the batter into the prepared tin and smooth the surface using a spatula or a palette knife. Place the tin on the centre rack of the preheated 180°C, conventional oven.


Bake for 20 minutes, then reduce the temperature to 150°C fan/170°C conventional and bake for a further 25 minutes or until a skewer inserted in the centre comes out clean. Cool the cake in the tin for 30 minutes, then turn it out onto a serving plate. If you like, you can reduce some of the poaching liquid and serve the syrup alongside the cake. 


To serve
This cake is fabulous served with custard or ice-cream. It will keep in an airtight container at room temperature for up to 4 days.


I had my slice with a cup of tea and shared the rest of the cake with my work colleagues.

See you all again next week with some more baking from my kitchen.

Bye for now,

Jillian


PRINT RECIPE

chocolate hazelnut cake

19 Jun 2023


My Dad's favourite cake is Aran Goyoaga's lemon pound cake and I make one for him every time I visit. He also quite likes chocolate cake so I thought I'd make him a chocolate pound cake for a change. Whilst doing a little sleuthing, I unearthed a chocolate cake recipe from Aran that was published in her first book, 
Small Plates and Sweet Treats.


The cake is made with hazelnut meal and buckwheat flour so it's naturally gluten free. It's meant to be served unadorned but I couldn't help myself and topped it with a glossy chocolate ganache.


Here's the recipe for you, adapted from here, which makes a 17cm cake. For all my recipes I use a 250ml cup and a 20 ml tablespoon, unsalted butter and 60g eggs. My oven is a conventional gas oven so if your oven is fan forced you may need to reduce the oven temperature by 20°C. 

Chocolate and hazelnut cake by Aran Goyoaga - makes a 17cm cake
Ingredients
30g hazelnuts
125g 70% dark chocolate, finely chopped 
90ml/85g oil or unsalted butter, chopped
1/4 tsp espresso powder
3 eggs, separated
50g brown sugar
60 mls (1/4 cup) plain full fat yoghurt
1 tsp vanilla extract
55g hazelnut meal
25g buckwheat flour
pinch salt
40g caster sugar

Chocolate ganache
50 mls cream
¼ tsp espresso powder
pinch salt
50g dark chocolate, finely chopped

Method
Grease and line the base of an 17cm cake tin with baking paper then dust with cocoa powder. Set to one side.

Pre-heat the oven to 180°C, conventional. Place hazelnuts on a baking sheet and roast for 5 to 7 minutes, until fragrant. Using a dry kitchen towel, rub the hazelnuts together to remove their skins. Cool then set to one side.

In a medium bowl, combine chocolate and oil or chopped butter with the espresso powder. Place the bowl over a pot filled part way with simmering water and melt the contents over the water bath. Let it cool slightly.

In a large bowl whisk together egg yolks and the brown sugar. Add the yoghurt, vanilla, the chocolate mixture, hazelnut meal, buckwheat flour and salt. Whisk to combine.


In a separate bowl whip the egg whites until they form semi stiff peaks. Sprinkle with the caster sugar while continuously whipping. Whip to stiff peaks. Fold one third of the egg whites into the yolk chocolate base to lighten it. Gently fold in the remaining egg whites.


Pour the batter into the pan and bake for 30 to 40 minutes or until the centre is set and a toothpick comes out clean. Be careful not to over bake it as the chocolate will burn. Allow to cool slightly before inverting onto a cooling rack. Serve as is or if you like, you can ice the cake with a chocolate ganache and decorate the top with the toasted nuts.


Ganache
Heat the cream in a small saucepan until close to boiling point. Add the espresso powder and salt and stir to dissolve. Add the chopped chocolate and leave for 5 minutes to allow the chocolate to melt. Gently stir the mixture until the mixture is smooth and slightly thickened. Leave to cool until a spreading consistency then top the cake with the ganache. Sprinkle the top with whole or coarsely chopped toasted hazelnuts.

I made the cake for a work morning tea and it was well received. The cake is nothing like a pound cake though. It's quite dense, more like a brownie than a cake, which isn't necessarily a bad thing and the chocolate ganache topping is fire! Meanwhile I've been working on the chocolate pound cake recipe. The first cake I made was pretty good but I'd to make a few tweaks before sharing the recipe with you.

See you all again next week with some more baking from my kitchen.

Bye for now,

Jillian


PRINT RECIPE

sticky date and ginger cake with butterscotch cream cheese icing

12 Jun 2023


Do you remember a few months back I made some
sticky date and ginger cookies? I really liked the flavour of the cookies and wondered if I could capture the flavour of the cookies in a cake. 
As the cookies were originally inspired by the ever popular sticky toffee pudding, I used an old sticky toffee pudding recipe as my starting point. 


I
nstead of topping the cake with toffee sauce, I made some butterscotch flavoured cream cheese icing then drizzled the cake with the leftover butterscotch sauce. If you didn't want to go down the cream cheese icing route then whipped cream topped with lashings of butterscotch sauce would go down a treat. As both the icing and sauce are sweet, the cake itself is barely sweet so if you made the cake without the icing I would increase the sugar to 150g.


I've made the cake twice now and I can report it works with either vegetable oil or butter. Here's the recipe for you which makes a 
17 cm layer cake. For all my recipes I use a 250ml cup and a 20 ml tablespoon, unsalted butter and 60g eggs. My oven is a conventional gas oven so if your oven is fan forced you may need to reduce the oven temperature by 20°C. If you'd like to make a 23cm cake, double the ingredients and the baking time should remain the same.


Sticky date, ginger and pecan cake with butterscotch cream cheese icing - makes a 17cm cake
Cake
100g chopped dried dates 
½ tsp bicarb soda
100 mls boiling water
40g dried dates
40g toasted pecans 
40g glace or crystallised ginger
1 tbs plain flour
75g room temperature unsalted butter or vegetable oil
100g soft light brown sugar
2½ tsp golden or maple syrup
1 tsp vanilla extract
2 eggs, at room temperature 
150g self-raising flour
½ tsp flaked sea salt 
1½ tsp ground ginger
¼ tsp ground cinnamon
pinch nutmeg

Butterscotch Cream Cheese Icing 
30 g (1 oz) unsalted butter
30 g (1 oz) brown sugar
30 mls cream
2 tsp golden syrup
Pinch salt flakes
50 g full-fat cream cheese, room temperature soft
40g unsalted butter, room temperature soft
150g soft icing sugar
1 tsp vanilla paste or extract

Method
Preheat the oven to 180°C, conventional. Grease, flour and line the base of a 17cm tin with baking paper, then set to one side.

Combine the 100g chopped dates and the 100 mls boiling water in a small saucepan and bring to the boil. Remove from the heat, add the baking soda which will froth and bubble, and leave to cool.  When cool, puree the dates with a stick blender or in a food processor. Set to one side. Coarsely chop the remaining dates, the pecans and glace ginger. Place into a small bowl and combine with the
 1 tbs plain flour.


Place the butter, brown sugar, golden syrup and vanilla extract in the bowl of a stand mixer and mix until light and creamy. Add the eggs, one at a time, and mix until incorporated. Sift the flour, salt and spices into a bowl then add a third of the flour to the batter, followed by a third of the date puree and continue this sequence until fully incorporated. You should have a nice smooth batter. Finally, stir in the chopped dates, pecans and glace ginger. If you're using oil, follow the same instructions but you won't need a stand mixer as the batter can be made in a bowl and mixed with a wooden spoon.


Spoon the batter into the prepared tin and bake for 45 minutes at 180°C conventional,  or until a skewer pushed into the centre comes out clean. Place on a wire rack and cool completely before unmoulding the cake.


Butterscotch Cream Cheese Icing
To make the butterscotch, combine the butter, brown sugar, cream, and the golden syrup in a small saucepan. Cook over a low heat until the butter melts and the mixture is smooth. Cook for a minute or two until the mixture thickens then add a pinch of salt and set aside to cool. 

In the bowl of a stand mixer fitted with a paddle, combine the cream cheese, the butter, icing sugar, the vanilla, a pinch of salt and 2 tablespoons of the cooled butterscotch. Beat on low speed for 10 minutes until soft and fluffy. 


Generously top the cake with the cream cheese icing and just before serving drizzle over the remaining cooled butterscotch. Can be kept in an airtight container in the refrigerator but is best served at room temperature.


I shared the cake with my neighbours and it received rave reviews. You can't ask for more than that,

See you all again next with some more baking from my kitchen.

Bye for now,

Jillian
PRINT RECIPE

chocolate praline layer cake

5 Jun 2023


I've been wanting to make
this Ottolenghi Devil's food cake with hazelnut praline for ages and with a birthday on the horizon (mine) the time had come. However, as my work mates have already declared the Clare Scrine chocolate zucchini cake as the best chocolate cake ever, I used that as my base and adapted the Ottolenghi filling and topping.


The cake recipe is pretty much foolproof but I was tired and used the wrong version. If you're wondering why the cake is so tall and handsome it's because I made the batter for a 20 cm cake but baked it in a 17 cm tin. I only realised my mistake after it was in the oven. 

I had all kinds of trouble with the praline filling though. The recipe didn't yield enough praline to both layer and swirl as per the original recipe so I didn't. Maybe it had something to do with my praline but I would have needed double the quantity but I'd run out of hazelnuts. The praline took way longer to process than the 5 minutes stated in the recipe - a good 10 minutes in my mini food processor and perhaps the end product wasn't loose enough. With insufficient praline I simplified the filling and the assembly process and thankfully, it all worked out in the end.


Here's the recipe for you which makes a 17 cm layer cake. If you'd like to make a 23cm cake, refer to the link for quantities. For all my recipes I use a 250ml cup and a 20 ml tablespoon, unsalted butter and 60g eggs. My oven is a conventional gas oven so if your oven is fan forced you may need to reduce the oven temperature by 20°C.


Chocolate praline layer cake - makes a 17 cm layer cake
Cake
2 eggs
75g sour cream
125ml (½ cup) vegetable oil (or other neutral oil)
60ml black coffee, cooled
2 tsp vanilla extract 
135g finely grated zucchini (from 1-2 zucchini) 
165g brown sugar
pinch salt
150g (1 cup) self-raising flour
¼ tsp bicarbonate of soda 
45g (⅓ cup) Dutch-processed cocoa powder

Hazelnut praline
150g blanched hazelnuts
135g caster sugar 
pinch salt

Mascarpone cream
225 mls cream
75g mascarpone
1 tsp vanilla bean paste
25g icing sugar
Tiny pinch of salt

Cake
Preheat the oven to 190°C, conventional. Grease and line the base of a deep 17cm tin baking paper. 

In a large bowl, whisk together the eggs, sour cream, vegetable oil, the cooled coffee and the vanilla until well combined and a little frothy. Add the zucchini and stir well to combine. In a separate large bowl, combine the sugar, salt, flour, bicarbonate of soda and cocoa powder.

Add the wet ingredients to the dry ingredients and stir gently until just combined, ensuring you scrape right to the bottom of the bowl to mix well. Pour the batter into the tin and then bake for about 1 hour to 1 hour 15 minutes or until a skewer inserted into the centre of the cake comes out mostly clean. It’s important not to overcook the cake, so keep a close eye on it. Once cooked, remove from the oven and leave to cool for a few minutes, then snap off the sides of the tin and leave to cool completely. 


Praline
With the still on oven, spread the hazelnuts onto a baking paper-lined medium baking tray and bake for 8 to 10 minutes, or until deeply golden, shaking the pan halfway through baking. Set aside, keeping the tray and baking paper. You’ll use them again later.

Place a large saucepan over a medium high heat and, once quite hot, sprinkle in 1/3 of the caster sugar to cover the base. It should immediately start to melt at the sides but not brown too quickly. Swirl the sugar in the pan a little, then add another 1/3 of the sugar, allowing it to melt a little before adding the remaining 1/3. Turn the heat down to medium and cook until the sugar is an amber caramel, stirring with a spatula just a couple times (but not much more). Add the hazelnuts and a pinch of salt, stirring to coat, then quickly transfer the mixture to your baking paper-lined tray and leave to cool completely.

Once cool, roughly break apart the praline then measure out 55g of the mixture. Place the remaining praline into a food processor. Blitz the remaining mixture in the food processor for about 5 minutes or until it turns into the consistency of a smooth nut butter, stopping to scrape the inside of the bowl with a spatula as necessary. Transfer this to a separate bowl.

Mascarpone Cream
Add all the ingredients to a stand mixer and beat on medium-high speed for 1 and 1/2 to 2 minutes, or until you have medium peaks. Refrigerate if not assembling right away (you want it nice and cold). 


Assembly
Halve the cake horizontally, then place one of the layers on a serving stand or plate. Top the cake with 2 tbs of the praline then half the cream mixture. Top with another 2 tbs of the praline and gently swirl it through the cream with your spatula. Carefully invert the other cake on top now. Top with 2 tbs of smooth praline, the remaining cream and repeat the same process with the smooth praline then decorate with the praline shards. 

Serve right away or refrigerate overnight to firm up the cream, but top with the praline just before serving. 


Despite all the trials and tribulations, the cake was absolutely delicious but a little extra praline would have made it even better.

See you all again next week with some more baking from my kitchen.

Bye for now,

Jillian


PRINT RECIPE
© DELICIOUS BITES • Theme by Maira G.