SLIDER

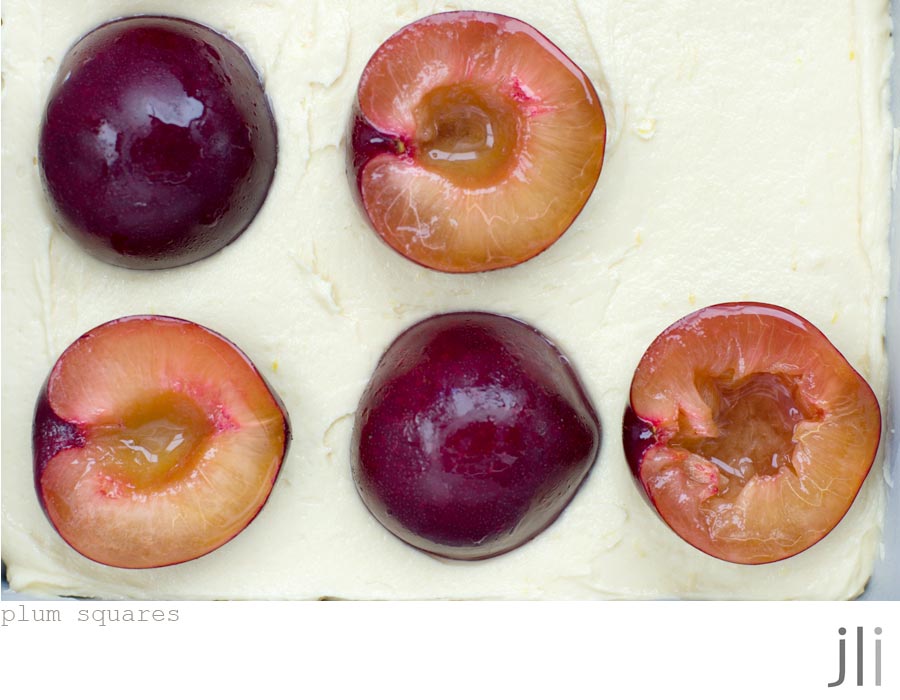
plum squares

9 Mar 2015

Summer in Sydney means stone fruit and each summer I like to make a simple butter cake topped with stone fruit. A few weeks ago I made a nectarine and blackberry cake but this time, I made plum cake. I make plum cake every year and I have a favourite recipe but this time I adapted it a little so I could use the buttermilk I had in the fridge.


I also wanted to use plum halves though in the end I'm not sure that was the best idea. The cooked plums always sink to the bottom of the cake but the plum halves were so juicy I wasn't sure I'd be able to turn the cake out without it breaking apart. I managed to turn the cake out but next time (and there will be a next time) I'll slice each plum half into quarters like I normally do and lay them decoratively over the top.


My workmates like most things I bake but they particularly like plum cake.


I really like it as well and if my freezer was a bit larger I'd freeze a couple of bags of sliced pitted plums so I could make plum cake any time of year. 


I think this would make a great winter pudding served warm from the oven with a dollop of cream or some ice cream or maybe both.

Here's the recipe for you. For all my recipes, I use a 250 ml cup and a 20 ml tablespoon. All eggs are 60 grams and my oven is a conventional oven not fan forced, so you may need to reduce your oven temperature by 20°C.

Plum Squares – makes 9 squares

Topping
½ teaspoon cinnamon
1 tbl sugar

Cake Ingredients
5 small plums
1 tablespoon caster sugar
125 grams (4 oz) unsalted butter
100 grams (½ cup) caster sugar
1 tsp grated lemon rind
2 eggs
1 cup self raising flour
¼ cup plain flour
60 mls (¼ cup) buttermilk or plain yoghurt

Method
To make the topping, thoroughly mix the cinnamon and sugar together.

Preheat the oven to 175°C/325°F. Line the base and sides of a 20 cm (8 inch) square tin with baking paper. Cut the plums in half and remove the pits. Sprinkle a tablespoon of caster sugar over the cut surface of the plums. Set aside.

To make the cake, cream the butter, sugar and lemon rind together in a bowl until light and fluffy. Add the eggs and mix until combined well. Sift the flours together. Add the flour alternately with the milk to make a soft batter. You may not need to use all the milk.

Spoon the batter into the lined tin. Decoratively arrange the plums over the top of the cake, gently pressing the plums down into the batter. Bake the cake for 20 minutes then sprinkle the top of the cake with the cinnamon sugar. Bake for a further 20 - 30 minutes or until the cake tests cooked when a skewer is inserted into it.

Cool the cake in the tin for about 15 minutes before turning out to cool on a wire rack. Turn right side up as soon as possible.


To serve, cut the cake into squares and serve accompanied by a good dollop of cream.


Sugared plums atop a lemon scented butter cake topped with cinnamon and sugar. What's not to like?

See you all again next week,

Jillian
PRINT RECIPE

sticky banana, pecan and nut loaf

2 Mar 2015

In my continuing search for the perfect banana cake I stumbled upon this recipe from Belinda Jeffrey's book, Mix and Bake. I knew I had some over ripe mashed bananas lurking in the fridge; checked the cupboard and had the rest of the ingredients, so last weekend I quickly put this cake together.


It's one of those cakes where it takes more time to weigh out and chop the ingredients than it does to put the whole thing together. I did alter the proportion of dates and nuts a little but next time might stick to the original ratio.


The cake came out of the oven smelling pretty good.


As soon as the cake was cooled, I cut a slice to see how it looked inside.


Here's the recipe for you. For all my recipes, I use a 250 ml cup and a 20 ml tablespoon. All eggs are 60 grams and my oven is a conventional oven not fan forced, so you may need to reduce your oven temperature by 20°C. If you'd like to make a large loaf cake, just double all the ingredients. The baking time won't change.

Sticky Banana, Pecan and Date loaf: (adapted from a recipe from Mix and Bake by Belinda Jeffery)

Ingredients
cup plain flour
½ teaspoon bicarbonate of soda
½ teaspoon ground cinnamon
pinch salt
85g (3oz) roasted walnuts or pecans, roughly chopped
85g (3oz) pitted dates, roughly chopped
¼ cup caster sugar
¼ cup brown sugar
1 egg
¼ cup vegetable oil
⅔ cup mashed very ripe bananas
¾ teaspoon vanilla extract
pecan or walnuts for topping

Preheat the oven to 180⁰C/350⁰F. Line a small loaf tin with baking paper or grease and dust with flour. Set aside.

Put the flour, bicarbonate of soda, cinnamon and salt into a medium-sized bowl and whisk them together with a balloon whisk for 45 seconds (or you can just sift them into the bowl instead). Add the nuts and dates and toss them about so they’re thoroughly coated in the flour mixture.

Put the sugars, egg and oil into another bowl and whisk them together for 1 – 2 minutes or until they’re light and creamy. Add the mashed banana and vanilla extract and whisk them in for another 30 seconds or until the mixture is fairly smooth (don’t worry that it’s not completely smooth – there will be some little lumps of banana in it).

Stir the dry ingredients into the banana mixture until they form a somewhat sloppy batter. Scrape this into the prepared tin and arrange the nuts on top.

Bake for about 1 hour or until the top of the loaf is springy and a fine skewer inserted in the middle comes out clean. Cool the loaf in the tin on a wire rack for 10 minutes, before turning it out onto the rack to cool completely. It keeps well in the fridge for about 5 days.


I decided to toast a slice of the cake then topped it with some fresh ricotta but I think butter would be better! The cake was good but not perfect so the hunt for the perfect banana cake recipe goes on.

I've just returned from a flying trip home to Brisbane. The bag has been unpacked and the fridge loaded with groceries and I'm about to head to the gym. I hope you enjoyed your weekend.

See you again next week with some more baking from my kitchen.

Bye for now,

Jillian
PRINT RECIPE

raspberry chocolate bundt cake

23 Feb 2015

Hi Every-one,

a few weeks ago one of the girls at work mentioned how much she loved the dark chocolate and raspberry muffins from Bourke Street Bakery. They sounded nice so I consulted my copy of the Bourke Street Bakery cookbook and set to work adapting my butter cake recipe. Instead of muffins I decided to make a little bundt cake.


Fresh raspberries are always ridiculously expensive in Sydney and I only buy them when they drop down to a certain price. Normally I'd suggest substituting frozen raspberries but with the recent health scare and frozen berry product recall, fresh raspberries are the way to go. Happily it's raspberry season at the moment in Sydney.


I was a bit worried about the raw sugar coating, something I'd not tried before. I kept my fingers crossed the molten sugar wouldn't weld the cake to the tin.


Thankfully it all worked and the cake came out nice and easily. In fact I thought it looked beautiful.


All the cake needed was a light dusting of icing sugar and it was ready to serve.


Here’s the recipe for you. For all my recipes, I use a 250 ml cup and a 20 ml tablespoon. All eggs are 60 grams and my oven is a conventional oven not fan forced, so you may need to reduce your oven temperature by 20°C. If you'd like to make a big bundt cake, just double all the ingredients. The baking time won't change.

Raspberry Chocolate Bundt Cake

Cake
butter for greasing
1 tbl raw sugar
125 grams (4 oz) unsalted butter 
100 grams (½ cup) caster sugar 
1 egg 
1 teaspoon vanilla extract
1 cup self raising flour
¼ cup plain flour 
125 mls (½ cup) buttermilk
85 g (3 oz) dark chocolate, coarsely chopped or chocolate chips
85 g (3 oz) raspberries

Decoration
icing sugar 

Method
1. Preheat oven to moderate (180°C/160°C fan-forced). Generously grease a small bundt tin with butter, scatter over the raw sugar to coat and then finish with a dusting of flour.

2. To make the cake, cream the butter, sugar and vanilla together in a bowl until light and fluffy. Add the egg and mix until combined well. Sift the flours together. Add the flour alternately with the buttermilk to make a soft batter. Gently fold through the chopped chocolate.

3. Spoon the mixture into the prepared tin, gently studding the raspberries into the mixture. Smooth surface. 

4. Bake for about 35-45 minutes or until the cake is well risen, the top is golden and the cakes tests ‘cooked’ when tested with a skewer.

5. Allow the cake to cool for about 10 minutes before turning out onto a wire rack to cool.

6. While the cake is still a little warm, dust the top of the cake with the icing sugar.


The cake was nice and moist and I thought the combination of the dark chocolate and raspberry was lovely. I'll have to put this recipe in the keeper file.

I visited my travel agent Kurt on Saturday and I've now booked my flights to Singapore and Japan. I've been to Singapore before but I've not been to japan before. I'd love your suggestions for things to see and do in Japan, places to visit and shops to shoot. Looking forward to reading your suggestions which you can leave in the comments section if you like.

Bye for now,

Jillian
PRINT RECIPE

plate 2 plate - ottolenghi's lentils, radicchio and walnuts with manuka honey

16 Feb 2015

Hi every-one and welcome to the first Plate 2 Plate post for 2015. Juliana and I both thought it was high time to make a salad so we turned to Ottolenghi's new book, Plenty More, for inspiration. As you know, I'm a bit of an Ottolenghi fan girl so I was keen to try out his new book. We mulled over a few recipes before coming across this lentil dish topped with radicchio, spicy walnuts and a tumble of herbs. The lentil image is by Juliana.


As Juliana lives in Switzerland and I live in Sydney it can be quite difficult finding ingredients that are in season in both places. Thankfully fresh herbs and lentils are always available. Herb photo by Juliana.


Here's my take.


I had most of the ingredients in my cupboard and when I found that radicchio was available in my local fruit shop we both knew we had our recipe.


I've made this dish twice so far mainly because I burnt the walnuts the first time round. The second time I made the dish, I lowered the oven temperature to 160°C and watched the walnuts like a hawk.


Once cooled, these walnuts are so yummy I think only half made their way into the salad. Here's my version of the finished dish.


I don't tolerate cheese all that well so I left it out of the dish. Instead I served it as a side dish with some lamb. Here's Juliana's version of the dish.


Here's another image of the finished dish from Juliana.


The lentils and walnuts can be made well ahead of time and the dish put together in just a few minutes topped with loads of fresh herbs. Apart from the dill, all the herbs I used in the dish were grown on my window ledge.


Here's the recipe for you from Plenty More by Yotam Ottolenghi. As this is a UK recipe, remember to use a 15 ml tablespoon. Image by Juliana.


Lentils, Radicchio and Walnuts with Manuka Honey
200g puy lentils
2 bay leaves
100g manuka honey
¼ tsp flaked chilli
½ tsp ground turmeric
Salt and black pepper
About 1 tsp water
3 tbsp red-wine vinegar
90ml olive oil
100g walnuts
½ medium-size radicchio
60g pecorino fiore sardo, or other mature ewe's or goat's cheese
20g each roughly chopped basil, dill and parsley

Heat the oven to 170°C/325°F. Put the lentils in a medium saucepan, cover with plenty of water, add the bay leaves and simmer for 15 minutes, or until tender.

While the lentils cook, prepare the walnuts. In a bowl, combine half the honey, the chilli, turmeric and a quarter-teaspoon of salt, and add enough water to create a thick paste.

Drain the lentils and return to the pan. Whisk together the vinegar, half the oil, the remaining honey, half a teaspoon of salt and some black pepper until the honey dissolves. Stir into the lentils while they're still hot and then leave to cool a little. Discard the bay leaves.

Add the walnuts to the honey/chilli paste and stir to coat. Spread on a baking sheet lined with baking paper and roast for 15-20 minutes, stirring once, until crunchy and dry, but still sticky.

Pour the remaining oil into a medium frying pan and place on high heat. Cut the radicchio into eight wedges and place these in the hot oil, sprinkling them with a little salt. Cook for a minute on each side and then transfer into a large bowl.

Add the lentils, walnuts, sliced pecorino and herbs. Stir gently, taste and season accordingly. Serve warmish or at room temperature.


As you expect from an Ottolenghi recipe, the dish zings with flavours - sweetness from the honey; bitterness from the radicchio; crunch from the walnuts; zing from the chilli and sour from the vinegar in the dressing. Just about perfect really. You can read Juliana's thoughts about the salad here.

See you all again next week with something sweet.

Jillian
PRINT RECIPE

valentine's day white chocolate and raspberry brownies

9 Feb 2015

Valentine's Day kind of snuck up on me this year. I looked through my files and found these images I shot last year for my Delicious Bites column. The post failed to run so rather than languish on my hard drive, I thought I'd share the images and recipe with you. 


I've been making these brownies for quite some time now and each time I make them I change the recipe a little. Some times I add a bit more white chocolate or an extra egg. Sometimes I'll add a little less flour or mix up the berries a bit. It's raspberry season here in Sydney so that's what I used this time but you certainly don't need to use fresh raspberries for these brownies; frozen raspberries are just as good.  As fresh raspberries are so delicate, I stud the brownie mixture with the raspberries instead of mixing them into the batter.

If you like, the brownies can be made entirely in one bowl so there's not too much washing up. These brownies are definitely cake like brownies rather than fudgey brownies so don’t be tempted to take them out before they’re fully cooked or they'll just taste like raw cake batter.


Once the brownies are baked and cooled, I often cut them into shapes before drizzling with a little melted white chocolate. I normally use a round cutter but in honour of Valentine’s Day I got busy with my heart shaped cutter. They’re perfect to give as gifts or to share with the ones you love.


Here’s the recipe for you. For all my recipes, I use a 250 ml cup and a 20 ml tablespoon. All eggs are 60 grams and my oven is a conventional oven not fan forced, so you may need to reduce your oven temperature by 20°C.
White Chocolate and Raspberry Brownies
Ingredients
⅔ cup plain flour
½ tsp baking powder
125g/4 oz unsalted butter
75g (2½ oz) white chocolate, coarsely chopped
2 eggs
½ cup caster sugar
1 tsp vanilla
1 cup raspberries, fresh or frozen
¼ cup flaked almonds

To decorate
50 g (1¾ oz) white chocolate, melted

Method
Preheat oven to 350F°/180C°.

Line the base and sides of a 20 cm (8 in) square tin with baking paper.

Sift the flour with the baking powder into a small bowl and set to one side.

Melt the butter and the white chocolate in a large ovenproof bowl in the microwave or over a pan of simmering water.

Allow to cool a little before stirring in the eggs, sugar and vanilla. Beat lightly with a wooden spoon just till combined, then stir the flour into the mixture to make a batter.

Scatter about 1/3 of the raspberries over the base of the tin. Spread the batter into prepared pan. Press the remaining berries gently into the mixture then top with the flaked almonds.

Bake at 350F°/180C° (conventional oven) for 35 minutes or until the top is golden brown.

Cool in the pan on a wire rack.

When cool, cut the brownies into 2 inch squares or cut into heart shapes before drizzling with the extra melted chocolate.

Allow the chocolate to set before serving.


I'll see you all again next week with the first Plate 2 Plate post for 2015.

Until then, Happy Valentine's Day!

Jillian
PRINT RECIPE

australia day long weekend - canberra

2 Feb 2015

I found a good hotel deal online and decided to drive down to Canberra for the Australia Day Long Weekend holiday. First destination was the Australian War MemorialI used to work in a Veteran's Hospital and heard many war stories during my time there. Both the good - the mate ship, and the bad -  prisoner of war stories from the Thai Burma railway. The AWM always has interesting displays, this time I saw Ben Quilty's After Afghanistan exhibition.


The War Memorial has a reflection pool and a Roll of Honour.


This is the Roll of Honour. Those walls of poppies and the names of the fallen, always tug at my heart strings.


The Australian War Memorial is quite an imposing construction but there are some gardens and leafy trees under which I took refuge from the heat of a hot Canberra summers day.


From there it was off to Bison's flagship store in Pialligo. 


I was given a personal tour of the store by Brian Tunks, Bison's owner and creative director.


Brian has been busily adding new items to his range and I've snapped up a few pieces in recent times both as gifts for friends and for my own home. I don't own any of the glass range yet, but I do love it so it's probably only a matter of time.


The apple jar is one of my favourite pieces.


There might be one of those jugs in my collection as well.


How could you go past one of the sweet milk bottles?


As my purchases were being wrapped Brian very kindly gave me a beautiful little wisteria bowl as a gift. I'm thinking of recipes which will highlight the colour, so look out for its appearance on the blog during the next few months.


Then it was time to check into my lodgings and check out the buzzing surrounds of New Acton.


Yes they are sunflowers and yes, those are garden beds. 


I'm pretty sure some of the produce featured in my breakfast from A. Baker. Poached eggs have never tasted so good. Last stop was the National Portrait Gallery for a wander before the drive home back to Sydney.

I hope you enjoyed my little trip to Canberra. Next week it's bake to baking on the blog.

Bye for now,

Jillian
PRINT RECIPE
© DELICIOUS BITES • Theme by Maira G.