SLIDER

adam liaw
Showing posts with label adam liaw. Show all posts

strawberry all in one pavlova

27 Jan 2025


It's the Australia Day public holiday today, so I decided to make a pavlova topped with whipped cream and some fresh strawberries. I've been making pavlovas my whole life using the tried and trusted method of slowly incorporating 60g of caster sugar for every 30g of egg white before adding a little bit of vinegar, cornflour and vanilla, that was until last year when I saw Adam Liaw make an all in pavlova on The Cook Up.


It was a revelation. There was no gradual adding of caster sugar, instead he used icing mixture instead of caster sugar and just put all the ingredients into the bowl of a stand mixer and whisked it for 8 minutes and hey presto, he had meringue. As i
cing mixture already includes starch, there's no need to add any extra cornflour, you just need egg whites, a pinch of salt and some vinegar and vanilla extract. 


Since then I've made a batch of meringues and and a pavlova using this method but I found the pavlova very sweet so I've reduced the sugar a little in the recipe. It's still a struggle baking a pavlova in my gas oven. It doesn't have a temperature option below 160
°C. It just has 'minimum' and it took 3½ hours in the oven at minimum before the pavlova was cooked enough to remove it from the baking paper.


Here's the recipe for you which makes a 16cm pavlova. If you'd like to make a bigger pavlova just increase the quantity of egg whites and icing mixture. For all my recipes I use a 250ml cup and a 20 ml tablespoon, unsalted butter and 60g eggs. My oven is a conventional gas oven so if your oven is fan forced you may need to reduce the oven temperature by 20°C. 


All in One Pavlova
90g egg whites, from approximately 3 egg whites 
Pinch of salt
135g icing mixture 
¾ tsp white vinegar 
¾ tsp vanilla extract
 
Topping
200mls thickened cream, whipped to soft peaks
1 punnet strawberries, washed, hulled and dried
Icing sugar

Method
Preheat the oven to 180°C conventional. Line a flat baking tray with baking paper and using a 16cm tin as your guide, mark out a circle on the paper. Flip the paper over and use this as your template. Place the paper onto the baking tray.

Place the egg whites into the bowl of a stand mixer with a pinch of salt and whisk on low speed until just combined. Add the icing mixture to the bowl and beat at high speed to form a glossy stiff meringue. This will take about 8 minutes. Gently fold through the vinegar and vanilla extract.


Spoon the meringue onto the baking paper to form a 16cm circle with a slightly flattened top. This will subside during the baking process creating a well for the cream. Place the pavlova in the oven and immediately reduce the oven temperature to 130°C, conventional, or the lowest setting for your oven and bake for 1¼ - 1½ hours or until the pavlova is dry and very lightly coloured. Turn the oven off and allow the pavlova to cool for a further 1 1⁄2 - 2 hours in the switched off oven, wedging the door open very slightly with a chopstick.


When cool, remove the pavlova from the baking paper and store in an airtight container. Just before serving, top the pavlova with the lightly whipped cream and berries and a dusting of icing sugar. 


This pavlova didn't make it into work. I shared it with my neighbours who were very pleased that I did. It was simply delicious. 


See you all again next week with some more baking from my kitchen.

Bye for now,

Jillian
PRINT RECIPE

xmas month 2022 - cranberry cheesecake

12 Dec 2022


I am quite the fan of Adam Liaw and watch his cooking show,
The Cook-Up, most nights. I've had his wife Asami's cheesecake recipe bookmarked for a few years but until now hadn't found the time to make it.

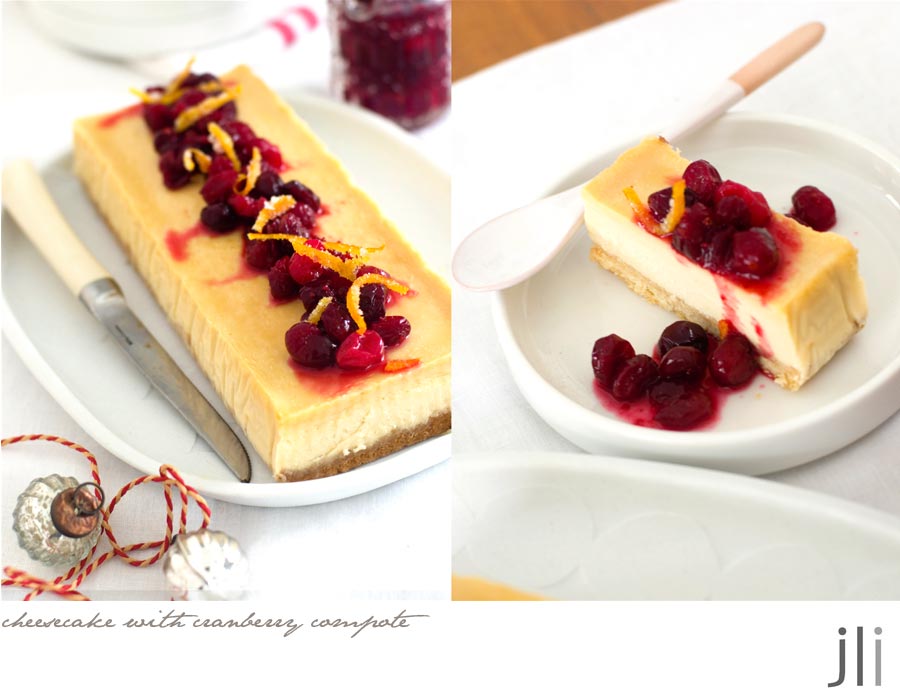
As is my way, I changed the recipe a little. When I lived in Canada, cheesecake always came topped with berries so I decided to make the cheesecake look a little more festive by topping it with a layer of cranberry compote. It also helped use up the bag of frozen cranberries I had lurking in my freezer.


The original cheesecake recipe had a crushed biscuit base but I'm not a fan of biscuit bases so I made a wholemeal shortbread base instead. Adam used whiskey in the filling but I used rum instead, as did Asami in the orginal recipe.


Here's the recipe for you which makes a 10 x 20cm cheesecake. Please note you will have to start this recipe the day before serving. For all my recipes I use a 250ml cup and a 20 ml tablespoon, unsalted butter and 60g eggs. My oven is a conventional gas oven so if your oven is fan forced you may need to reduce the oven temperature by 20°C.

Cranberry cheesecake – start this recipe the day before serving
Base
50g unsalted butter
1 and 1/2 tbs (25g) caster sugar
¼ cup (35g) plain flour
¼ cup (35g) wholemeal plain flour
pinch salt
½ tsp vanilla essence

Filling
125g sour cream
250g cream cheese
1 egg 
50g soft brown sugar
50g caster sugar 
100ml thickened cream
1 tsp good-quality dark rum 
2 tbs (25g) cornflour
1 tsp vanilla paste or vanilla extract

Topping
250g fresh or frozen cranberries, thawed
¼ cup orange juice
⅓ cup (80g) caster sugar
¼ cup water
3 tsp orange rind, divided

Method
Preheat the oven to 180°C, conventional. Line a 10 x 20cm rectangular loaf pan with baking paper. To make the base, cream the butter, sugar and vanilla together in a small bowl until light and creamy. Mix in the flours and salt and combine until the mixture forms a soft dough. Press the mixture into the base of the tin, (the base should not go up the sides of the tin). Bake for 15-20 minutes until lightly golden. Remove from the oven and cool completely.

While the base is baking and cooling, make the filling. In a large bowl, mix the sour cream and cream cheese together with a wooden spoon or spatula. Stir in the egg and sugars, then add the cream, rum and vanilla and fold everything together. Stir in the cornflour (there's no need to sieve it first) and then allow the mixture to drain through a fine sieve (don't push it through or you may get small lumps). You can also save some time by making the filling in the food processor but don't skip the sieving process.

Pour the mixture over the cooled base in the pan. Tap the pan on the bench firmly a few times to remove any air bubbles. This step is very important, as air bubbles will expand with baking and affect the texture of the filling.

Place the pan in a larger baking tray and fill the large baking tray with boiling water halfway up the sides of the cheesecake pan. Bake the cheesecake for 1 hour, or until the cheesecake has set. Turn off the oven, keeping the door closed and leave the cheesecake undisturbed for about 3 hours. Removing it from the oven before that time will cool it too quickly and you may get cracks in your filling. After 3 hours, remove the cheesecake from the oven, cover with foil and refrigerate overnight to allow it to set further. 


Topping
Combine cranberries in a small saucepan with the juice, sugar, the water and 2 tsp orange rind. Bring to the boil, then reduce heat to medium-low. Simmer, stirring occasionally, until berries are soft and the sauce turns syrupy, about 8 to 10 min. Cool the compote completely before topping the cheesecake. 


Just before serving, sprinkle the remaining rind over the top then cut the cheesecake into bars to serve.  The cheesecake is very rich, so it's best to serve it in small slices. 


Look how smooth that baby is and best of all, it received rave reviews as well. The cranberry compote was really delicious and when I can track down frozen cranberries again I'll be making some more.

See you all again on Friday with another Xmas month post. 

Bye for now, 

Jillian

PRINT RECIPE
© DELICIOUS BITES • Theme by Maira G.