SLIDER

honey & co
Showing posts with label honey & co. Show all posts

hot cross babka

14 Apr 2025


When I started thinking about Easter, I knew I wanted to make something yeasted. Originally I was going to make some hot cross cinnamon rolls but with a long drive looming and with little time to bake and photograph before my midday departure, I pivoted and decided to make a babka instead.


Now just a warning - a babka is a labour of love. You do need to make the dough the day before because it benefits from an overnight rest in the fridge. Once rolled it's much easier to slice and roll the babka if the filling has firmed up a little, so you'll need another 30 minute or so sleep in the fridge. Once the babka has been rolled and is in the tin, you need time for it to rise. In some good news, the orange syrup that you pour over the babka can be made ahead of time.

I have made a hot cross babka before but not since I started using Nadine Ingram's hot cross bun recipe. The buns are so good, I just knew they would make an excellent babka base and it took all my will power to wait an hour for the babka to firm before I was able to remove it from the tin, slice it then photograph it for you.


Here's the recipe for you, which makes a large loaf cake, which I adapted from a Nadine Ingram recipe with babka instructions from Honey & Co. For all my recipes I use a 250ml cup and a 20-ml tablespoon, unsalted butter and 60g eggs. My oven is a conventional gas oven so if your oven is fan forced you may need to reduce the oven temperature by 20°C.


Hot Cross Babka
Fruit Mix

45g each sultanas, raisins and currants
150 mls boiling water
1 Earl Grey tea bag
35g dried apricots, chopped or candied rind
finely grated rind of 1 orange

Dough
300g bread flour
3/4 tsp fine salt
1 and 1/2 tsp ground cinnamon
¼ tsp each mixed spice and ground allspice
a pinch of cloves
7g dried yeast
45g softened unsalted butter
1 tbs soft brown sugar
1 egg
150 mls milk

Filling
50g very soft unsalted butter
100g light brown sugar
3 tsp ground cinnamon
pinch sea salt flakes
1 tbs almond meal
1 tsp syrup (golden or maple)

Topping
Egg wash (1 egg beaten with a pinch of table salt) or 1-2 tbs cream
1 batch orange syrup (recipe follows)

Orange syrup
50g caster sugar
1 tbs water
60mls strained orange juice

To serve
Butter

Fruit soak
Place the sultanas, raisins and currants, tea bag and boiling water in a bowl. Set aside for an hour or until the fruit is plump. Remove the tea bag and drain the fruit well, discarding the liquid. Pat the fruit dry with a paper towel. Just before using, add the dried apricots or candied rind and the orange zest .

Dough
Sift the flour, salt and spices into the bowl of a stand mixer fitted with a dough hook. Add the dried yeast, butter, sugar and egg. Mix together on a low speed adding enough milk to form a sticky dough. Once incorporated, increase the speed to medium and mix for 7 minutes. The dough will have pulled away from the side of the bowl forming a ball. Add the fruit mixture and continue to mix until incorporated. The dough will be quite sticky at this point. Place the dough into a large lightly greased bowl. Wrap the bowl in plastic wrap and place in the fridge to chill for at least 2 hours. You can leave it there for up to 12 hours, but not much longer or it will start to double in size.

Babka
The following day, bring the dough to room temperature. Grease and line a loaf tin with baking paper, allowing some overhang. In a small bowl mix the filling ingredients until they're well combined and form a smooth paste.

Roll out the dough with a rolling pin on a very lightly floured workbench to a rectangle about 15 inches x 11 inches. You may need to flip the dough over once or twice to get an even, smooth sheet, but try to work with as little flour as you can so as not to dry the dough out.

Lay the rectangle lengthways in front of you and spread the filling in a thin layer all over. Brush the edges of the dough with some water. Lift the long edge of the dough closest to you and start rolling it up away from you, keeping it nice and tight without stretching the dough, until you end up with a sausage about 15 inches long. If it comes out a little longer, push it in from both ends to condense it a little; if it comes out shorter, then use your hands to roll it out a little until it reaches 15 inches. Press to seal the dampened end onto the roulade and then use both hands to even out the roll into a perfect thick cigar. Rest the cigar on its seam.


Trim about ¾ in/2 cm off both ends of the roulade with a serrated knife. At this stage you can chill the dough for ½ hour to firm the filling. Now use the knife to gently cut the roll into half lengthwise, starting at the top and finishing at the seam. You are essentially dividing the log into two long even halves, with the layers of dough and filling visible along the length of both halves. With the cut sides facing up, gently press together one end of each half, and then lift the right half over the left half. Repeat this process, but this time lift the left half over the right, to create a simple, two-pronged plait. Gently squeeze together the other ends so that you are left with the two halves, intertwined, showing the filling on top. Carefully lift the cake into the loaf pan. Cover the pan with a wet tea towel and leave to rise in a warm place for 1 to 1½ hours. My babka was close to the rim of the loaf tin.


Preheat the oven to 220ºC (conventional), making sure you allow plenty of time for it to heat fully before the babka has finished rising. Remove the tea towel then brush the babka with the egg wash or cream. Reduce the temperature to 180ºC, conventional, and bake for 30-35 minutes or until dark golden brown. Place the cake on the middle rack of the oven, and bake for about 30 minutes, until a skewer inserted in the centre comes out clean. If not ready, return to the oven for another 5-10 minutes.

Make the orange syrup while the babka is baking. It can also be made in advance and stored in the fridge.


Orange syrup
While the babka in the oven, make the glaze. Combine the sugar, water and the juice and bring to a boil. Simmer for 5 minutes or until syrupy. As soon as the babka comes out of the oven, place it on a cooling rack and douse with the syrup. Leave to cool before removing the babka from the tin or it might disintegrate. The babka will keep for 3 days, wrapped and stored in an airtight container.


I can't tell you just how delicious this still warm from the oven babka tasted. It was divine. Toasted and topped with ice cream it made for a killer dessert.


See you all again next week with some more baking from my kitchen.

Bye for now,

Jillian


PRINT RECIPE

salted peanut butter babka

30 Sept 2024


A few years ago I was the babka queen but it's been at least 2 years since I last made one. A few months ago I saw a recipe for salted peanut scrolls in Delicious magazine. They sounded delicious and I planned to make a batch, that is until I wondered whether a peanut butter flavoured babka was a thing.

After I discovered it was indeed a thing, I decided to make one. I used the Honey and Co babka dough recipe, then filled the babka with the Cherry Moon General store filling, then soaked it in maple flavoured syrup after taking it from the oven. Making a babka is a 2 day process. I usually make the dough and refrigerate it overnight before shaping, proving and baking.


It was quite cold
 in Sydney the day I made the dough, so it took 4 hours for my filled babka to prove and instead of brunch, I had a slice for afternoon tea. Here’s the recipe for you which makes one babka, inspired by this recipe For all my recipes I use a 250ml cup and a 20 ml tablespoon, unsalted butter and 60g eggs. My oven is a conventional gas oven so if your oven is fan forced you may need to reduce the oven temperature by 20°C.


Salted Peanut Butter and Maple Babka inspired by Cherry Moon General Store
Ingredients
90 g diced unsalted butter at room temperature
2 tsp dried yeast
1 egg
40g caster sugar
1 tsp vanilla
100-125 mls milk
330 g plain flour
A pinch of table salt

Filling
100g smooth peanut butter
55g roasted salted peanuts, roughly chopped
100g brown sugar

To finish
2 tbs melted butter or cream
Sea salt flakes

Maple flavoured syrup 
100g caster sugar
100 mls water
1½ 
tsp maple extract

Method
Place the butter, yeast, egg, sugar, vanilla and 100 mls of the milk in a large mixing bowl, then top with the flour and salt. Use the dough attachment on your mixer or your hands to bring it all together to a smooth, shiny dough, adding the remaining 20 mls of milk if it looks dry. Don’t worry too much if you still have some whole flecks of butter running through the dough; they will make your final bun super-light.

Once the dough has a nice texture to it, wrap the bowl in plastic wrap and place in the fridge to chill for at least 2 hours. You can leave it there for up to 12 hours, but not much longer or it will start to double in size.

Assembly

Place the chilled dough on a lightly floured surface and roll into a rectangle of about 40cm x 30cm. While the dough is still cool, evenly spread with peanut butter. Combine the peanuts and the brown sugar in a bowl then sprinkle the mixture over the peanut butter.


If the dough has softened too much for you to handle it, place on a tray and chill in the fridge for 10 minutes to firm up. While you are waiting, butter a 1kg loaf tin and line the base and long sides with baking paper, making sure that there is an overhang so that you will be able to lift the baked loaf out easily.

Tightly roll up the dough from the long side. Use a pastry cutter or sharp knife to cut the log in half along its length to expose the layers. Place the halves with the cut sides facing upwards. Lift one halved log over the other so that they form a cross at their midpoints, with the filling layers still pointing upwards. Continue to twist the strands over each other until the dough looks like a lovely, twisted plait.

Place in the lined baking tin and leave to prove in a warm place until the dough is fluffy, soft and doubled in size. This will take about 
1 and 1/2 hours in a warm kitchen, or up to 4 hours if it is chilly.


Preheat the oven to 220°C conventional. Brush the surface of the babka with melted butter or cream then sprinkle the top with a few salt flakes. Place the babka in the oven and immediately reduce the temperature to 190°C. Bake in the oven for 10 minutes, then turn the tin around for an even bake and leave for another 10 minutes. Bake for a further 15-20 minutes until the babka is well browned and cooked through.


While the babka is in the oven, prepare the maple flavoured syrup. Combine the sugar and water in a small saucepan over medium-low heat, stirring to dissolve the sugar. Bring to a simmer and cook for a few minutes until thickened. Take off the heat then add the maple extract. Set aside until needed.


Remove the babka from the oven and immediately pour the maple flavoured syrup all over the hot babka. You must let the babka cool completely in the tin or it will fall apart.


My next door neighbour loved it and came back for seconds whilst the babka was declared 'good but different' by my work colleagues and definitely was at it's best when still warm.

This was my first attempt at this babka and whilst good, I consider it a work in progress. The yeast I used to make the dough was on it's last legs, so the dough didn't rise as much as I would like and the filling was a bit dry, making it hard to twist. I think a little butter added to the peanut butter would solve this problem, so I'm keen to make the babka again, maybe drizzled with a little maple flavoured icing.  

See you all again next week with some more baking from my kitchen.

Bye for now,

Jillian
PRINT RECIPE

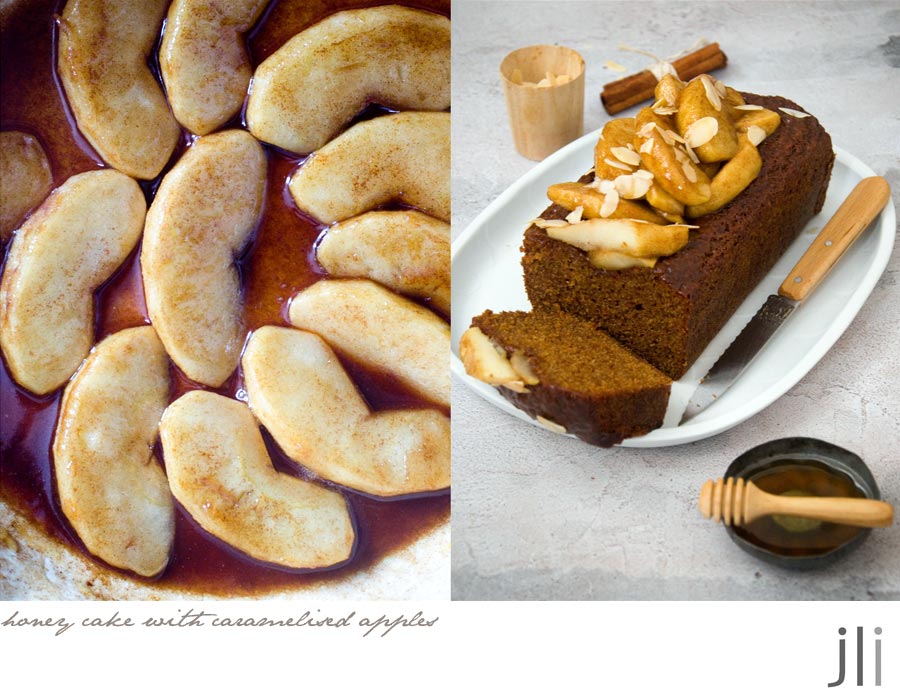
honey cake with caramelised apples

25 Sept 2022


Growing up I loved the honey cake my Grandmother used to make for Rosh Hashana (Jewish New Year). She died many years ago and I don't think I've had honey cake since then. This year I had a hankering for some and turned to Honey and Co for the recipe


The type of flour used in the recipe wasn't specified so I used plain flour. The cake when baked had quite a crater, so I remade it using self raising flour. The crater wasn't quite so deep the second time around bu
t it was no big deal because the crater was going to be hidden anyway.

As apple dipped in honey is traditionally served at Rosh Hashana I topped the honey cake with some caramelised apples from an Aran Goyoaga recipe and a few toasted flaked almonds.

Here's the recipe for you, which makes a small loaf. For all my recipes I use a 250ml cup, a 20ml tablespoon, unsalted butter and 60g eggs. My oven is a conventional oven so if you have a fan-forced oven you may need to reduce the temperature by 20°C.


Honey cake with caramelised apples
Ingredients
75mls boiling water
1 tea bag
175g SR flour
½ tsp bicarb soda
Pinch salt
½ tsp ground ginger
½ tsp cinnamon
100g caster sugar
170g honey
100ml vegetable oil
1 egg

Caramelised Apples
1 large firm and juicy apple such as a Granny Smith
50g caster sugar
15g unsalted butter
15ml apple cider vinegar
15ml vanilla extract
½ tsp cinnamon
¼ tsp ginger
1-2 tbs boiling water, if needed 
 
To serve
1 tbs toasted flaked almonds

Method
Preheat the oven to 180°C conventional. Grease and line a small bundt pan with baking paper.

Combine the boiling water and tea bag in a mug and allow to steep for a few minutes before draining the tea bag. Sift the flour, bicarb soda, salt and spices into a small bowl.

Combine the sugar, the honey and the egg in a mixing bowl. Add the oil and stir thoroughly until well combined. Add the flour mixture in thirds alternating with the still warm tea until all ingredients are combined and no lumps remain. 
 
 
Pour the batter into the prepared pan. Bake in the preheated 180°C conventional oven for 25 minutes before rotating the tin, then bake for a further 20-25 minutes or until the cake feels springy to the touch and a tester inserted into the centre should come out clean.

Let cool 15 minutes before removing from the tin. Slide a knife around the edges to help loosen the cake if necessary and then transfer to a cooling rack while you prepare the apples.

Caramelised apples
Peel, halve and core the apple. Cut each half into slices that are about ¼ inch thick.

Heat a medium sauté pan over medium-high heat. Sprinkle the sugar evenly over the bottom of the pan and cook until it melts and turns a light amber colour. Carefully stir in the butter, vinegar, vanilla, and spices, as the caramel may splatter.

Add the apple slices and toss to coat with the caramel. Reduce the heat to medium and cook for 10-15 minutes, turning the apples occasionally. Try not to mush them too much. The apples should be slightly soft and caramel colored. If the caramel thickens too much, add a little boiling water before letting the apples cool in the pan. 
 

To serve, brush 1-2 tbs of the apple caramel over the top of the cake. Top the cake with the caramelized apple slices and then sprinkle over the almond flakes.

 
The honey cake tasted just as I remembered and was a hit with the neighbours. The caramelised apples were simply delicious and I can see I'll be making them again. As for the second cake I made, there is only 1 slice left and I admit to eating at least 3/4 of the loaf. 
 
See you all again next week with some more baking from my kitchen.
 
Bye for now,
 
Jillian

PRINT RECIPE

chocolate tahini babka

10 May 2022


Last year inspired by a Honey and Co recipe, I made a batch of
chocolate tahini buns and they were so good my neighbours are still talking about them. On Saturday I decided to turn the bun recipe into a babka.


The dough is really easy to put together so I made the dough in the morning; let it rest in the fridge for a few hours; shaped the babka in the afternoon; let the shaped babka rest in the fridge overnight before baking it on Sunday morning.


I shared it with my neighbours who were just as enthusiastic with the babka as they were with the chocolate tahini buns.


Here's the recipe if you'd like to give it a try which makes one large babka. For all my recipes I use a 250ml cup and a 20 ml tablespoon, unsalted butter and 60g eggs. My oven is a conventional gas oven so if your oven is fan forced you may need to reduce the oven temperature by 20°C.

Chocolate Tahini Halva Babka inspired by a Honey and Co recipe
Ingredients
90g diced unsalted butter at room temperature
2 tsp dried yeast
1 egg
40g caster sugar
1 tsp vanilla
100 - 125 mls milk
330g plain flour
A pinch of table salt

Method
Place the butter, yeast, egg, sugar, vanilla and 100 mls of the milk in a large mixing bowl, then top with the flour and salt. Use the dough attachment on your mixer or your hands to bring it all together to a smooth, shiny dough, adding the remaining 20g/mls of milk if it looks dry. Don’t worry too much if you still have some whole flecks of butter running through the dough; they will make your final bun super-light.

Once the dough has a nice texture to it (after about 2–3 minutes with an electric mixer or 5–6 minutes working by hand), wrap the bowl in plastic wrap and place in the fridge to chill for at least 2 hours. You can leave it there for up to 12 hours, but not much longer or it will start to double in size.

Filling
½ cup chocolate tahini spread 
50g dark chocolate, coarsely chopped
75g halva, crumbled
Sea salt flakes
1-2 tbs cream or milk 
2 tsp sesame seeds
1 batch base sugar syrup (recipe follows)

Method
Place the chilled dough on a lightly floured surface and roll into a rectangle of about 40cm x 30cm. Spread the tahini mixture over the dough, reaching right to the corners, then sprinkle with chocolate and halva and a sprinkling of sea salt. Roll up tightly from one of the longer sides, so that you end up with a 40cm-long log.

If the dough has softened too much for you to handle it, place on a tray and chill in the fridge for 10 minutes to firm up. While you are waiting, butter a 1kg loaf tin and line the base and long sides with baking parchment, making sure that there is an overhang so that you will be able to lift the baked loaf out easily.

Use a pastry cutter or sharp knife to cut the log in half along its length to expose the layers. Place the halves with the cut sides facing upwards. Lift one halved log over the other so that they form a cross at their midpoints, with the filling layers still pointing upwards. Continue to twist the strands over each other until the dough looks like a lovely twisted plait.


Place in the lined baking tin and leave to prove in a warm place until the dough is fluffy, soft and doubled in size. This will take about 1 and 1⁄2 hours in a warm kitchen, or up to 2 hours if it is chilly.

Preheat the oven to 220°C conventional. Brush the surface of the babka with cream or milk then sprinkle the top of with the sesame seeds. Place the babka in the oven and immediately reduce the temperature to 190°C. Bake in the oven for 10 minutes, then turn the tin around for an even bake and leave for another 10 minutes. Bake for a further 10-15 minutes until the babka is well browned and cooked through. 
Remove the babka from the oven and immediately pour the sugar syrup all over the hot cake. You must let this cool in the tin or it will fall apart. 


Base sugar syrup
100g/mls water
100g granulated sugar
15 mls light corn syrup or honey

Method
Place all the ingredients in a small pan and stir to dissolve the sugar. Bring to the boil, skim off any foam that comes to the top and remove from the heat. If you are making a larger quantity (a litre or more), bring to the boil, skim and cook for 3–4 minutes, then allow to cool. You can make this syrup in advance — just keep it in a jar or bottle in the fridge for up to 2 weeks.


The perfect morning tea, a slice of still warm babka served with a nice cup of tea. 

See you all again next week with some more baking from my kitchen. 

Bye for now,

Jillian
PRINT RECIPE

chocolate tahini buns

11 Jul 2021


Last year during the U.K. lockdown, Honey and Co had to close their London restaurants. As well as take away meals they sold diy Fitzrovia bun kits and produced a video illustrating how to make the buns at home. As well as the ingredients to make their gorgeous fitzrovia buns, the kit also included ingredients to make half a dozen chocolate tahini sesame buns.


I have the Honey and Co bun dough recipe (see below) but didn't have a recipe for the chocolate tahini filling. The buns looked really good though and once I found some chocolate tahini spread (harder than it sounds) I set to work and whipped up my own version of these buns. Not every recipe works out first time but these buns were a winner. I shared a few with my neighbours and tucked a few in the deep freeze for later.


I made the buns over a 2 day period. I rested the dough overnight but it's winter here in Sydney so after I shaped the buns it took a few hours before they'
risen enough to bake. Instead of breakfast buns they became after lunch buns.


If you'd like to make a batch of chocolate tahini buns, here's the recipe for you which makes 6-8 buns. For all my recipes I use a 250ml cup and a 20 ml tablespoon, unsalted butter and 60g eggs. My oven is a conventional gas oven so if your oven is fan forced you may need to reduce the oven temperature by 20°C.

Chocolate Tahini Buns inspired by Honey and Co

Dough

70 g unsalted butter, diced and at room temperature

1½ tsp dried yeast

1 egg

30 g caster sugar

80–100 mls milk

300 g (2 cups) plain flour

A pinch of table salt


Method
Place the butter, yeast, egg, sugar and 80 mls of the milk in a large mixing bowl, then top with the flour and salt. Use the dough attachment on your mixer or your hands to bring it all together to a smooth, shiny dough, adding the remaining 20 mls of milk if it looks dry. Don’t worry too much if you still have some whole flecks of butter running through the dough; they will make your final bun super-light.
 
Once the dough has a nice texture to it (after about 2–3 minutes with an electric mixer or 5–6 minutes working by hand), wrap the bowl in plastic wrap and place in the fridge to chill for at least 2 hours. You can leave it there for up to 12 hours, but not much longer or it will start to double in size.
 
Filling
½ cup chocolate tahini spread 
65g dark chocolate, coarsely chopped 
65g halva, crumbled
Sea salt flakes
 
Topping 
1-2 tbs melted butter or cream 
2 tsp sesame seeds 
1 batch base sugar syrup (recipe follows)
 
Base sugar syrup

75 mls water

75g caster sugar

2 tsp (10 mls) honey


Method

Remove the dough from the fridge and roll out with a rolling pin on a very lightly floured workbench to a rectangle about 12 inches x 8 inches. You may need to flip the dough over once or twice to get an even, smooth sheet, but try to work with as little flour as you can so as not to dry the dough out.


Lay the rectangle length-ways in front of you and spread the tahini in a thin layer all over. Sprinkle with the halva and chopped chocolate at regular intervals on top. Finish with a few salt flakes then fold over the short edges to contain the filling before you start rolling.


Lift the long edge of the dough closest to you and start rolling it up away from you, keeping it nice and tight without stretching the dough, until you end up with a sausage about 12 inches long. If it comes out a little longer, push it in from both ends to condense it a little; if it comes out shorter, then use your hands to roll it out a little until it reaches 12 inches. Refrigerate for about 20 minutes to firm up the filling then cut into six, seven or eight even-sized slices, depending on how many buns you want.


Line a round tin with a piece of baking paper so that it comes up the sides in one piece, and lay the buns flat on the base, spiral facing upwards. This is the time to freeze the buns if you want to bake them at a later date; otherwise leave them in a warm place.


Preheat the oven to 220°C conventional. Allow the buns to continue rising until they look about ready to explode (another 20 minutes or so). The dough should have expanded to fill the gaps and it should be shiny and taut. Brush with the melted butter or cream and sprinkle the sesame seeds over the top of the buns.


Place in the centre of the oven and immediately reduce the oven temperature to 200°C. Bake for 10 minutes, and then turn the tin for an even bake. Reduce the temperature to 190°C, conventional. Bake for another 10 - 15 minutes or until the top of the buns are golden brown. Remove from the oven and pour all the sugar syrup over the buns. Allow to cool slightly before devouring.


While the buns are baking, prepare the syrup. Place all the ingredients in a small pan and stir to dissolve the sugar. Bring to the boil, skim off any foam that comes to the top and remove from the heat. If you are making a larger quantity (a litre or more), bring to the boil, skim and cook for 3–4 minutes, then allow to cool. You can make this syrup in advance — just keep it in a jar or bottle in the fridge for up to 2 weeks.


Here are a few guidelines to working with this dough from Sarit Packer:

·     Allow at least 2 hours to refrigerate it before shaping, as it can be very soft when freshly made. Ideally, if you plan ahead, make the dough the day before, place it in a large bowl, cover and refrigerate overnight.


·    Try to work it with as little additional flour as you dare. The end product will benefit greatly.


·     Have all your fillings ready before you start on the dough. It also helps if you have your tray lined in advance.


·     If you are going to bake after shaping, leave the buns at room temperature to prove. If you are preparing in advance, freeze the unbaked buns as soon as they are shaped (to preserve as much yeast activity as possible when you send it to sleep in the freezer).


·     You can shape the buns in the evening, place them on the baking tray and pop them in the fridge to proof slowly overnight and bake first thing in the morning (a good way of making your partner or guests indebted to you for the rest of the day/week/year).


·     Filled buns will keep for up to a week in the freezer but after that they start to deteriorate and lose their plumpness.


·     Always freeze unbaked dough uncovered on a tray, then (once frozen) you can transfer to a container or freezer bag or wrap the tray with plastic wrap. When you are ready to bake, thaw overnight in the fridge before taking out to proof in the morning (or if you only sleep 5–6 hours, simply leave them out at room temperature, and when you wake they should be ready to bake).


The buns are at their best still warm from the oven, so the next day I just reheat them for 10 seconds in the microwave prior to serving so the chocolate has a chance to melt a little. These buns are a bit sweet, a bit savoury and simply delicious. 

See you all again soon with some more cooking from my kitchen. 

Bye for now, 

Jillian

PRINT RECIPE

honey and co coconut almond cake with cherries

6 Jun 2021

I don't bake with fresh cherries as they are just too expensive so I use frozen cherries instead. I don't think I have the patience required to pit vast quantities of cherries either. I had half a packet of frozen cherries in my freezer and was thinking of the best way to use them.

As you know I have a continuing love affair with the duo behind Honey and Co. I recently spied a plum version of this coconut and almond cake on their Instagram feed and when I tracked down the original recipe it used cherries. I'd found my recipe.

The cake is a simple melt and mix affair topped with luxe ingredients, in this case cherries and pistachios, then baked until golden brown. All that's needed is a sprinkle of icing sugar and maybe a dollop of cream if you're feeling fancy.

Here's the recipe for you which will make an 8 inch cake. For all my recipes I use a 250ml cup and a 20 ml tablespoon, unsalted butter and 60g eggs. My oven is a conventional gas oven so if your oven is fan forced you may need to reduce the oven temperature by 20°C.

Honey and Co coconut and almond cake with cherries
Ingredients
⅔ cup almond meal
Scant ½ cup plain flour (65g)
⅓ cup shredded unsweetened coconut
¾ tsp baking powder
pinch salt
2 eggs, room temperature
½ cup caster sugar
cup packed light brown sugar
1 tsp vanilla extract
100 g cooled melted butter
200 grams fresh sweet cherries, stemmed and pitted, or frozen pitted sweet cherries, thawed and patted dry (you can also use sliced pitted plums)
1 tablespoon caster sugar
35 g unsalted pistachios, chopped
Icing sugar, to serve (optional)

Method
Preheat oven to 180°C. Grease and line the base of a 8 inch round tin with baking paper. 

Combine dry ingredients in a bowl. In a separate bowl, mix the eggs with the sugars, vanilla and cooled melted butter. Pour the wet ingredients onto the dry batter mixing to form a thick batter. 

Pour the batter into the prepared tin. Tear the cherries in half over the cake sprinkling with the extra tablespoon of caster sugar. Top with the pistachios and bake for 45-50 minutes or until golden brown and a skewer comes out dry
 
Allow to cool for 1 hour before removing from the tin. Dust with icing sugar before serving.
The cake was everything you'd expect from Honey and Co, equal parts simple to make but delicious. I'm sure it would be equally delicious topped with plums with a touch of lemon rind in the batter.

See you all again next week with some more baking from my kitchen. 

Bye for now, 

Jillian
PRINT RECIPE
© DELICIOUS BITES • Theme by Maira G.