SLIDER

michael rantissi
Showing posts with label michael rantissi. Show all posts

xmas month 2022- layered watermelon and strawberry pavlova

19 Dec 2022


Each year for Christmas, I declare I will make Christopher Tse's famous watermelon cake and so far it hasn't happened. It wasn't even on my radar this year until I saw a photo on instagram of a layered turkish delight
 pavlova from Kepos and Co.  


Inspired by 
Christopher Tse's famous confection, I decided to make a watermelon and strawberry version of the pavlova.


Instead of Turkish delight and grapefruit segments, I used watermelon cubes and rosewater scented strawberries then topped the pavlova with grapes, pistachios and rose petals. The pavlova is very fragile but once assembled it looked gorgeous and the pavlova base was far easier to make than an almond dacquoise! 

Here's the recipe for you which makes a 10 x 20cm pavlova. For all my recipes I use a 250ml cup and a 20 ml tablespoon, unsalted butter and 60g eggs. My oven is a conventional gas oven so if your oven is fan forced you may need to reduce the oven temperature by 20°C.


Layered watermelon and berry pavlova  - serves 4
Pavlova
4 egg whites, at room temperature
210g icing sugar mixture
20ml white vinegar
10ml rosewater
 
Filling
200 gm hulled strawberries 
5 ml rosewater 
1 tsp caster sugar
100g seedless watermelon, cubed
2½ ml rosewater 
½ tsp caster sugar
150g mascarpone
150 ml pouring cream
25g icing sugar
½ tsp vanilla paste

Topping
7 seedless red grapes, halved
3 tsp slivered pistachios
3 tsp dried rose petals, optional 

Method
Preheat the oven to 160°C, conventional. Spray a 20 x 20cm square baking dish with oil and line with baking paper.

Using an electric mixer fitted with the whisk attachment, whisk the egg whites for 2 to 3 minutes until soft peaks form. With the machine running, add the icing sugar mixture, the vinegar, and rosewater and then whisk for a further 8 to 10 minutes, until glossy and firm.

Spoon the mixture into the prepared tin and make the top smooth.  Bake for exactly 20 minutes, then remove from the oven and set aside to cool completely. Don’t worry if the meringue looks a bit rustic when you take it out of the oven.  


Filling
20 minutes before assembling the pavlova, halve the strawberries and place in a bowl with 5 ml rosewater and 1 tsp caster sugar. Stir to combine then set aside. Place the cubed watermelon in a separate bowl with 2
½ ml rosewater and ½ tsp caster sugar. Stir to combine then set aside.

Put the mascarpone, cream, icing sugar and vanilla a large bowl and whisk until soft peaks form.


To assemble
Cut the meringue in half so there are two 20 x 10 cm pieces. Put one piece on a serving plate and top with half the mascarpone mixture, half the cubed watermelon and half the strawberries. Gently top with the remaining meringue, then the  mascarpone mixture, the watermelon cubes and the strawberries. Just before serving, scatter over the grapes, pistachios and rose petals.


The pavlova looked so pretty and the combination of the berries, watermelon with just a hint of rosewater was delicious. I can see I'll be making many different versions of this layered pavlova in my future.

I'll be back tomorrow some cookie recipes to tide you over until 2023.

Bye for now,

Jillian
PRINT RECIPE

asparagus, pea and feta tart

9 Nov 2022

Today's post is to ensure you that I don't live on cakes, biscuits and buns alone. As well as sweet baking I also do some savoury baking.


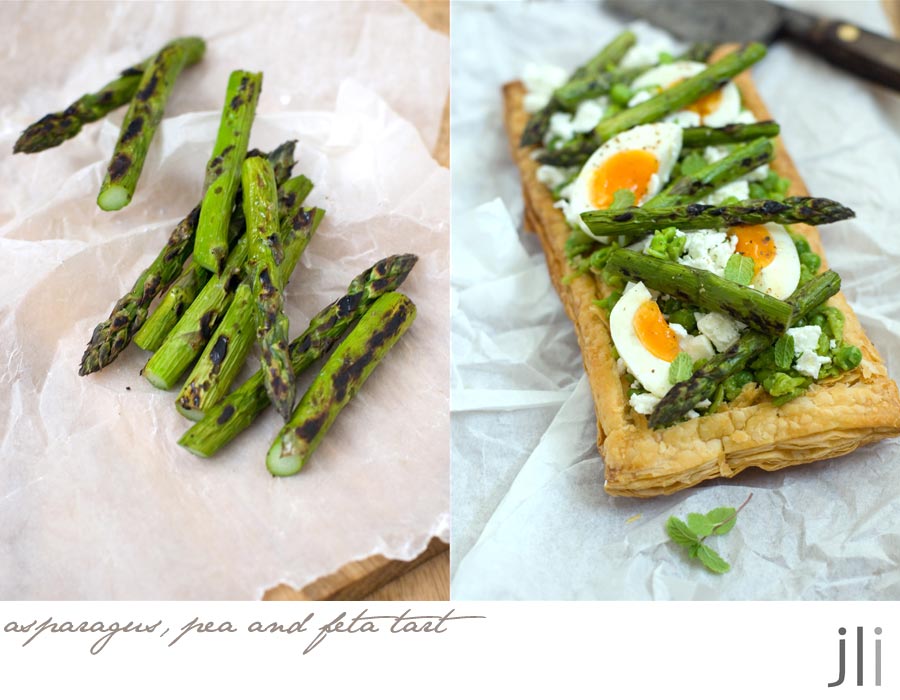
It's spring time in Sydney and the fruit shops are filled with new season asparagus. Whilst looking for recipes for Christmas 2022, I came across some recipes from Kepos Kitchen, including this one for an asparagus, pea and feta tart.


I love peas, asparagus, feta cheese and a soft boiled egg, so I was sold. The only problem I had was trying to track down my favourite brand of all butter puff pastry, Careme. When that proved impossible I went with what I could find in the supermarket. A 24 x 24cm square tart seemed a bit unwieldy, so I cut the pastry into two halves and made 2 tarts.


Here's the recipe for you from Hummus and Co by Michael Rantissi and Kristy Frawley which makes 2 tarts. For all my recipes I use a 250ml cup and a 20 ml tablespoon, unsalted butter and 60g eggs. My oven is a conventional gas oven so if your oven is fan forced you may need to reduce the oven temperature by 20°C.


Asparagus, pea and feta tart – serves 3-4
Ingredients
350 g frozen green peas, thawed overnight
1 sheet store bought puff pastry, about 24cm x 24cm
Grated zest and juice of 1 lemon
4 tablespoons olive oil, plus extra for drizzling
12-14 asparagus spears, peeled and trimmed
150 g feta
3 soft boiled eggs
Micro herbs for garnish (optional)
 
Method
Preheat the oven to 190°C, conventional. Line a large baking tray with baking paper. 


Cut the pastry lengthwise into two 12cm pieces. Using a knife, make a 1cm border around the edge of the pastry (don’t cut all the way through) then dock the centre with a fork. Put the pastries on the prepared tray and bake for about 20 minutes or until golden brown, puffed up and very firm. Remove from the oven and set aside to cool to room temperature. 

Put the peas in a bowl and crush them. Stir in the lemon zest, lemon juice and zest and 3 tablespoons of olive oil. Season with salt and pepper and set aside.


Heat a chargrill pan or a barbecue grill plate to high. Drizzle the asparagus with 1 tablespoon of the olive oil and sprinkle with salt and pepper. Cook for 3 to 4 minutes, until grill marks appear.


To assemble the tart, put the pastries onto a serving or chopping board (as this will be easier to cut the tart) and top each with half of the crushed pea mixture. Crumble the feta evenly over the tarts. Cut the eggs into half and arrange them on the tarts. Top with the grilled asparagus, sprinkle with sea salt and cracked black pepper. Drizzle with additional olive oil and micro herbs if using.


I had half of one of the tarts for my lunch and the leftovers were devoured for an afternoon snack. The tart was really delicious especially the char on the asparagus spears. This recipe is definitely a keeper.

See you all again next week with some more baking from my kitchen.

Bye for now,

Jillian


PRINT RECIPE

tahini sesame swirl teacake

10 Jan 2022

Welcome to my first post for 2022. I'm just about to return to work for the first time in 6 months. I baked up a storm during my break for those weekends when I just don't have time to bake.

 
This tahini swirl teacake was on my long list of 'Things to bake' and on the day I made the cake I was particularly distracted. 
 
 
I only had 3 eggs in the fridge and one of the eggs destined for the cake accidentally made it's way into the food scraps bin instead of the batter.


The recipe is dairy free but if you don't mind dairy, you could swap the orange juice for yoghurt. I think the addition of yoghurt would mellow out the tahini flavour a little. The cake is quite sweet so if you serve the cake with a dollop of yoghurt, which I did, the yoghurt helps to cut through the sweetness.


If you'd like a cake that tastes just a little different then maybe this tahini sesame swirl teacake is the cake for you. The recipe was adapted from 'Falafel For Breakfast' by Michael Rantissi and Kristy Frawley, whilst the black sesame swirl was pinched from a Claire Saffitz recipe. 

 
The original recipe called for a few tablespoons of sesame seeds which were folded through the batter. Instead, I ground up black sesame seeds added them to a portion of batter, alternated layers of the different coloured batters then did a few swirls with a chopstick. I have to say I'm mightily impressed with that swirl.


Here's the recipe for you which makes a makes a 5 cup bundt cake or a 17cm round cake. For all my recipes I use a 250 ml cup, a 20 ml tablespoon, unsalted butter and 60 g eggs. My oven is a conventional oven so if you have a fan-forced oven you may need to reduce the temperature by 20°C. The original recipe can be found here.

Tahini and black sesame swirl teacake 
Coating 
2 tsp white sesame seeds
2 tsp black sesame seeds
2 tsp sugar

Cake 
1½ tbs black sesame seeds
2 eggs
150g (⅔ cup) caster sugar
1 vanilla bean, split lengthwise and seeds scraped or 1 tsp vanilla extract
125 ml (½ cup) light extra virgin olive oil or neutral oil
160 ml (⅔ cup) orange juice or yoghurt
135g (½ cup) tahini
185 g (1¼ cups) plain flour
1½ tsp baking powder
Pinch salt

Method
Preheat the oven to 170°C, conventional. In a small bowl mix together the sesame seeds and sugar. Brush the sides of a kugelhopf or fluted ring (bundt) cake tin with butter or oil then sprinkle with the sesame seed mixture. Set aside in the fridge.

Finely grind the black sesame seeds in a food processor, spice grinder or with a mortar and pestle. Place into a small bowl and set aside.

Put the eggs, sugar and vanilla in a large bowl and mix using a wooden spoon.  Slowly add the oil, stirring. Add the orange juice and stir to combine. Add the tahini and mix well.  Sift the flour, baking powder and salt over the wet ingredients and then mix until just combined. Do not over mix.

Measure out 1 cup of the batter and add to the bowl containing the ground black sesame seeds. Mix until combined.

Pour about ⅓ plain batter into the prepared tin and then pour over ⅓ black sesame batter. Repeat the layering process until there is no batter left. Using a chopstick or knife gently swirl the batter a few times to create the swirl. Place the tin in the preheated oven and bake for 1 hour, or until golden and firm.
 
Allow the cake to cool in the tin for 10 minutes then turn out onto a wire rack to cool completely.
You can serve the cake with a dollop of natural yoghurt or enjoy it with a cup of mint and lemon tea.
 
See you all again next week with some more baking from my kitchen.
 
Bye for now,
 
Jillian

PRINT RECIPE

xmas month 2021 - chocolate raspberry pavlova

13 Dec 2021

Welcome to week 3 of Xmas month 2021. In Australia Pavlova is a traditional Christmas dessert and this year I decided to make a chocolate pavlova. Pavlova is made from just a few ingredients - egg whites, sugar, cornflour and a little bit of vinegar to create the characteristic marshmallow like interior.


The 70% dark chocolate swirled through the pavlova adds extra sugar to an already sweet dessert, so it's really important to counterbalance all that sweetness with something tart. I think fresh raspberries are the perfect match atop lashings of softly whipped unsweetened cream. If fresh raspberries aren't available where you live, I've given you a recipe for a berry compote which can be made from frozen berries.


As the chocolate pavlova mixture is inclined to spread more than regular meringue, I’ve suggested making a 7 inch pavlova which when baked should make an 8 inch pavlova.

 
Here’s the recipe for you which makes an 8 inch pavlova. The pavlova recipe was adapted from a recipe from Falafel For Breakfast: Modern Middle Eastern Recipes for the Shared Table from Kepos Street Kitchen by Kristy Frawley and Michael Rantissi. For all my recipes I use a 250 ml cup, a 20 ml tablespoon, unsalted butter and 60 g eggs. My oven is a conventional oven so if you have a fan-forced oven you may need to reduce the temperature by 20°C. 


Chocolate raspberry pavlova – makes an 8 inch pavlova 
120 g (4 oz) 70% dark chocolate
4 egg whites (120g), at room temperature
Pinch salt
220 g (1 cup) caster sugar
1 tablespoon white vinegar
1 tablespoon cornflour

Berry compote (Optional)
200g berries, fresh or frozen
45g (3 tbs) caster sugar
The juice of half a lemon
1-2 tbs water

Topping 
300 mls thickened cream
1 tsp vanilla bean paste
1 punnet raspberries

Method 
Preheat the oven to 170°C, conventional. Mark a 7 inch circle onto a sheet of baking paper then turn the paper upside down. Use the paper to line a baking tray. I used the Bakemaster insulated baking sheet from Everten. I like to secure the paper with clips but you can also use a small dollop of the meringue mixture to fix the paper to the baking tray. 

Put the chocolate in a heatproof bowl over a saucepan of simmering water, making sure that the water doesn't touch the base of the bowl. Stir until melted then set aside to cool to room temperature. Alternatively, melt the chocolate in a microwave.

Using an electric mixer with the whisk attachment, whisk the egg whites with a pinch of salt until soft peaks form. Slowly add the sugar a tablespoon at a time and whisk until it forms a thick and glossy meringue and the sugar crystals have all dissolved.  Fold in the vinegar and cornflour and then gently swirl in the melted chocolate.

Spoon the meringue onto the baking tray, using the circle as a guide. Try to build up the walls of the pavlova so that it’s at least 2 inches high as the meringue spreads whilst cooking. Reduce the oven temperature to its lowest setting, place the tray onto the centre rack and bake for 1¼ - 1½ hours or until the pavlova is firm and the base is dry. I like to leave the pavlova in the turned off oven to cool before removing it from the oven and placing it on a wire rack. Once cold it can be stored in an airtight container until it is time to decorate.

Berry compote (optional)
To make the compote, combine all the ingredients into a small saucepan. Bring the mixture to a boil and then reduce the heat to a simmer. Gently simmer the mixture for 15-20 minutes. The mixture will have thickened a little and the berries should still hold their shape. Place into a covered bowl and refrigerate until needed. 


To decorate 
In a small bowl whip the cream with the vanilla bean paste until soft peaks form. Carefully remove the baking paper from the pavlova, then place onto a serving plate and decorate the pavlova with the whipped cream and berries. If you like, just before serving you can dollop on some of the berry compote.
 
 
Another delicious Christmas dessert which best of all can be made ahead of time then just decorated on the day. 

I'll be back again later this week with another classic dessert for Christmas week.

Until then,
 
Bye for now,

Jillian


PRINT RECIPE

chocolate meringues with rhubarb and raspberry compote

20 Jun 2016

Whenever a recipe calls for egg yolks, I always freeze the whites. If I need to make a pavlova or meringues, the frozen whites are easy to defrost and it saves the problem of what to do with all those leftover yolks.


Whilst rummaging through the freezer a few weeks back I found a container of egg whites and feeling the need for something sweet, I set about turning the whites into some chocolate meringues. Now those of you who've followed my blog for a while know that chocolate meringue made with cocoa doesn't always work out. The cocoa tends to deflate the egg whites and the meringue loses its shape.

I found this recipe for chocolate meringues in ‘Falafel for Breakfast’ by Michael Rantissi and Kristy Frawley and I was keen to try the recipe because it used chocolate rather than cocoa. The melted chocolate didn't deflate the meringue and my new oven cooked the meringues perfectly.


My new oven and I are still building a relationship. After much trial and terror I've worked out that the bottom of the oven is really hot and each rack gets progressively cooler towards the top of the oven. To bake bread, pizza or to make a roast I use the bottom rack. To bake cakes and biscuits or to make a casserole I use the middle rack but until now I've not tackled meringue so I wasn't sure where to cook them. I decided to bake the meringues on the top shelf; cooked them for just over an hour and they were done perfectly. Too easy!


Once they were cold, I broke one of the meringues in half, tasted it and found it was way too sweet for my taste. As I'd made six I needed to find a way of making the meringues palatable. I folded some Greek yoghurt through double cream I had in the fridge, topped the meringue with a spoon of the oven baked rhubarb and raspberry compote I'd made earlier and a new dessert was born. The combination of the sweet chocolatey meringue, slightly sour cream and the tangy rhubarb compote was delicious.


Here's the recipe for you which makes 12 large meringues. I made a half batch which yielded six meringues.

Chocolate Meringues (makes 12 large meringues)
Ingredients
120g (4 ½ oz) dark chocolate (at least 70% cocoa), chopped
4 egg whites, at room temperature
1 cup (220g) caster sugar
1 tsp cornflour
1 tsp white vinegar

To serve
125 g double cream
¼ cup Greek yoghurt
Berries or oven roasted rhubarb

Method
Preheat oven to 140°C/275°F. Line a baking tray with baking paper.

Place chocolate in a small heatproof bowl over a small saucepan of simmering water (don't allow bowl to touch water) or melt the chocolate in the microwave; stir until just melted. Set aside to cool to room temperature.

Beat egg whites in a small bowl with an electric mixer until soft peaks form; gradually add caster sugar, beating after each addition until dissolve until the mixture forms a thick and glossy meringue. Fold in the cornflour and vinegar then swirl in the melted chocolate. Spoon 2 heaped tablespoons of the mixture onto the baking tray for each meringue leaving room for the meringues to expand during cooking.

Bake meringues for 45 minutes - 1 hour or until the meringues are firm and dry to the touch. Turn the oven off and leave the meringues to cool in the oven with door ajar.

To serve, combine the double cream with the Greek yoghurt. Dollop the cream over the meringues and serve with fresh berries or some tart rhubarb compote.


See you all again next week with my last baking post before I head overseas.

Jillian
PRINT RECIPE

pita bread

16 May 2016

For those of you with sharp eyes you may have noticed a change or two on the blog. It has a new name for a start, Delicious Bites, and it also has a fresh new look. Many thanks to Maira for the design.

I do hope you like the changes. The blog has a recipe page and a new feature, a print button, to make it easier to locate and print out the recipes. I've been working on this redesign since February so it's been a bit of a labour of love. It's not complete yet as I still have to relabel some of the posts and make a few minor tweaks. I've also joined instagram though there isn't much to see at this stage as my latest purchase, a little tablet, is only a few hours old.

Now onto this week's recipe. When it comes to making bread, I've been having a bit of a battle with my new oven and so far the oven is winning. I've worked out the best way to make pizza in my oven so I figured I'd be able to make some flat breads.


A few months ago I bought a copy of 'Falafel for Breakfast' by Michael Rantissi and Kristy Frawley. The recipe book has been much thumbed since I bought the book but I've only just started cooking from it.


Last weekend I made a Middle Eastern spread for lunch. I made three recipes from the book and this recipe for pita/za'atar bread was the first thing I made. I quickly demolished these flatbreads and have just made another batch.


I made a half batch of the dough and topped 2 of the pitas breads with za'atar and olive oil.


pita bread photo blog-3_zpsk49ew9as.jpg

Here's the recipe for you f
rom Falafel for Breakfast by Michael Rantissi and Kristy Frawley. For all my recipes, I use a 250 ml cup and a 20 ml tablespoon. All eggs are 60 grams and my oven is a conventional gas oven not fan forced, so you may need to reduce your oven temperature by 20°C. My oven is quite slow, so I baked the pita breads at 200°C.

Pita Bread – makes eight, 

Ingredients
500g strong bread flour, sifted, plus extra for dusting
1x 7g dry yeast sachet
1 tbs sea salt flakes
2 ½ tbs extra virgin olive oil
350 ml warm water

Pita bread
Put the flour, yeast and salt in a large bowl and mix to combine. Make a well in the centre and slowly add the olive oil. Using your hands, combine the flour and oil. Gradually add the warm water until the dough is a little sticky (you may not need to use all of it). The dough will come together when you start kneading it.

Dust a work surface with flour and knead the dough for 3–4 minutes, until it forms a nice smooth consistency.

Put the dough in a clean bowl and cover with a damp tea towel (dish towel) or plastic wrap with a few holes pricked in it. Leave in a warm place to rise for 1 hour, or until doubled in size.

Cut the dough into 8 equal pieces. Roll each piece of dough into a ball (or whatever shape you like). Dust the work surface with extra flour, place the 8 balls of dough on it and cover with the damp tea towel or plastic wrap with holes to rise again for 30 minutes.

Roll out each ball of dough into a circle about 5 mm thick, or whatever thickness you like. Leave to rest for 20 minutes.

Put the dough circles on the baking tray (you may need to cook them in batches) and bake for 10–15 minutes, or until a light colour. Allow to cool on a tea towel (dish towel) and use within 1–2 days.


Za’atar bread
8 tbs za’atar
150 ml good-quality olive oil

To make za-atar bread, once you’ve rolled the balls of dough into rounds and set them aside to rest for 20 minutes, preheat the oven to 180°C and line a baking tray with baking paper.

Put the za’atar and olive oil in a bowl. Mix to combine.

Gently stamp your fingers into the dough rounds, making little valleys just deep enough so the za’atar oil won’t roll off the dough. (Don’t press too hard as you want the dough to remain aerated.) Spoon the za’atar oil over the dough.

Put the dough circles on the baking tray (you may need to cook them in batches) and bake for 10–15 minutes, or until a light colour. Allow to cool on a tea towel (dish towel) and use within 1–2 days.


pita bread photo blog-10_zpsikevxmdk.jpg

For my lunch, I filled the pita with hummus, beef kofta and salad. The following day for a delicious snack I dipped the toasted za'atar bread into the hummus.


I hope you enjoyed your weekend. I'll be back next week with this month's Plate 2 Plate post.

Bye for now,

Jillian
PRINT RECIPE
© DELICIOUS BITES • Theme by Maira G.