SLIDER

light meals
Showing posts with label light meals. Show all posts

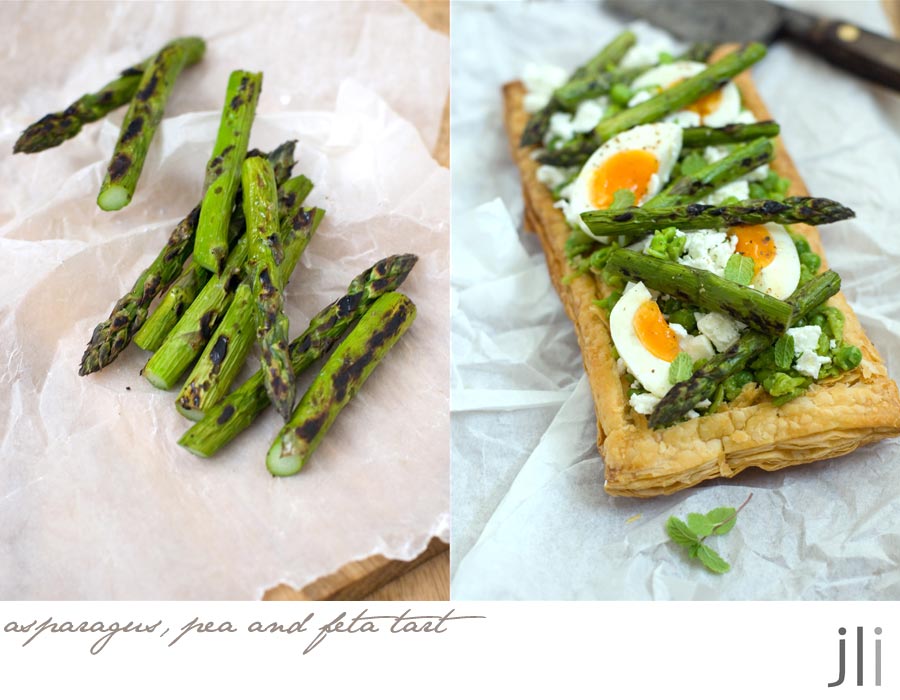
asparagus, pea and feta tart

9 Nov 2022

Today's post is to ensure you that I don't live on cakes, biscuits and buns alone. As well as sweet baking I also do some savoury baking.


It's spring time in Sydney and the fruit shops are filled with new season asparagus. Whilst looking for recipes for Christmas 2022, I came across some recipes from Kepos Kitchen, including this one for an asparagus, pea and feta tart.


I love peas, asparagus, feta cheese and a soft boiled egg, so I was sold. The only problem I had was trying to track down my favourite brand of all butter puff pastry, Careme. When that proved impossible I went with what I could find in the supermarket. A 24 x 24cm square tart seemed a bit unwieldy, so I cut the pastry into two halves and made 2 tarts.


Here's the recipe for you from Hummus and Co by Michael Rantissi and Kristy Frawley which makes 2 tarts. For all my recipes I use a 250ml cup and a 20 ml tablespoon, unsalted butter and 60g eggs. My oven is a conventional gas oven so if your oven is fan forced you may need to reduce the oven temperature by 20°C.


Asparagus, pea and feta tart – serves 3-4
Ingredients
350 g frozen green peas, thawed overnight
1 sheet store bought puff pastry, about 24cm x 24cm
Grated zest and juice of 1 lemon
4 tablespoons olive oil, plus extra for drizzling
12-14 asparagus spears, peeled and trimmed
150 g feta
3 soft boiled eggs
Micro herbs for garnish (optional)
 
Method
Preheat the oven to 190°C, conventional. Line a large baking tray with baking paper. 


Cut the pastry lengthwise into two 12cm pieces. Using a knife, make a 1cm border around the edge of the pastry (don’t cut all the way through) then dock the centre with a fork. Put the pastries on the prepared tray and bake for about 20 minutes or until golden brown, puffed up and very firm. Remove from the oven and set aside to cool to room temperature. 

Put the peas in a bowl and crush them. Stir in the lemon zest, lemon juice and zest and 3 tablespoons of olive oil. Season with salt and pepper and set aside.


Heat a chargrill pan or a barbecue grill plate to high. Drizzle the asparagus with 1 tablespoon of the olive oil and sprinkle with salt and pepper. Cook for 3 to 4 minutes, until grill marks appear.


To assemble the tart, put the pastries onto a serving or chopping board (as this will be easier to cut the tart) and top each with half of the crushed pea mixture. Crumble the feta evenly over the tarts. Cut the eggs into half and arrange them on the tarts. Top with the grilled asparagus, sprinkle with sea salt and cracked black pepper. Drizzle with additional olive oil and micro herbs if using.


I had half of one of the tarts for my lunch and the leftovers were devoured for an afternoon snack. The tart was really delicious especially the char on the asparagus spears. This recipe is definitely a keeper.

See you all again next week with some more baking from my kitchen.

Bye for now,

Jillian


PRINT RECIPE

spinach and ricotta pie with a cheese crust

27 Jul 2020


Julia Busuttil Nishimura's greens pie from her book Ostro has been one of the most baked items during COVID-19 lockdown. It's not too dissimilar from Skye McAlpine's recipe for spinach mint and ricotta pie so I decided to combine the 2 to make this spinach and ricotta pie with a cheese crust.


We're teetering on the brink of increased restrictions here in NSW and with it, panic buying has returned. Toilet paper and pasta are hard to find and when I went looking for frozen spinach with which to make this pie, I tried 2 supermarkets and both had sold out yet there was a glut of fresh spinach at the fruit shop. 


Instead I bought a bunch of spinach for the pie which I trimmed, washed, cooked, drained then squeezed the water out, chopped it and then remembered why I usually use frozen spinach. What a pfaff!


Here's the recipe for you adapted from A Table in Venice by Skye McAlpine and Greens Pie by Julia Busuttil Nishimura. For all my recipes I use a 250 ml cup, a 20 ml tablespoon, unsalted butter and 60 g eggs. My oven is a conventional oven so if you have a fan-forced oven you may need to reduce the temperature by 20ºC. 


Spinach and ricotta pie with cheese crust – makes a 17cm pie 
Serves 4
Ingredients
Pastry
250g plain flour
50g grated parmesan cheese
A generous pinch salt
125g cold unsalted butter, diced
⅓ cup cold water

Filling
1 tbsp extra-virgin olive oil
1 leeks, white and light green parts only, neatly sliced and washed
1 garlic clove, sliced
250 frozen spinach, defrosted or 1 bunch spinach washed and wilted as above
175g ricotta cheese, well drained
20g parmesan, grated
2 eggs
Pinch nutmeg
Sea salt and freshly ground black pepper

Pastry
To make the pastry, combine the flour, cheese and salt in a bowl. Add the butter and rub it into the flour with your fingertips until the mixture resembles breadcrumbs. Add enough cold water to make dough, bringing it together with your hands until smooth or you could do this step in the food processor. Shape the dough into a ball, wrap in cling film and chill for 30 minutes or overnight.

Meanwhile preheat the oven to 200°C. Grease a 17cm spring-form tin. Cut off ⅓ of the dough and roll out thinly on a lightly floured surface to fit the base of the spring-form tin. Using a rolling pin drape the pastry over the base cutting it to fit. Cover the pastry with a piece of baking paper, before attaching the ring. This should hold the baking paper in place avoiding the need for baking beads. Chill for 15-20 minutes then bake the base for 20 minutes until the pastry is lightly golden. Remove the tin from the oven, unclip the ring and remove the baking paper and set aside to cool while you make the filling.  

Heat the olive oil in a frying pan over a low heat. Add the leek, garlic and a pinch of salt and sauté for about 10 minutes until soft and translucent. Set aside in a large bowl. Defrost the frozen spinach in the microwave, squeezing out the excess water from the spinach before transferring to the bowl. Add the ricotta, the parmesan, 1 whole egg and half a beaten egg and the nutmeg then season and mix well. Don’t discard the egg as the remainder will be used to glaze the top of the pie. Return the mixture to the fridge while you finish lining the tin. Divide the remaining pastry in half and roll out one half thinly on a lightly floured surface. Use this half to line the sides of the tin leaving a little overhang. 

Once you’ve lined the sides of the tin return the case to the fridge to firm a little before spooning in the filling. Roll out the remaining pastry so it’s large enough to cover the tin. My spring-form tin is quite high so I folded the edges of the pastry over the filling and glazed the edge of the pastry before laying the remaining pastry over the top of the pie to form a lid. Trim off any excess pastry and use your fingers to seal the edges together. Use a sharp knife to slash 4 slits at the centre of the pie to allow the steam to escape. Brush the leftover beaten egg all over the top of the pie.

Bake the pie for 45 minutes to 1 hour or until the pastry is dark golden and the filling heated through (slide a knife into one of the slashes down to the base of the pie; it should come out feeling warm to the touch). Remove from the oven and cool for 5-10 minutes. Turn out of the tin and serve warm or at room temperature.


Parmesan cheese is one of my favourite things and it adds a little extra flavour to the pastry, which was already delicious and adding a leek to the mixture added a little extra flavour to the filling. It was definitely worth making.


See you all again next week with some more baking from my kitchen. 

Bye for now,

Jillian
PRINT RECIPE

tiropita strifti - greek cheese pies

29 Jul 2019


When I was in Greece most days I'd buy a cheese pie for lunch. Some times it would be cut from a larger pie but normally I'd buy an individual pie. My favourite cheese pies were the ones shaped like snails, tiropita strifti. 


Once I arrived home in Sydney I started looking at recipes so I could recreate the cheese pie at home. I found plenty of recipes but you had to make the filo from scratch. Unfortunately I don't have a large enough kitchen bench or table to make filo at home so I had to use store bought filo and winged the filling recipe.


The cheese filling varied from pie to pie but feta cheese was always in the mix. Most online recipes suggested combining cheeses as feta alone could be too salty so I added some ricotta cheese. Some recipes added dill or mint and as I have a little pot of mint growing in my kitchen that's what I added. The rolling process reads more complicated than it really is but you can find YouTube videos that demonstrate the process. 


Here's the recipe for you. For all my recipes I use a 250 ml cup, a 20 ml tablespoon, unsalted butter and 60g eggs. My oven is a conventional gas oven so if your oven is fan forced you may need to reduce the oven temperature by 20°C. 


Tiropita Strifti – makes 4
Ingredients
8 sheets defrosted filo pastry
Olive oil spray
30g melted butter
1 tsp sesame seeds

Filling
200 g feta, crumbled
200 g ricotta
Two eggs
1 tbs chopped fresh mint
Salt and freshly ground pepper

Method
Preheat the oven to 190ºC. Grease a baking tray and set to one side. Unwrap the filo pastry then cover the pastry with a damp tea towel while you make the filling.

Filling
In a bowl mix the crumbled feta, ricotta, eggs, mint and a sprinkle of salt and pepper to taste. Divide into four.

To Assemble 
Stack the 8 sheets together. Lightly spray the top sheet of filo with olive oil spray then flip it over gently pressing it together with the underlying piece of filo. You’ll use 2 pieces of filo per tiropita.

Spread a quarter of the filling along the long edge of the pastry sheets, about 2 cm in from the edge. Fold the 2 cm of dough in over the filling, and also along the sides. Lightly spray the exposed filo pastry with olive oil before gently rolling up like a strudel. 

Once you have made the roll then form it into a snail, tucking in the loose end so the snail doesn’t uncurl. Brush the top and side of the snail liberally with butter before lightly sprinkling with sesame seeds. Place the snail on the tray and repeat the process with the remaining filo pastry and filling. 

Bake in the preheated 190ºC oven for 50 minutes to 1 hour until the pastry is crisp and golden. Remove to a rack and allow to cool a little. Serve warm with a green salad. 


The commercial filo pastry I used is much thinner and more fragile than the hand made filo used in Greece, but my version still tasted pretty good. I'll definitely be making these again.

See you all again soon with some more baking from my kitchen.

Bye for now,

Jillian
PRINT RECIPE

ottolenghi's cauliflower cake

1 Jul 2019


As I was leaving work last week a colleague mentioned she'd made Ottolenghi's cauliflower cake for a friend who was going through a bad patch. 


The recipe for this savoury cake is in Plenty More and although I'd bookmarked the recipe in my copy some time ago, I'd never made it. Cauliflowers are in season at the moment so I bought one on Saturday and made my version of the cake.


I make Helen Goh's broccoli cake quite often and the technique is quite similar. There are a few steps involved in making the cake so I prepared the vegetables and onion and rosemary infused oil on Saturday and baked the cake on Sunday. 


A few people had mentioned in their reviews that the cake was a bit bland so I made sure I seasoned the mix well and added some garlic to the onion because most savoury things taste even better with a bit of garlic. I also halved the recipe to make a 17cm cake.


Here's the recipe for you. For all my recipes I use a 250 ml cup and a 20 ml tablespoon, 60 gm eggs and unsalted butter unless specified. My oven is a conventional gas oven, not fan forced, so you may have to lower your oven temperature by 20°C.


Caulifower Cake, adapted from Ottolenghi's Plenty More. Makes a 17cm cake.
Ingredients
Melted unsalted butter, for brushing
1½ tsp white sesame seeds
½ tsp black sesame seeds 
½ small cauliflower, outer leaves removed, broken into 2 cm florets - 250g 
1 small red onion, peeled - 85g 
1 clove garlic, peeled and thinly sliced
40 mls olive oil
¼ teaspoon finely chopped rosemary
3 large eggs
75g coarsely grated Parmesan or another aged cheese 
7g basil leaves, chopped
60g plain flour, sifted
¾ teaspoon baking powder
¼ teaspoon ground turmeric
Salt and black pepper

Method
Preheat the oven to 200ºC. Line the base and sides of a 17cm springform cake pan with baking paper and brush the sides with melted butter. Mix together the white and black sesame seeds and sprinkle them around the inside of the pan so that they stick to the sides.

Cook the cauliflower florets in a large pot of boiling salted water. Simmer for 15 minutes until the cauliflower is soft and cooked through. Drain in a colander and set side to cool.. 

Cut 4 round slices 5-mm thick off one end of the red onion and set aside. Chop the rest of the onion and place in a small pan with the garlic, the oil and rosemary. Cook for 10 minutes over medium heat, stirring from time to time, until soft. Remove from the heat and set aside to cool.

Place the cooled onions in a medium sized bowl. Add the eggs, parmesan cheese and the basil and mix well. Then add the flour, baking powder, turmeric, ½ tsp salt, pepper to taste and mix until you have a smooth batter. Gently fold in the cooked and cooled cauliflower florets and mix lightly to thoroughly coat. Be careful not to break up the florets too much.

Spoon the cauliflower mixture into the pan, spreading it evenly and arrange the reserved onion rings on top. Place in the centre of the oven and bake for 50 - 55 minutes, until golden brown and set; a knife inserted into the centre of the cake should come out clean. Remove from the oven and leave for at least 20 minutes before serving. It needs to be served just warm, rather than hot, or at room temperature.


I served mine as a lunch dish with a simple salad and like all Ottolenghi recipes, it was delicious. I can definitely see I'll be making this again quite soon.


See you all again next week with some more baking from my kitchen.

Bye for now,

Jillian
PRINT RECIPE

roasted broccoli chilli and ricotta cake

25 Jun 2018


As you all know I've long had a love affair with Ottolenghi. Following the publication of Sweet, I'm now transferring my affection to his co-author Helen Goh. Helen writes a weekly column which appears in Good Food and this is one of her recipes.


I like to make a meat-free meal each week. I love ricotta, parmesan and chilli and don't mind broccoli, so this recipe fitted the bill. The original recipe serves 6 so I downsized the recipe to fit into my favourite tin and it still made 4 serves. I roasted the broccoli the day before I made the cake and stored it in the fridge. 


The longer the cake was stored in the fridge, the more intense the flavours became. I found the chilli flavour very mild so I topped the cake with some hot sauce for an extra kick. The recipe has quite a few steps and when I remake it, as I'm sure I will, I'm going to see if I can streamline the process a little while maintaining all the flavours. 


Here's the recipe for you which makes a 16cm cake. The link to the original recipe which makes a 20cm cake can be found above. For all my recipes I use a 250 ml cup, a 20 ml tablespoon, unsalted butter and 60g eggs. My oven is a conventional gas oven so if your oven is fan forced you may need to reduce the oven temperature by 20°C.

Roasted broccoli, chilli and ricotta cake - serves 4
225g broccoli, florets and stems cut into 2-3cm pieces 
100 mls extra virgin olive oil 
2 tsp sea salt flakes 
freshly ground black pepper 
1½ cloves garlic, peeled, halved lengthwise, then thinly sliced 
1 long, mild red chilli, thinly sliced 
1 small onion, peeled and grated 
1 lemon, zested 
3 eggs, lightly beaten 
30g parmesan, plus 1 tbsp extra for sprinkling, finely grated 
150g ricotta cheese 
90g self-raising flour 
salt and pepper 

Method 
Preheat the oven to 220°C. Line the base of a 16cm round spring-form cake tin with baking paper.

Bring a large pot of water to the boil and blanch the broccoli for 1 minute. Drain the broccoli and transfer to a large oven tray and toss with 1 tbs of the extra virgin olive oil, 3/4 tsp salt flakes and a few turns of the pepper mill. Place in the oven and roast for 10 minutes, then set aside to cool.

Reduce the oven temperature to 200°C. While the broccoli is roasting, pour the remaining olive oil (you should have about 75mls) in a small saucepan, add the garlic and half of the sliced chilli (the other half will be sprinkled over the cake before it goes into the oven), then place over low heat to infuse. When the garlic just begins to colour, about 10 minutes, remove from the heat and set aside to cool to room temperature. Remember that the garlic will continue to cook off the stove, so don't allow it to get too brown before removing from the heat. 

In a large mixing bowl, combine the roasted broccoli, grated onion and lemon zest. Add the eggs, the cooled infused olive oil and the grated parmesan, then crumble over the ricotta cheese and season with 1 tsp sea salt flakes. Add the flour and fold gently until just combined. Scrape the mixture into the prepared cake tin and use a small spatula to smooth the surface. Sprinkle over the 1 tablespoon of extra parmesan cheese and the remaining sliced chillies. 

Place into the oven for 35 minutes, until a skewer inserted into the middle comes out clean. Allow to cool for 15 minutes before releasing from the cake tin onto a serving plate. 


Tip: the cake is best served warm or at room temperature. It can also be wrapped in cooking foil and refrigerated for up to 3 days. I served the cake with a simple salad with chilli sauce on the side.

See you all again next week with my final travel post from Rome.

Bye for now,

Jillian
PRINT RECIPE

mushroom tart

20 Nov 2017


I've been working on expanding my meat free options and decided to make another savoury tart from the Popina Book of Baking. Whilst leafing through the book I found this mushroom tart recipe which combines dried porcini mushrooms with fresh mushrooms. I love porcini mushrooms so was I sold.


I bought some button mushrooms and field mushrooms and would have bought some swiss browns as well except they were very expensive. You can use any combination of mushrooms.


The tart uses the same pizza dough base as the ratatouille tart.


I made the mushroom mixture the day before I baked the tart so it didn't take long to put together. I lightened the filling a bit by adding milk to the egg and cream mixture.


The tart came out of the oven just in time for my Sunday lunch.


Here's the recipe for you which makes 6 servings. For all my recipes I use a 250ml cup and a 20ml tablespoon. I use 60g eggs and unsalted butter in all my recipes. My oven is a conventional gas oven so if you're oven is fan forced, you may need to lower the temperature by 20ºC.

Mushroom tart – adapted from The Popina Book Of Baking by Isidora Popovic.

You'll need an 8 inch square or round tart tin 

Filling 
1 quantity Pizza Dough 
15 g dried porcini mushrooms 
1 large red onion, diced 
40 mls olive oil
2 tbs water 
¾ tsp salt 
½ tsp cracked black pepper 
1 tsp finely chopped thyme leaves plus extra for serving
2 cloves garlic, finely chopped
150 g button mushrooms, halved if large
200 g field mushrooms, thickly sliced
100 mls cream
75 mls milk
1 egg, beaten

Method
Put the porcini mushrooms into a bowl of warm water and leave to soak for 20 minutes. Drain, chop then set aside.

Put the onion, oil, and water into a frying pan and sauté for about 10 minutes or until soft and the water has evaporated. Remove from the heat and add the salt, pepper, thyme leaves, garlic and the porcini mushrooms and stir to combine.

Preheat oven to 200ºC. Put the button and field mushrooms into a baking tray; drizzle with oil then cover the tin with foil and roast for 15 minutes. Remove from the oven and leave to cool covered for a further 10 minutes. Drain any excess liquid from the mushrooms, then stir them into the onion mixture.

Reduce the oven temperature to 180ºC and while the vegetables are cooling make the pizza dough.

Pizza dough 
220g plain flour 
1tsp dried yeast 
½ tsp salt 
2 tbs olive oil 
1 egg 
80 mls warm water 

Method 
Mix the flour, yeast and salt in a bowl. Make a well in the centre and pour in the oil, egg and water. Mix together to form a soft dough. Cover the dough and allow to rest for 10 minutes before gently kneading on a lightly oiled surface. The dough should be soft but not sticky. Roll the dough to 3mm thickness.

To make the tart, grease the tin then line the tart tin with the pizza dough but don’t trim the edges yet. In a bowl mix the cream, milk and egg then pour half the mixture into the prepared tart shell. Spread the cooled vegetables over the tart before carefully pouring in the remaining cream mixture. Trim the excess pizza dough before baking.

Bake the tart at 180ºC for 30 min or until the pastry is golden brown and the filling is set. Remove from the oven and leave to cool before serving. Garnish the cooked tart with sprigs of thyme.


This was another extremely delicious tart from the book. The pizza crust is so easy to make I can't wait to make another tart using a different filling, maybe something pumpkiny?

See you again soon with some more baking from my kitchen.

Bye for now,

Jillian
PRINT RECIPE

ratatouille tart

23 Oct 2017


I don't just bake sweet things you know. Saturday night is pizza night in my house and I've made the pizza dough so often that I know the Marcella Hazan recipe off by heart. I'm trying to eat a little less meat these days so last weekend I decided to make a vegetable tart adapted from a recipe I found in The Popina Book of Baking.


I've had the recipe book for a few years now but have mainly baked sweet treats from the book. Looking through the book it probably has more savoury then sweet recipes and this tart which uses a pizza dough base instead of a shortcrust pastry base intrigued me. 


The original recipe used oven roasted zucchini and fennel for the vegetable filling but I decided to use oven roasted ratatouille flavoured with fresh basil leaves. As I don't tolerate cream very well, the yoghurt based filling also appealled to me.


The dough was really easy to make and the filling tasted lovely as well. The tart turned out so well I'm keen to try a few other filling combinations soon. I think I can feel mushrooms calling my name.


Here's the recipe for you which makes 6 servings. For all my recipes I use a 250ml cup and a 20ml tablespoon. I use 60g eggs and unsalted butter in all my recipes. My oven is a conventional gas oven so if you're oven is fan forced, you may need to lower the temperature by 20ºC.

Ratatouille tart

You'll need a 10 X 33 cm rectangular tart tin for this recipe.

Filling

350 g eggplant cut into 1cm cubes
100g zucchini cut into ½ cm slices
100g red capsicum, cut into 1cm cubes
1 red onion halved then sliced thinly
1 garlic clove, sliced thinly
40 mls olive oil
1 tsp salt
½ tsp cracked black pepper
10 basil leaves
100g mature cheddar cheese, grated
150g Greek yoghurt
6 cherry tomatoes halved
1 quantity pizza dough
extra basil leaves

Filling
Preheat oven to 200ºC. Put the eggplant, zucchini, capsicum, onion, garlic, oil, salt and pepper into a baking tray and toss to coat. Cover the tin with foil and roast for 30 minutes. Uncover the tin and cook for a further 10 minutes or until the vegetables have softened and coloured a little. Cover the tray and cool for 15 minutes. Lower the oven temperature to 190ºC and while the vegetables are cooling make the pizza dough.

Pizza dough
220g plain flour
1 tsp dried yeast
½ tsp salt
2 tbs olive oil
1 egg
80 mls warm water

Method
Mix the flour, yeast and salt in a bowl. Make a well in the centre and pour in the oil, egg and water. Mix together to form a soft dough. Cover the dough and allow to rest for 10 minutes before gently kneading on a lightly oiled surface. The dough should be soft but not sticky. Put to one side.

To make the tart, drain any excess liquid from the vegetables, then mix in 60g of the cheese. Grease the tin then line it with the pizza dough but don’t trim the edges yet. Place the basil leaves on the base of the tart. Mix the yoghurt with the remaining cheese and pour into the tart shell. Scatter the roasted vegetables over the top spreading them evenly before topping with the halved tomatoes. Trim the edges of the tart. 


Bake the tart at 190ºC for 30 minutes or until the pastry is golden brown and the filling is set. Remove from the oven and leave to cool before serving. Top each slice with a few basil leaves.

See you all again next week with some more baking from my kitchen.

Bye for now,

Jillian
PRINT RECIPE

ricotta gnocchi with peas and mint

18 Sept 2017

You know I do cook other things don't you, not just cakes and desserts? In fact I spend all weekend cooking meals for the week ahead. As well as things I can heat up like curries and casseroles, I also like to cook things that take about 20 minutes to get onto the plate.


A few years ago my friend Vanessa asked if I'd ever made ricotta gnocchi. I hadn't but when I eventually did, I wondered why I'd ever made them any other way. You can have gnocchi in the pot in about 10 minutes flat and whilst I love potatoes, I probably love ricotta just as much. 


Apart from salt, pepper and nutmeg all you need are 4 key ingredients - eggs, parmesan cheese, flour and ricotta.


Like all gnocchi, you need to use a light hand with these and only use enough flour to stop the dough from sticking.


I don't usually bother but I decided to roll the gnocchi over a fork to make those characteristic ridges.


I made these gnocchi for my lunch on Saturday but I was faced with a dilemma. What sauce should I make to pair with the gnocchi? I make tomato based sauces all the time and I was a bit worried a tomato sauce would swamp these delicate gnocchi so I looked to Gordon Ramsay for some inspiration. I found this recipe and adapted the sauce a little by swapping mint for the thyme. I thought peas and mint sounded like the perfect combination of spring flavours.


The gnocchi only took a minute or two to cook and the sauce took about 5 minutes to put together so the gnocchi were on my plate in next to no time. If you'd like to try these for yourself, here's the recipe for you. For all my recipes I use a 250 ml cup and a 20 ml tablespoon and all eggs are 60 grams. 

Ricotta gnocchi with peas and mint - serves 4

Ingredients
500g fresh ricotta
2/3 cup grated parmesan cheese, plus a little extra to serve
2 large egg yolks, beaten
1 tsp salt
pinch of nutmeg
1 cup plain flour, plus extra if required

Sauce
Olive oil, for frying
Freshly ground black pepper
150g peas, defrosted if frozen
Knob of butter
a few sprigs of mint,  leaves only
Zest of 1 lemon

Method
Place ricotta in a fine sieve over a bowl for 30 minutes to drain off any excess liquid. Place drained ricotta in a bowl with grated cheese, egg yolks, salt and nutmeg. Add flour and mix to form a dough. Add a little extra flour if the dough is too sticky and wet. Be careful not to overwork.

Divide dough into quarters and gently roll into two-centimetre-diameter logs on a lightly floured surface. Cut into two-centimetre pieces and gently place on a lightly floured tray. Press down with back of a fork to make indents in each gnocchi. Continue with remaining dough.

To cook gnocchi, drop into a saucepan of simmering, lightly salted water and remove as soon as they float to the top, after one or two minutes. Drain thoroughly.


Sauce
Heat a frying pan over a medium-high heat and add a little olive oil. Add the gnocchi to the pan with a pinch of salt and black pepper and sauté for 1-2 minutes on each side until coloured. Add the peas and butter and season to taste. Toss, then add the lemon zest. Serve topped with the mint leaves and some grated parmesan.


So how were the gnocchi? Brilliant! The parmesan cheese in the gnocchi turned a bit crusty when fried and the peas, mint and lemon made for a lovely fresh and light sauce. I've stored some of these gnocchi in the freezer and I'll be having them again for my dinner later this week.

I hope you all had lovely weekends.

See you all again soon.

Bye for now,

Jillian

PRINT RECIPE
© DELICIOUS BITES • Theme by Maira G.