SLIDER

skye mcalpine
Showing posts with label skye mcalpine. Show all posts

upside down fig and mascarpone cake

6 Apr 2026

Sometimes my fridge is filled with bits and pieces that need to be used in a hurry. I had some mascarpone that was close to it's expiry date and in the freezer were the leftover figs from the fig galette I made a few weeks ago. I hunted through my recipe books for a recipe that used both ingredients.


I found a lovely recipe for a fig and mascarpone cake in Skye McAlpine's book, A Table in Venice. I was going to top the cake with fig slices until I found a few other recipes online that topped the cake with figs flavoured with Marsala. That sounded like a good idea to me so I decided to combine the two recipes and came up with this upside down fig cake.

Here's the recipe for you that makes a 17 cm cake. For all my recipes I use a 250ml cup and a 20 ml tablespoon, unsalted butter and 60g eggs. My oven is a conventional gas oven so if your oven is fan forced, you may need to reduce the oven temperature by 20°C.


Upside down fig and mascarpone cake – adapted from a recipe from A Table in Venice by Skye McAlpine and a recipe from Olive magazine.

Marsala figs
6 figs halved lengthways or quartered depending on the size of the figs.
2 tbs caster sugar
45 mls Marsala

Cake
125g room temperature mascarpone
100g caster sugar
1 tsp vanilla extract
2 room temperature eggs
125g self-raising flour
½ tsp baking powder
a good pinch of sea salt
4-6 fresh figs, stems removed, chopped into chunks

Method
Heat the oven to 180°C, conventional. Grease and line a 17-cm cake tin with baking paper. If using a springform tin, wrap the base with foil to prevent any leaks.

Put the halved figs into a bowl with 1 tbs of the caster sugar and the Marsala, and toss well. Set aside for 15 minutes.


In a large bowl, beat the mascarpone, sugar and vanilla together until creamy then add the eggs and mix until well combined. Sift in the flour, baking powder and salt and stir until well combined. Gently stir in the fig pieces.


Scatter the bottom of the tin with the remaining caster sugar and then arrange the fig halves, cut-side down. Carefully spoon the batter into the prepared tin and place the tin on a baking tray on the middle shelf of the oven, to catch any drips. 


Bake for 1 hour or until golden, risen and a skewer inserted into the middle comes out clean. The cake is quite delicate, so cool the cake in the tin for 10-15 minutes, before turning out onto a wire rack. 


Pour over any remaining marsala syrup and leave to cool before cutting into slices. I served my slice with a dollop of double cream.


The marsala figs are genius but I wasn't sold on the texture of the cake. I think I'll revisit the recipe using a tried and true butter cake batter for the base, so watch this space.

See you all again next week with some more baking from my kitchen.

Bye for now,

Jillian
PRINT RECIPE

pistachio butter layer cake with lemon cream cheese icing

9 Mar 2025


My next door neighbour turned 11 last week and I promised that I'd make her a birthday cake. A kind work friend sourced a very large bottle of pistachio cream a few months ago and it has been lurking in my cupboard ever since. The pistachio cream is a key ingredient in the Skye Mcalpine cake I made a few years ago,  however I couldn't find any pistachio cream at the time so I used the home made version. 


Armed with my very large jar of pistachio cream I remade the cake and decided to make it into a layer cake. As it was going to be a birthday cake, I wanted it to look a little bit fancy. I made the cake on Friday but didn't ice it until Sunday. I was a bit worried that the cake might have dried out a little, so at the last minute I made a lemon soak which I brushed over each cake layer. I then sandwiched the cake layers together with my favourite Natalie Paull lemon flavoured fluffy cream cheese icing and I piped the rest onto the top of the cake. Piping isn't my forte but a sprinkle of chopped pistachios covered up the wonky bits.

Here's the recipe for you which makes a 17cm 
cake. For all my recipes I use a 250ml cup and a 20 ml tablespoon, unsalted butter and 60g eggs. My oven is a conventional gas oven so if your oven is fan forced you may need to reduce the oven temperature by 20°C.


Cake

125g caster sugar 
125g unsalted butter, softened 
1 tsp vanilla extract 
pinch salt 
120g pistachio cream
100g plain yoghurt
2 large eggs 
150g self-raising flour

Lemon soak (Optional)
30mls water
30mls lemon juice
2 tbs caster sugar

Tiff’s Zingy lemon stuff (makes 150g)
2 small lemons
2 tbs (40ml) water 

Lemon cream cheese icing
150g full fat softened cream cheese
150g squidgy soft unsalted butter 
pinch salt
50g yoghurt powder or dried milk powder
175g icing sugar
55g Tiff’s lemon zingy stuff

To decorate

A handful of coarsely chopped pistachios
 
Cake
Heat the oven to 180°C, conventional. Grease, flour and line the base of a 17cm round tin with baking paper. Set to one side.

In the bowl of a stand mixer combine the caster sugar, butter and vanilla and mix on a low speed until light and creamy.  Add the pistachio cream and a generous pinch of salt, and beat until smooth. Slowly beat in the yoghurt and eggs until well combined. Sift in the flour and mix until you have a smooth batter.


Pour the batter into the tin and level the top with an offset spatula. Bake on the centre rack of the preheated 180°C, conventional oven for 45 minutes, then cover with a sheet of foil and bake for a further 10-15 minutes or until the cake is lightly golden on top and a skewer comes out clean when inserted into the middle. Place the cake on a cooling rack and cool for 10 minutes before unmoulding from the tin. Allow the cake to cool completely before decorating. 


Lemon soak
Combine all the ingredients in a small saucepan. Bring to a simmer over a medium heat, stirring until the sugar has dissolved. Take off the heat and cool a little before using.

Tiff’s Zingy lemon stuff (makes 150g)
Juice one lemon and place the juice in a non-reactive saucepan with the water. Trim the stalk end off the other lemon, halve it, and remove any visible seeds, then slice into thin half-moons and add to the lemon juice in the saucepan. Cover the saucepan with a lid and simmer over a low heat until all the pith is translucent. Take care the lemon doesn't catch any colour as it simmers. You can also use the microwave - cover with a lid and zap for 3 - 5 minutes on high. Cool, then whiz to a paste in a small food processor. Scrape the paste into a small container, doing a final seed check, and chill.

Icing
Place the cream cheese, butter and yoghurt or milk powder and salt in the bowl of an electric stand mixer. Sift the icing sugar over the top. Beat with the paddle attachment for 10 minutes on speed 4 (below low) until pale, and fluffy. Store covered in the fridge until needed. If refrigerated, rewarm in the microwave in 20-second bursts until softened. Finish the icing by stirring in 55g of the zingy lemon stuff. 


To assemble
Once the cake has cooled, use a long serrated knife to slice horizontally through the centre of the cake. Use the loose bottom of a cake or tart tin to slide in between the layers and lift off the top layer. Slide the bottom layer off the cooling rack and on to a serving plate or cake stand. 

Using a pastry brush gently dab the cut surface of each cake layer with the lemon soak. Place one cake layer on a serving dish and spoon 3/4 cup of the icing over the first layer. Top with the second layer and either pipe or spoon the rest of the icing over the top of the cake using the back of a spoon to smooth it out, then sprinkle over a few chopped pistachios for decoration.


Store the decorated cake in a sealed container the refrigerator but let it stand for about 30 minutes to bring it to room temperature before serving.

We did a food swap on Sunday morning. In exchange for birthday cake, I received a still hot from the oven bagel from my neighbours. How was the cake? Absolutely delicious. I'm not sure if the lemon soak was necessary but it did add a little extra lemon flavoured goodness to the cake.

See you all again next week with some more baking from my kitchen. 
 
Bye for now, 

Jillian
PRINT RECIPE

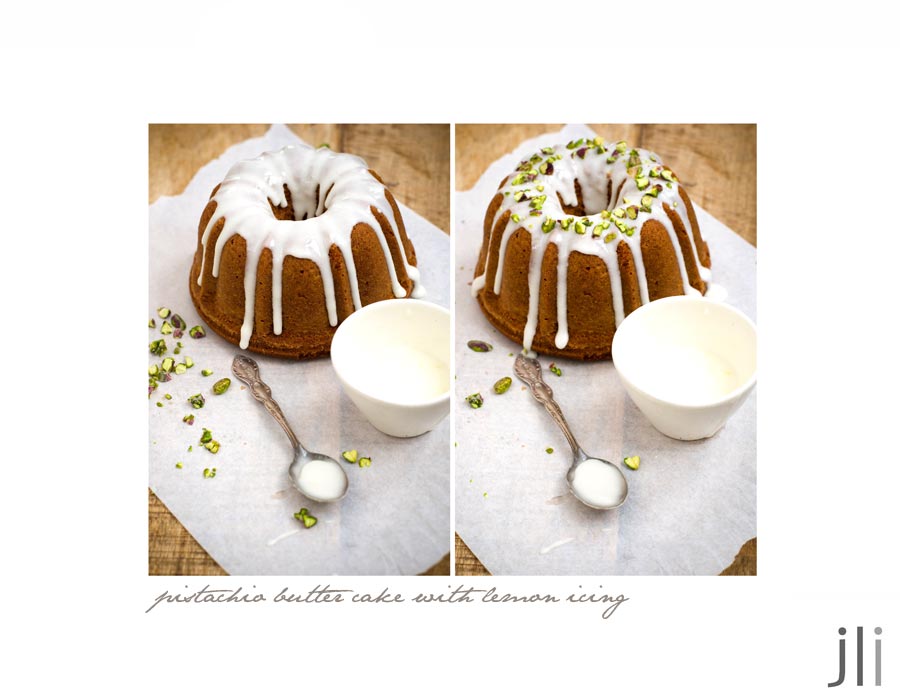
pistachio butter cake with lemon icing

15 May 2023


With a trip to Venice on the horizon, I've been devouring Skye's McAlpine's book 'A Table in Venice'. Skye often features a pistachio butter cake on her instagram page and I've been trying to track down a copy of the recipe. After scouring the internet I managed to find the recipe online. 
The recipe calls for Sicilian pistachio paste which I wasn't able to find but instructions to make your own are included in the recipe. If you can find the Sicilian pistachio paste then just add 120g to the creamed butter and sugar. 


Here's the recipe for you which makes a small bundt cake. It's adapted from a recipe which was originally published in the 
The Sunday Times Magazine. 
For all my recipes I use a 250ml cup and a 20 ml tablespoon, unsalted butter and 60g eggs. My oven is a conventional gas oven so if your oven is fan forced you may need to reduce the oven temperature by 20°C.


Pistachio butter cake with lemon icing
Pistachio butter
80g unsalted, roasted pistachios
40g white chocolate
1 tbsp caster sugar
1 tsp vanilla extract

Cake
125g caster sugar
125g room temperature unsalted butter
2 large eggs 
150g self-raising flour sifted with a pinch salt
100g plain yoghurt

Icing 
100g icing sugar
5g melted butter
Juice of 1 lemon 
A handful of pistachios, coarsely chopped
 
Method
Heat the oven to 180°C, conventional. Grease and flour a 5 cup bundt tin. Place in the fridge until needed.

In a small food processor, combine the pistachios with the white chocolate, 1 tbsp of caster sugar and the vanilla extract. Blend for 10 minutes or so until very creamy, occasionally stopping the machine to scrape the sides with a spatula. (Mine never reached this stage - it was more like a pistachio marzipan)

In the bowl of a stand mixer, cream 125g of caster sugar with the butter, then add the pistachio butter and beat until smooth. Slowly beat in the eggs and mix until well combined. Stir in the flour in batches alternating with the yoghurt  and beat until you have a smooth batter. If the batter seems a little dry, then add an extra tablespoon or 2 of milk or yoghurt.


Spoon the batter into the bundt tin and smooth the top then bake on the centre rack of the preheated 180°C oven for 45 minutes, before covering with a sheet of foil and then bake for a further 10-15 minutes or until the cake is lightly golden on top and a skewer comes out clean when inserted into the middle.


Remove the cake from the oven and cool on a baking rack for 10-15 minutes before turning the cake out of the tin. Once cooled, make the glaze. 


Sift the icing sugar into a small bowl, whisk in the melted butter and sufficient lemon juice until the icing becomes pourable: it should be the consistency of runny honey. Spoon the glaze over the cake allowing it to drip down the sides, then sprinkle over a few chopped pistachios for decoration. Leave to cool completely before serving.


Pretty easy to make and with a perfect crumb.


See you all again next week with some more baking from my kitchen.

Bye for now,

Jillian


PRINT RECIPE

Chocolate, orange and hazelnut breakfast bread

10 Apr 2023


For Easter this year I thought I might make a batch of Pan di Ramerino, Tuscan rosemary and raisin buns, however whilst looking through Skye McAlpines' book 'A Table in Venice' for food and travel inspiration, I spied a recipe for Putizza, a Slovenian bread. It looked intriguing, so instead of making a batch of hot cross buns or pan di ramerino, I decided to make this chocolate, orange and hazelnut bread. 


I've changed the technique a little from Skye's original recipe. I like to activate the yeast when making a sweet dough, just to be sure. I also made the dough, brioche style, by slowly adding butter to the base dough, then I did a few stretch and folds before resting the dough in the fridge.


Following Skye's instructions I made the dough the day before, filled and shaped the loaf, then covered the tin with plastic wrap before refrigerating it overnight. The following day, it took a few hours for the loaf to come to room temperature and to rise before I glazed and baked the bread which came out of the oven in time for brunch. 


Here’s the recipe for you which makes a 23cm breakfast bread. For all my recipes I use a 250ml cup and a 20 ml tablespoon, unsalted butter and 60g eggs. My oven is a conventional gas oven so if your oven is fan forced you may need to reduce the oven temperature by 20°C.

Chocolate, orange and hazelnut breakfast bread
Ingredients
7g dried yeast
250ml whole milk 
1 tsp caster sugar
1 large egg, lightly beaten
470g strong white flour
1 teaspoon salt
70g caster sugar 
70g salted butter, diced 
1 egg to glaze

For the filling
70g salted butter, softened
50g demerara sugar 
50g breadcrumbs
2 tbls milk
70g dark chocolate, roughly chopped
75g blanched toasted hazelnuts, roughly chopped 
Grated zest of orange 
50g raisins or sultanas, steeped in 40ml brandy or orange juice

Method
Grease a large bowl and set to one side. Combine the yeast, milk and 1 tsp sugar in a large liquid measuring cup and rest for 5 minutes or until foamy then stir in the beaten egg.

In the bowl of a stand mixer fitted with the dough hook, mix the flour, sugar and salt and stir on low to combine. Add the egg mixture and mix on low to combine until a dough has formed, about 5 minutes. With the mixer on low, add the butter, one piece at a time. When all the butter has been added, which should take a further 5 minutes, increase the speed to medium and beat the butter into the dough, until all the little butter pieces are incorporated. Transfer the sticky dough to the prepared bowl. 

Cover the bowl with plastic wrap and let rise for 30 minutes. Place your fingers or a spatula underneath the dough and gently pull the dough up and fold it back over itself. Turn the bowl and repeat this folding again. Continue 6 to 8 more times, until all the dough has been folded over on itself. Re-cover the bowl with plastic and let it rise for another 30 minutes. Repeat the folding process again then cover the bowl with cling film or a damp tea towel and 
leave in a warm place for about 1 and ½ hours, until doubled in size. I prefer to leave the dough in the fridge for at least 2 hours to firm before shaping. 


Make the filling 
Beat the butter, sugar and breadcrumbs together with an electric mixer until they form a thick paste. Add the milk and beat again until creamy. Stir in the chocolate, hazelnuts and orange zest, then cover and set to one side.

Grease a 23cm round springform cake tin with butter. Take the risen dough out of the bowl and knock the air out of it. Cut off a third of the dough and roll or stretch it out into a 23cm round. Place it in the tin, then roll out the rest of dough on a lightly floured surface until you have a rectangle, roughly 35 x 25cm. Stir the raisins and their juices into the filling and then spread it over the dough as evenly as you can taking it right up to the edges. Roll it up tightly from the longest side, then cut it into 8 – 10 roughly 4cm wide rounds. Place the rounds snugly on top of the dough in the cake tin, swirly side up. Cover with cling film and leave in a warm place for 45 minutes until nearly doubled in size or place in the fridge overnight  if you're planning to make this for breakfast.


Heat the oven to 180°C, conventional. Beat the remaining egg and brush it over the dough. Place the tin on the centre rack and bake for 40 minutes or until golden on top, then turn out onto a cooling rack. The putizza is best eaten on the day it is baked.


I had a piece or 2 of the bread, 
still warm from the oven, for brunch with a cup of tea and it was absolutely delicious. If you increased the amount of filling by 50%, I think you could make a large batch of amazing chocolate, orange and hazelnut filled scrolls from this recipe.


Next Easter I promise I'll make those rosemary and raisin buns. See you all again next week with some more baking from my kitchen.

Bye for now,

Jillian
PRINT RECIPE

spinach and ricotta pie with a cheese crust

27 Jul 2020


Julia Busuttil Nishimura's greens pie from her book Ostro has been one of the most baked items during COVID-19 lockdown. It's not too dissimilar from Skye McAlpine's recipe for spinach mint and ricotta pie so I decided to combine the 2 to make this spinach and ricotta pie with a cheese crust.


We're teetering on the brink of increased restrictions here in NSW and with it, panic buying has returned. Toilet paper and pasta are hard to find and when I went looking for frozen spinach with which to make this pie, I tried 2 supermarkets and both had sold out yet there was a glut of fresh spinach at the fruit shop. 


Instead I bought a bunch of spinach for the pie which I trimmed, washed, cooked, drained then squeezed the water out, chopped it and then remembered why I usually use frozen spinach. What a pfaff!


Here's the recipe for you adapted from A Table in Venice by Skye McAlpine and Greens Pie by Julia Busuttil Nishimura. For all my recipes I use a 250 ml cup, a 20 ml tablespoon, unsalted butter and 60 g eggs. My oven is a conventional oven so if you have a fan-forced oven you may need to reduce the temperature by 20ºC. 


Spinach and ricotta pie with cheese crust – makes a 17cm pie 
Serves 4
Ingredients
Pastry
250g plain flour
50g grated parmesan cheese
A generous pinch salt
125g cold unsalted butter, diced
⅓ cup cold water

Filling
1 tbsp extra-virgin olive oil
1 leeks, white and light green parts only, neatly sliced and washed
1 garlic clove, sliced
250 frozen spinach, defrosted or 1 bunch spinach washed and wilted as above
175g ricotta cheese, well drained
20g parmesan, grated
2 eggs
Pinch nutmeg
Sea salt and freshly ground black pepper

Pastry
To make the pastry, combine the flour, cheese and salt in a bowl. Add the butter and rub it into the flour with your fingertips until the mixture resembles breadcrumbs. Add enough cold water to make dough, bringing it together with your hands until smooth or you could do this step in the food processor. Shape the dough into a ball, wrap in cling film and chill for 30 minutes or overnight.

Meanwhile preheat the oven to 200°C. Grease a 17cm spring-form tin. Cut off ⅓ of the dough and roll out thinly on a lightly floured surface to fit the base of the spring-form tin. Using a rolling pin drape the pastry over the base cutting it to fit. Cover the pastry with a piece of baking paper, before attaching the ring. This should hold the baking paper in place avoiding the need for baking beads. Chill for 15-20 minutes then bake the base for 20 minutes until the pastry is lightly golden. Remove the tin from the oven, unclip the ring and remove the baking paper and set aside to cool while you make the filling.  

Heat the olive oil in a frying pan over a low heat. Add the leek, garlic and a pinch of salt and sauté for about 10 minutes until soft and translucent. Set aside in a large bowl. Defrost the frozen spinach in the microwave, squeezing out the excess water from the spinach before transferring to the bowl. Add the ricotta, the parmesan, 1 whole egg and half a beaten egg and the nutmeg then season and mix well. Don’t discard the egg as the remainder will be used to glaze the top of the pie. Return the mixture to the fridge while you finish lining the tin. Divide the remaining pastry in half and roll out one half thinly on a lightly floured surface. Use this half to line the sides of the tin leaving a little overhang. 

Once you’ve lined the sides of the tin return the case to the fridge to firm a little before spooning in the filling. Roll out the remaining pastry so it’s large enough to cover the tin. My spring-form tin is quite high so I folded the edges of the pastry over the filling and glazed the edge of the pastry before laying the remaining pastry over the top of the pie to form a lid. Trim off any excess pastry and use your fingers to seal the edges together. Use a sharp knife to slash 4 slits at the centre of the pie to allow the steam to escape. Brush the leftover beaten egg all over the top of the pie.

Bake the pie for 45 minutes to 1 hour or until the pastry is dark golden and the filling heated through (slide a knife into one of the slashes down to the base of the pie; it should come out feeling warm to the touch). Remove from the oven and cool for 5-10 minutes. Turn out of the tin and serve warm or at room temperature.


Parmesan cheese is one of my favourite things and it adds a little extra flavour to the pastry, which was already delicious and adding a leek to the mixture added a little extra flavour to the filling. It was definitely worth making.


See you all again next week with some more baking from my kitchen. 

Bye for now,

Jillian
PRINT RECIPE

polenta and raisin biscuits

29 Apr 2019


It's just over a week now until I leave for Europe but on Sunday I discovered my biscuit tin was empty. I was looking for something uncomplicated to bake that would tide me over until I fly out.


I'd bookmarked this biscuit recipe in Skye McAlpine's book, A Table in Venice and it looked pretty easy to put together. The cookies are made with polenta and I like to use fine polenta for baking. I'd run out but I couldn't find any at the fruit shop where I'd last bought it. Instead I found a packet of maize flour which looked pretty similar to the polenta flour I'd used in the past.


I decided to halve the recipe because there is no way I could eat 40 biscuits before I go. I needed to make a few adjustments to the recipe though maybe because of the maize flour. The mixture was really dry so I had to use more liquid than indicated before it would come together. I also added some lemon rind to give the flavour a lift and swapped the grappa for rum, because that's all I had on hand.


Here's the recipe for you with my adjustments but there is a link to the original recipe below. For all my recipes I use a 250 ml cup, a 20 ml tablespoon, unsalted butter and 60g eggs. My oven is a conventional gas oven so if your oven is fan forced you may need to reduce the oven temperature by 20°C. 


Polenta and Raisin Biscuits, adapted from A Table in Venice by Skye McAlpine  - makes 20

Ingredients
50g raisins
10ml rum
150g maize flour
100g plain flour
½ tsp baking powder
a pinch of salt
75g caster sugar
½ tsp finely grated lemon rind
1 tbsp milk
50g salted butter, diced
1 large egg, lightly beaten

Preheat the oven to 180ºC. Cover the raisins with boiling water and soak for 10 minutes. Drain, rinse then combine the raisins and rum in a small bowl and cover with a tea towel. Leave to steep while you make the dough.

Put the maize flour, flour, baking powder, salt, sugar and lemon rind in a bowl and mix well. Put the milk and butter into a small saucepan and leave over a low heat for 1-2 minutes, until the butter has melted.

Pour this mixture into the dry ingredients and then add the egg. Add the raisins and any remaining liquid to the mixture and bring everything together. You may need to use your hands to do this.

Take heaped teaspoonfuls of the dough and shape them into small ovals, roughly the size of a walnut. Arrange them on a baking sheet lined with baking parchment, leaving a little space around each one. Bake for 10-15 minutes or until lightly golden, then transfer to a wire rack to cool. 


The biscuits will keep in an airtight container for up to a week. I've only had one of the biscuits so far with a cup of tea. The biscuit wasn't  overly sweet and has a crunchy texture from the polenta. They're definitely moreish.

See you all again.

Bye for now,

Jillian

PRINT RECIPE

spinach, ricotta and mint pie

25 Mar 2019


A good friend of mine gave me a copy of Skye McAlpine's book, A Table in Venice for Christmas. It's no secret that I love Italian food and I follow Skye on instagram, so I browsed the pages with interest.


This is the first recipe I've made from the book and it was a bit of a given that I should choose this spinach, ricotta and mint pie. Spinach and ricotta is one of my favourite flavour combinations so I buy ricotta from my local fruit shop every few weeks; there is always frozen spinach in my freezer and I have a pot of mint growing on the window ledge. 


I made the pastry early on Sunday morning and did a few book-folds with the top crust to make sure it was extra flaky.


In Skye's recipe she pre-bakes the whole pastry case whilst I just pre-baked the base. I've done this many times before and it does seem to be enough to prevent the dreaded 'soggy bottom' from occurring.


As well as changing the technique a little I've adjusted the filling recipe a little to fit my 17cm tin and my indecent love for ricotta. If you double everything it will make a 23 cm pie. Skye's recipe suggested a 30 minute baking time but my pie was looking fairly pale and uninteresting at 30 minutes, so I baked it for an hour.


I had a slice of pie for my Sunday lunch. The pastry was satisfyingly short and the filling was delicious. Next time I'll add a little cooked chorizo to the mix to mirror a favourite Marcella Hazan pasta sauce.


Here's the recipe for you. For all my recipes I use a 250 ml cup, a 20 ml tablespoon, unsalted butter and 60g eggs. My oven is a conventional gas oven so if your oven is fan forced you may need to reduce the oven temperature by 20°C.

Spinach ricotta and mint pie – from A Table in Venice by Skye McAlpine

Makes a 17cm pie, which serves 4

Ingredients
Pastry
250g plain flour
125g cold butter, diced
A generous pinch salt
⅓ cup cold water

Filling
250 frozen spinach, defrosted
2 tsp olive oil
175g ricotta cheese, well draned
20g parmesan, grated
2 eggs
½ bunch mint, leaves finely chopped
Sea salt and freshly ground black pepper

Pastry
Sift the flour into a large mixing bowl. Add the butter and rub it into the flour with your fingertips until the mixture resembles breadcrumbs. Stir in the salt then add enough cold water to make dough, bringing it together with your hands until smooth or you could do this step in the food processor. Shape the dough into a ball, wrap in cling film and chill for 30 minutes or overnight.

Meanwhile preheat the oven to 200ºC. Grease a 17cm springform tin. Cut off ⅓ of the dough and roll out thinly on a lightly floured surface to fit the base of the springform tin. Using a rolling pin drape the pastry over the base cutting it to fit. Cover the pastry with a piece of baking paper, before attaching the ring. This should hold the baking paper in place avoiding the need for baking beads. Chill for 15-20 minutes then bake the base for 20 minutes until the pastry is lightly golden. Remove the tin from the oven, unclip the ring and remove the baking paper and set aside to cool while you make the filling.  

Defrost the frozen spinach in the microwave, squeezing out the excess water from the spinach before transferring to a bowl and drizzling with the olive oil. Add the ricotta, the parmesan, 1 whole egg and half a beaten egg, season and mix well. Don’t discard the egg as the remainder will be used to glaze the top of the pie. Stir in the mint then return the mixture to the fridge while you finish lining the tin.

Divide the remaining pastry in half and roll out one half thinly on a lightly floured surface. Use this half to line the sides of the tin leaving a little overhang. Once you’ve lined the sides of the tin return the case to the fridge to firm a little before spooning in the filling. Roll out the remaining pastry so it’s large enough to cover the tin. My springform tin is quite high so I folded the edges of the pastry over the filling and glazed the edge of the pastry before laying the remaining pasty over the top of the pie to form a lid. Trim off any excess pastry and use your fingers to seal the edges together. Use a sharp knife to slash 4 slits at the centre of the pie to allow the steam to escape. Brush the leftover beaten egg all over the top of the pie.

Bake the pie  for 45 minutes to 1 hour or until the pastry is golden and the filling heated through (slide a knife into one of the slashes down to the base of the pie; it should come out feeling warm to the touch). Remove from the oven and cool for 5-10 minutes. Turn out of the tin and serve warm or at room temperature.


See you all again next week with some more baking from my kitchen.

Bye for now,

Jillian
PRINT RECIPE
© DELICIOUS BITES • Theme by Maira G.