SLIDER

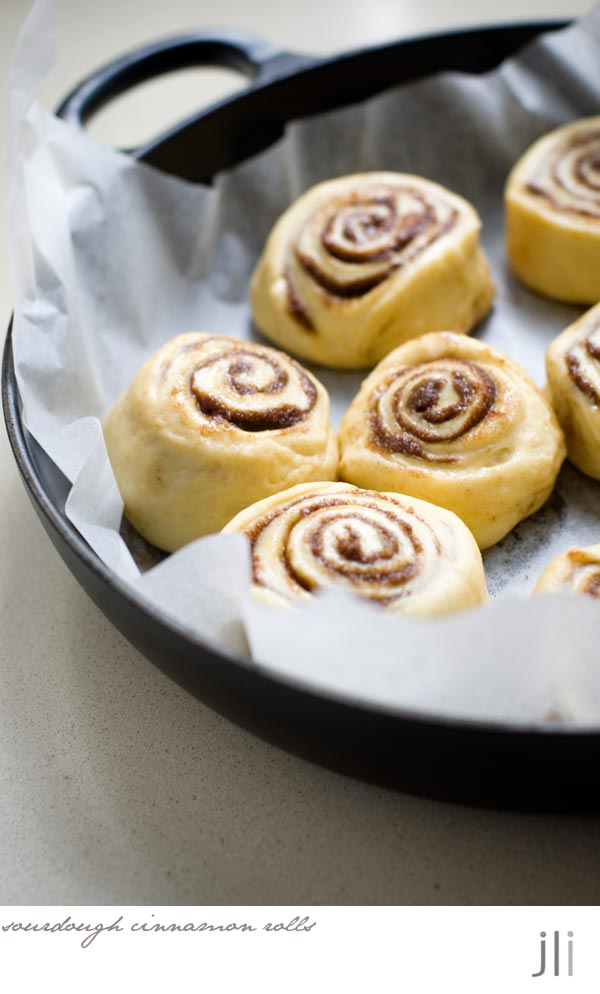
sourdough cinnamon rolls

21 Feb 2022

Now that I have an active starter I've been converting some of my favourite bread recipes into sourdough recipes. I thought I'd start with these cinnamon rolls adapted from a Sarah Keiffer recipe. I wasn't sure how much sourdough starter I'd need to use with a sweet enriched dough so I searched the internet and found a suggested figure of 30% starter to flour. I also tweaked the quantity of filling and icing a little bit because I figured you can't have too much of a good thing.

These cinnamon roll always rested overnight in the fridge so they take the same amount of time to prepare as the yeasted version. The only additional step is making sure your starter is bubbly and active and ready to use. I normally feed my starter the night before I prepare the dough so it's ready to go in the morning.

As this was my first time making a sweet roll leavened with sourdough I was a bit concerned the finished rolls might have tasted a bit too sour. I did bake an off cut and without any icing and scant filling, there was a discernable tang but once filled and topped with cream cheese icing, they tasted delicious.


Here's the recipe for you which makes 8 or 9 rolls. For all my recipes I use a 250ml cup and a 20 ml tablespoon, unsalted butter and 60g eggs. My oven is a conventional gas oven so if your oven is fan forced you may need to reduce the oven temperature by 20°C.

Sourdough cinnamon rolls
Dough
2 large eggs, at room temperature
50 mls milk warmed to 29°C
30 mls honey
1 tsp vanilla extract
255g plain flour
90g sourdough starter, fed and active
½ tsp salt
75g room temperature unsalted butter, cut into small pieces

Filling
50g unsalted butter at room temperature
100g brown sugar
3 tsp cinnamon
1 tbs almond meal
Pinch salt

Icing
30g unsalted butter 
at room temperature
60g cream cheese 
at room temperature
1 tsp vanilla
90g icing sugar, sifted
Pinch salt

Method
Place all the wet ingredients into a jug and stir to combine. Place the flour into the bowl of a stand mixer and using a wooden spoon or spatula mix in the wet ingredients. Cover the bowl and sit for 20 minutes.

Add the sourdough starter and salt to the bowl, then using the dough hook, mix for about 5-6 minutes until the dough starts to come together and all clumps have disappeared. The dough should start to pull from the sides of the bowl but it will not completely remove from the bottom. With the mixer on low, add the butter one piece at a time, waiting to add each until the previous is absorbed. When all the butter has been added, increase the speed to medium and beat the butter into the dough until all the little butter pieces are incorporated and the dough is very smooth and elastic - this could take around 8-10 minutes. The dough should feel tacky.

Scrape the dough into a greased bowl. Cover the bowl with plastic wrap and let rise for 30 minutes. Place your fingers or a spatula underneath the dough and gently pull the dough up and fold it back over itself. Turn the bowl and repeat this folding again. Continue 6 to 8 more times, until all the dough has been folded over on itself. Re-cover the bowl with plastic and let rise for 30 minutes. Repeat this series of folding 3 more times, for a rise time of 2 hours and a total of 4 foldings. Put the covered bowl into the fridge to thoroughly chill. I normally refrigerate the dough overnight and fill the rolls the following day.


The following day 
mix the filling ingredients in a small bowl to form a smooth paste then set aside. Roll the cold dough out onto a lightly floured work surface to about an 8 x 12 inch rectangle. Using an offset spatula or a butter knife spread the filling over the dough, leaving about a 1-inch (2.5-cm) border along one short side. Starting on the short side covered in filling, tightly roll the dough up into a log until you reach the end that doesn't have any butter or filling. Pinch the clean end of dough to the log to seal closed. Using a serrated knife trim the edges and then cut the dough into 8 or 9 roughly equal pieces.


Grease and line the base of a 9 by 13-inch (23 by 33-cm) pan or a 26cm round pan with baking paper. Place the rolls in the pan and cover with plastic wrap to prove somewhere warm (around 25°C) for 2 to 3 hours until increased in size by at least 50%. The dough will relax and puff up during this time. They're ready to bake when the dough feels very soft and light—give the dough additional time to prove if necessary.

While the rolls are proving, preheat the oven to 180°C, conventional. Bake the rolls on the centre rack for 30-35 minutes until lightly browned on top and cooked through in the centre.

While the rolls are baking, make the cream cheese icing. Cream the butter, cream cheese and vanilla together either with a wooden spoon or with a hand mixer until light and fluffy. Add the icing sugar and a pinch of salt and mix until completely combined. 


When the rolls are golden, transfer the pan to a wire rack and let cool for 5 minutes. Using an offset spatula or table knife, apply a thin layer of the cream cheese icing, using about one-third of the mixture. Let the rolls cool for another 15 to 20 minutes then top with the rest of the icing and serve.


These rolls didn't last very long. Thankfully I still have one stashed away in the deep freeze for a rainy day. 

See you all again next week with some more baking from my kitchen. 

Bye for now, 

Jillian
PRINT RECIPE

marzipan plum cake

As it's plum season here in Sydney I made my annual plum cake. You, dear readers, really seem to like plum cake and this recipe is one of my most visited. This year I thought I'd mix it up a bit and try out a new recipe.


I used a Mikkel Karstad recipe as my inspiration and topped the cake with plums instead of the apples used in the original recipe. Good quality marzipan is hard to find in Sydney so I decided to make some using this Trine Hahnemann recipe from her book, Scandinavian Baking. I wasn't sure whether to use raw almonds or blanched almonds to make the marzipan so I used half and half.


The cake is made entirely in a food processor so it's really easy to whip up. Here’s the recipe for you which makes a 17cm cake. For all my recipes I use a 250ml cup and a 20 ml tablespoon, unsalted butter and 60g eggs. My oven is a conventional gas oven so if your oven is fan forced you may need to reduce the oven temperature by 20°C. If you'd like to make an 8 inch cake then refer to the linked recipe for quantities but extend the cooking time because plum cakes take a long time to bake.


Plum and marzipan cake - adapted from a Mikkel Karstad recipe from Copenhagen Cult Recipes by Christine Rudolph and Susie Theodorou.
Marzipan
100g almonds
20g icing sugar, plus more to dust

Method
Whizz the almonds in a food processor until they become a paste. Add the icing sugar, whizz again, then add 10ml of water and whizz for a final time. This makes about 130g marzipan.

Ingredients
6-8 plums, pitted then quartered
½ tsp ground cinnamon
1 tbs raw sugar
125g unsalted butter, softened
125g soft brown sugar
1 tsp vanilla extract
125g marzipan, chopped
2 eggs
¼ cup plain flour
Pinch salt
Finely grated zest of 1 lemon
1 tbs raw sugar, for topping the cake
Crème fraîche or double cream, to serve

Method
Preheat the oven to 180°C, conventional. Grease and line the base of a 17cm tin with baking paper. In a bowl, toss the plum slices with the cinnamon and sugar, then leave for at least 20 minutes. 


Meanwhile, add the butter, sugar and vanilla to the marzipan in the food processor and process until smooth. Gradually add the eggs, then the flour, salt and lemon rind. Spread the batter into the prepared tin and top with the plum slices then sprinkle over the extra tablespoon of raw sugar. Bake for 1 hour or until set and the fruit has caramelised. If the fruit is browning too much, cover with foil and cook the cake until set in the centre.


Cool for 1 hour then serve warm or at room temperature with crème fraîche or cream. 

There is no rising agent in the cake so it's quite dense. I took the leftovers into work and it was declared ' sensational'. Whilst still warm it's a bit more pudding than cake but as it's so delicious, I just know I'll be making this cake again. 
 
See you all again next week with some more baking from my kitchen. 
 
Bye for now, 
 
Jillian
PRINT RECIPE

olive sourdough loaf

12 Feb 2022

As you know, I fell down the sourdough rabbit hole at Christmas time. Once I managed to get a viable starter it seemed silly not to keep using it. However I really don't eat much bread so I only bake a loaf every week or two. I start the process Friday night when I feed my starter; I prepare the dough on Saturday then bake the loaf on Sunday. I slice the bread the day it's baked, freeze it and defrost the slices as needed.

Last year a workmate introduced me to the delights of sourdough olive bread. I've been using the Tivoli Road Baker recipe book as my sourdough resource and as soon as I spied the picture of their olive loaf I knew I had to make it. 


Every time I make sourdough bread I'm convinced it will be a disaster. As I'm still a novice, I find the sticky dough a bit hard to wrangle so I reduce the water quantity in the dough to a level I can just about manage. I downsized the recipe to make a smaller loaf and as I don't own a proving basket, I proved the bread in a loaf tin. The loaf tin was a bit too big for the amount of dough so when I turned out the loaf it looked a bit sad and flat. 
 
 
However once in the oven the magic happened and before too long I had an pretty nice looking loaf of olive bread. I managed to exert self control and waited for the bread to cool down before slicing into it and it was just perfect!
 

If you'd like to make your own sourdough olive bread, here’s the recipe for you which makes a medium size loaf. For all my recipes I use a 250ml cup and a 20 ml tablespoon, unsalted butter and 60g eggs. My oven is a conventional gas oven so if your oven is fan forced you may need to reduce the oven temperature by 20°C.

The marinated olive recipe makes more than you need. Just keep any leftovers in the fridge then bring them to room temperature before using.

Sourdough olive bread, adapted from the Tivoli Road Baker
Marinated Olives
125g green olives, pitted 
125g black olives, pitted
1 sprig rosemary leaves picked and coarsely chopped
1/2 tsp dried thyme leaves
1 sprig oregano leaves picked and coarsely chopped
1/2 lemon, zested and quartered
2 tsp extra virgin olive oil

Method
The day before you mix the dough, drain the olives well and put them in a bowl with all the marinade ingredients. Mix to combine, cover and leave at room temperature to marinate overnight.

Tapenade
Before you mix the dough, place 75g of olives from the marinade in a blender and blitz until you have a coarse paste. The coarse chunks will add texture and give the bread an extra olive hit. Place in a fine sieve over the sink to drain any excess liquid and then mix to combine with 100g of marinated olives.

Starter Build
40g starter
20g baker’s flour
20g wholemeal flour
40g water

Method
Around 4–6 hours before you plan to mix your dough, combine the starter, flours and water for the starter build, mixing well to combine. You will use 70g of this for the dough; retain the rest for maintaining your starter.

Dough
70g starter
250g baker’s flour
70g wholemeal flour
200g water
6g salt
100g marinated olives
75g tapenade
15g baker’s flour
15g semolina

Method
At least 30 minutes before you plan to mix the dough, combine the flours and water in a large mixing bowl. Mix them with your hands until thoroughly combined, and then cover with a damp cloth and set aside for the autolyse.

When the starter is ripe and bubbly, mix it with the flour and water, sprinkle over the salt and finish mixing the dough. I normally use my stand mixer and mix for 5 minutes using the dough hook. Cover with a damp cloth and set aside in a warm place for at least 30 minutes, before your first set of folds

Dust the remaining olives with some of the flour and semolina to coat. This will make it easier to incorporate them into the dough and distribute them evenly. As you do the first turn and fold add the olives and the tapenade, ensuring they are evenly distributed. Complete three sets of folds, resting the dough in between each one for 30–45 minutes. After your last set of folds, cover the dough with a damp cloth and leave to prove at room temperature for 2–3 hours.

Scrape the dough onto the bench; pre-shape the dough, cover with a damp cloth and leave it to rest on the bench for 15–20 minutes. When the dough has relaxed, shape the dough as desired, then place it seam side up in a lightly floured proving basket. Cover with a damp cloth and place in the fridge overnight, until ready to bake.

An hour before you plan to bake the loaf, place a Dutch oven onto the centre rack of your oven then heat to it's maximum temperature. When it's time to bake, invert the loaf onto a piece of baking paper; lightly dust the top of the loaf with semolina then score a few times with a razor blade or a sharp knife. 
 

Carefully place the loaf into the Dutch oven using the baking paper as a handle and place the lid on top. Bake the loaf for half an hour with the lid on, and then remove the lid and bake for a further 20-30 minutes or until you have a nice golden crust. Once baked, tip the bread out of the pan onto a wire rack to cool completely before slicing.
 
 
It's delicious as is or served topped with cream cheese and smoked trout and it also made a killer toasted cheese and tomato sandwich!

See you all again next week with some more baking from my kitchen. 

Bye for now, 

Jillian

PRINT RECIPE

apricot and cream cheese yeasted cake

7 Feb 2022


You know the old saying that a camel is a horse designed by a committee? The same might hold true for this cake. I had a batch of Sarah Keiffer's gooey cinnamon roll dough in my freezer. I had apricots in the fridge which I'd planned on freezing but then wondered if I could combine the 2 things into a single item. 


I checked through my cookbooks and found 2 yeasted apricot recipes that appealled.The first was Julia Busuttil Nishimura's apricot yeasted cake whilst the second was Claire Saffitz's recipe for apricot and cream brioche.

 
I didn't have any creme fraiche but I had cream cheese in my fridge so I decided to go down the Claire Saffitz route. I used the cream cheese filling from an apple galette recipe I made a few years ago and rather than honey syrup, I made a batch of vanilla syrup. 

Would all the disparate elements fall in line to make a delicious dish I asked myself? There was only one way to find out. I defrosted the dough, mixed the filling, sliced the apricots and gave it a whirl.
 

Ideally you'll need to start the recipe the day before serving and the cake is best served the day its made. Here’s the recipe for you which makes a 23cm cake. For all my recipes I use a 250ml cup and a 20 ml tablespoon, unsalted butter and 60g eggs. My oven is a conventional gas oven so if your oven is fan forced you may need to reduce the oven temperature by 20°C.

Apricot Cream Cheese Yeasted Cake
Dough
2 large eggs at room temperature
90 mls milk, lukewarm
30 mls honey
1 tsp vanilla extract
2 cups (300g) plain flour 
1 tsp yeast
½ tsp salt
75g room temperature unsalted butter, cut into small pieces 

Vanilla Syrup
40g sugar
40mls water
½ tsp vanilla bean paste or ½ vanilla bean, seeds scraped

Cream Cheese Filling
125g cream cheese, at room temperature
1½ tbs caster sugar
½ tsp vanilla
1 egg, lightly beaten

Topping
12 apricots, halved pitted then quartered
¼ cup caster sugar
1 tsp finely grated lemon rind

Dough
Grease a large bowl. Combine the eggs, milk, honey and vanilla in a large liquid measuring cup.

In the bowl of a stand mixer fitted with a paddle, mix the flour, yeast, and salt and stir on low to combine. Add the egg mixture and mix on low to combine. With the mixer on low, add the butter, one piece at a time. When all the butter has been added, increase the speed to medium and beat the butter into the dough, until all the little butter pieces are incorporated, 1 minute. Transfer the dough to the prepared bowl. The dough will be very sticky and you will need a spatula to scrape the dough into the bowl.

Cover the bowl with plastic wrap and let rise for 30 minutes. Place your fingers or a spatula underneath the dough and gently pull the dough up and fold it back over itself. Turn the bowl and repeat this folding again. Continue 6 to 8 more times, until all the dough has been folded over on itself. Re-cover the bowl with plastic and let rise for 30 minutes. Repeat this series of folding 3 more times, for a rise time of 2 hours and a total of 4 foldings. Tightly cover the bowl with plastic wrap and refrigerate overnight.

Vanilla Syrup
Place the sugar and water into a small saucepan. Place over a medium heat and stir to dissolve the sugar. Bring the mixture to a boil then lower to a simmer and simmer for 2-3 minutes or until the mixture has slightly thickened. Take off the heat and stir through the vanilla bean paste or vanilla pod and seeds. Allow to cool completely before using.

Assembly
Flour a work surface and knead the dough 10 to 12 times to activate the gluten. Shape the dough into a ball, cover the top lightly with flour, and cover with a tea towel and let come to room temperature.

Grease a 23cm springform tin and line the base with baking paper. On a lightly floured surface, roll the dough into a 26cm circle. (Do not flour top of dough.) Lift the dough and place it over the base of the springform tin, making sure the dough is even and completely covers bottom of the tin. Fold and press the outside edges in a diagonal pattern to create a crimped edge then clip the sides to the base of the tin. Cover and leave in a warm place for 45 minutes or until puffy.

While the dough is rising, preheat the oven to 180°C, conventional. In a small bowl mix the cream cheese with the sugar, the vanilla and a tablespoon or two of the beaten egg to form a smooth paste, then spread in a thin layer over the dough. Arrange the apricot slices decoratively over the cream cheese.


In a small bowl combine the sugar with the lemon rind. Sprinkle most of the sugar mix over the apricots, leaving a little to sprinkle over the edge of the pastry. Brush the edges of folded over dough with the remaining beaten egg before sprinkling with the sugar mix. 

Place in the preheated oven and bake for 35-45 minutes or until the apricots are soft and the dough is risen and golden. Once the tart comes out of the oven, gently brush the vanilla syrup over the whole tart, repeating every 10 minutes until all the syrup has been absorbed. 
 
 
The tart is best served on the day it’s made but can be refreshed in the microwave for 10 seconds the next day.
 

My neighbour really enjoyed my 'experiment' and thought the cake was a bit panettone like.
 
 
The topping for the cake is really delicious but I thought there was a bit too much dough for the filling. Next time I'd make it using a pizza tray adding perhaps 50% more filling for a better balance. Otherwise the cream cheese and apricot combination would make a killer gallete filling and I'm hoping I get the chance to make one before the apricot season has ended.
 
See you all again next week with some more baking from my kitchen.

Bye for now,

Jillian


PRINT RECIPE
© DELICIOUS BITES • Theme by Maira G.