SLIDER

almond butter banana bread

26 Jul 2021

Sydney is back in lock-down and although I have sourdough starter in the fridge, instead of sourdough bread I thought I'd make that other lock down staple, banana bread. First I had to wait a week for my bananas to get really brown and the mashed banana is now loitering in the deep freeze.
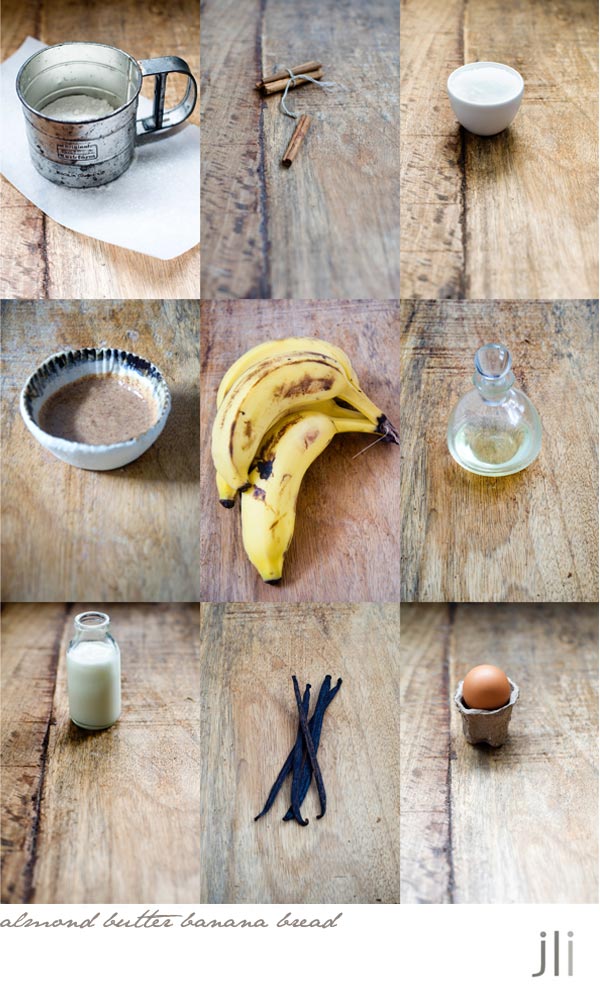
With my barely used copy of Dessert Person sitting on the shelf and a bottle of almond butter in the cupboard, what else could I do but make a loaf of Claire Saffitz's almond butter banana bread? 
Banana bread is called a quick bread for good reason. It takes longer to line the tin and measure out the ingredients than it takes to construct the cake. I made a few changes to the recipe, sunflower oil for coconut oil and cinnamon for cardamom because of personal preference and buttermilk for yoghurt because I was low on yoghurt.
The sugar crusted almond butter swirl is a thing of beauty and a really tasty addition.
I made a half batch of the batter and baked the banana bread in my mini loaf tin. I'm currently taking a break from work and we're in lockdown so the gym is shut. I need to make small batch items and practice portion control otherwise those COVID kilos will creep up on me. Thankfully my next door neighbours are happy to accept socially distanced care packages and the rest of the loaf is sliced and in the freezer.
Here's the recipe for you which makes a small, 8 x 17 cm loaf. For all my recipes I use a 250ml cup and a 20 ml tablespoon, unsalted butter and 60g eggs. My oven is a conventional gas oven so if your oven is fan forced you may need to reduce the oven temperature by 20°C. If you'd like to make a larger loaf, then double the quantity of ingredients and the bake time should stay the same.
Almond butter banana bread, makes a small loaf – adapted from a Claire Saffitz recipe.

Almond butter swirl
1 tbs (22g) almond butter
2 tsp caster sugar
½ tsp neutral oil 
 
Cake
⅔ cup plain flour
½ tsp baking powder
generous pinch flaky salt
¼ tsp bicarb soda
½ tsp cinnamon
1 large egg, cold from the refrigerator
⅓ cup caster sugar
½ cup (112g) mashed banana (from very ripe bananas) approximately 1 large banana
¼ cup plain, whole-milk Greek yoghurt or buttermilk
1 tsp vanilla extract
2 tbs (44g) almond butter
¼ cup neutral oil
¼ cup unsalted roasted chopped almonds (optional)
 
Method 
Place the oven rack in the centre of the oven then preheat the oven to 180º C, conventional. Grease then line a small loaf pan, base measuring 8 x 17 cm, with baking paper. Line the bottom and two longer sides with a piece of parchment paper, leaving an overhang of 2-3 cms on each side, and set the pan aside.
 
Almond butter swirl 
Stir together all the ingredients in a small bowl and mix until smooth. Set mixture aside.
 
Cake 
In a large bowl, whisk together the flour, baking powder, salt, bicarb soda and cinnamon. Set aside.
 
In a jug, whisk the egg to break up the yolk and white. Add the remaining ⅓ cup sugar and whisk vigorously until the mixture is smooth and slightly thickened, about 30 seconds. Add the mashed banana, Greek yoghurt, vanilla, 2 tbs almond butter and ¼ cup oil and whisk vigorously until the mixture is smooth (some banana lumps are OK).
 
Pour the banana mixture into the bowl with the flour mixture and whisk gently, just until you have a smooth batter with no dry spots. Add the almonds (if using) and fold the batter with a flexible spatula, scraping the bottom and sides of the bowl to make sure everything is well incorporated. 
 
Scrape the batter into the prepared pan and smooth the top. Dollop teaspoons of the reserved almond butter mixture all across the top of the batter and then use a toothpick or chopstick to drag figure eights across the surface, making a swirl pattern. 
 
Place in the preheated oven and bake until the top has risen and split and a cake tester or toothpick inserted into the centre comes out clean, 50-60 minutes. Remove the banana bread from the oven and set aside to cool in the pan for at least 20 minutes.
When cool, use a paring knife or small offset spatula to cut between the cake and the pan along the shorter sides. Use the parchment paper to lift out the banana bread and let it cool completely on a wire rack before slicing. 
 
Makes one small loaf which, if well wrapped, will keep for 4 days. As expected, this banana bread is really, really good so good in fact that next time I make this I'll make a slightly larger loaf because bigger is better.
See you all again next week with some more baking from my kitchen.
 
Bye for now,
 
Jillian
 
 
PRINT RECIPE

oven roasted pumpkin soup

21 Jul 2021


I don't know about you, but I've been spending a lot of time at home lately. So instead of my usual meat and salad roll for lunch I've decided to slow down and prepare my lunch. I've been making soup for lunch which I then serve with home made bread and this week, I also made a cauliflower cake.

This roast pumpkin soup is so delicious, I thought I'd share the recipe with you. Normally I top the soup with just a swirl of yoghurt but this week I fancied up the bowl with some fried eggplant a la Julia Nishimura and instead of yoghurt, I did a swirl of tahini. If you make the soup with oil and vegetable stock and top it with a tahini swirl, the soup becomes vegan.


Here's the recipe for you which serves 4. For all my recipes I use a 250ml cup and a 20 ml tablespoon.

Roast pumpkin soup
1½ tbsp olive oil
3 cloves garlic, unpeeled
750g butternut or Jap pumpkin, halved and skin on
Salt, black pepper and chilli flakes
1 tbs butter or oil 
1 medium onion, coarsely chopped 
1 medium carrot, peeled and coarsely chopped 
1 medium potato, peeled, chopped
2 cups chicken or vegetable stock
1 cup water
 
To serve
Plain yoghurt or tahini
coriander leaves
toasted flaked almonds
fried eggplant (optional) 
 
Fried eggplant (optional)
2 tbs plain flour
1 tsp ground cumin
pinch of sea salt 
1 small eggplant (about 200 g), cut into 1.5 cm cubes
vegetable oil, for shallow-frying
 
Method 
Preheat oven to 200°C /180°C fan-forced. Line a large baking tray with baking paper. Place pumpkin and garlic in a bowl. Add oil then season with salt, pepper and chilli flakes and toss to coat. Arrange pumpkin mixture, in a single layer, on prepared tray. Bake for 1 hour or until pumpkin is golden and fork tender. Leave to cool in the turned off oven.
 
Melt butter in a large saucepan over medium-high heat. Add onion and carrot and cook stirring for 5 minutes or until the onion has softened. Squeeze garlic cloves from skin and add the garlic to the pan. Add potato, stock and 1 cup cold water. Cover then bring to the boil. Reduce heat to medium-low and simmer for 15 minutes or until potato is tender. Scrape the pumpkin from the skin and add to the saucepan. Cook for 10 minutes, or until heated through. Set aside for 5 minutes to cool slightly then using a stick blender, blend pumpkin mixture until smooth. Return to pan over low heat while you prepare the eggplant.
 
Fried eggplant
Combine the flour, cumin and salt in a small bowl. Toss the eggplant in the seasoned flour and shake off any excess. Heat 2 cm of oil in a small saucepan or frying pan over a medium heat and fry the eggplant in batches until golden and soft on the inside. Remove with a slotted spoon and drain on paper towel.
 
Ladle the soup into bowls, top soup with some yoghurt or tahini, fried eggplant cubes and some coriander and slivered almonds. Sprinkle with a few salt flakes just before serving.


See you all again next week with some more baking from my kitchen. 

Bye for now,

Jillian

PRINT RECIPE

semolina coconut and marmalade cake

19 Jul 2021


Just before we went into lockdown in Sydney, I borrowed the cookbook 'Jerusalem' by Ottolenghi and Sami Tamimi from my local library. I photocopied a few recipes and returned the book whilst I still could.

This recipe for a semolina coconut and marmalade cake resonated with me for a number of reasons. We're deep into winter here so apart from apples and pears, citrus abounds in the fruit shop. The cake looked simple to make which also appealled to me. It's an Ottolenghi recipe so I knew it would be bursting with flavour and I had just about everything I needed to make the cake without a trip to the shops. I fished out the almost finished bottle of mandarin marmalade and the dregs of the blood orange marmalade and had just enough marmalade to make the cake.

 
The cake is quick to put together and because I decided to make the cake in a bundt tin, it only took 30 minutes to bake.
 
Here's the recipe for you which makes a small bundt cake (5 cup capacity). For all my recipes I use a 250ml cup and a 20 ml tablespoon, unsalted butter and 60g eggs. My oven is a conventional gas oven so if your oven is fan forced you may need to reduce the oven temperature by 20°C.
 
Semolina, coconut and marmalade cake - adapted From Jerusalem by Yotam Ottolenghi and Sami Tamimi 
Ingredients
90ml sunflower oil
125ml orange juice 
80g orange marmalade (ideally fine-cut, without peel) 
2 eggs 
2 tsp grated orange zest 
35g caster sugar 
35g desiccated coconut 
45g plain flour 
pinch sea salt flakes
90g semolina 
1 tbsp ground almonds 
1 tsp baking powder 
thick Greek yoghurt, to serve 
 
Soaking syrup 
100g caster sugar 
1 tbsp water 
75mls orange juice 
 
Method 
Grease and flour a 5 cup bundt tin then place in the fridge. Preheat oven to 180ºC conventional. 
 
 
In a large jug, whisk together oil, orange juice, marmalade, eggs and orange zest until marmalade is dissolved. I used my stick blender for this step as my marmalade was a bit chunky. In a separate bowl, mix together all the dry ingredients. Add the wet ingredients to the dry ingredients and mix until all is well combined. The mixture should be runny. Pour the butter into the prepared tin. 
 
 
Bake for 30-35 minutes at 180ºC conventional, or until a skewer inserted in the top comes out clean and cake has turned an orangey-brown on top. 
 
Near the end of the baking time, place the sugar and water in a small saucepan and bring to the boil, stirring until the sugar has dissolved. Stir in the orange juice and simmer for a minute then remove from the heat. As soon as the cake comes out of the oven, pour over a few tablespoons of the syrup allowing it to fully absorb. 
 
After 10 minutes gently ease the cake from the tin and unmould onto a cooling rack. Use a pastry brush to brush the cake all over with the hot syrup. You'll need to do this in a few goes, sometimes waiting a minute or two before the syrup is absorbed. Make sure you use all the syrup.


When cool, slice thickly and serve with Greek yoghurt. I found some candied orange rind lurking in the fridge so I decorated the cake with a few strands.
 
I shared the cake with my neighbours and it received the thumbs up. I had a slice with a cup of tea and as expected it was delicious, redolent with coconut, orange and sticky with syrup.
 
See you all again very soon with some more cooking from my kitchen.
 
Bye for now,
 
Jillian
PRINT RECIPE

chocolate tahini buns

11 Jul 2021


Last year during the U.K. lockdown, Honey and Co had to close their London restaurants. As well as take away meals they sold diy Fitzrovia bun kits and produced a video illustrating how to make the buns at home. As well as the ingredients to make their gorgeous fitzrovia buns, the kit also included ingredients to make half a dozen chocolate tahini sesame buns.


I have the Honey and Co bun dough recipe (see below) but didn't have a recipe for the chocolate tahini filling. The buns looked really good though and once I found some chocolate tahini spread (harder than it sounds) I set to work and whipped up my own version of these buns. Not every recipe works out first time but these buns were a winner. I shared a few with my neighbours and tucked a few in the deep freeze for later.


I made the buns over a 2 day period. I rested the dough overnight but it's winter here in Sydney so after I shaped the buns it took a few hours before they'
risen enough to bake. Instead of breakfast buns they became after lunch buns.


If you'd like to make a batch of chocolate tahini buns, here's the recipe for you which makes 6-8 buns. For all my recipes I use a 250ml cup and a 20 ml tablespoon, unsalted butter and 60g eggs. My oven is a conventional gas oven so if your oven is fan forced you may need to reduce the oven temperature by 20°C.

Chocolate Tahini Buns inspired by Honey and Co

Dough

70 g unsalted butter, diced and at room temperature

1½ tsp dried yeast

1 egg

30 g caster sugar

80–100 mls milk

300 g (2 cups) plain flour

A pinch of table salt


Method
Place the butter, yeast, egg, sugar and 80 mls of the milk in a large mixing bowl, then top with the flour and salt. Use the dough attachment on your mixer or your hands to bring it all together to a smooth, shiny dough, adding the remaining 20 mls of milk if it looks dry. Don’t worry too much if you still have some whole flecks of butter running through the dough; they will make your final bun super-light.
 
Once the dough has a nice texture to it (after about 2–3 minutes with an electric mixer or 5–6 minutes working by hand), wrap the bowl in plastic wrap and place in the fridge to chill for at least 2 hours. You can leave it there for up to 12 hours, but not much longer or it will start to double in size.
 
Filling
½ cup chocolate tahini spread 
65g dark chocolate, coarsely chopped 
65g halva, crumbled
Sea salt flakes
 
Topping 
1-2 tbs melted butter or cream 
2 tsp sesame seeds 
1 batch base sugar syrup (recipe follows)
 
Base sugar syrup

75 mls water

75g caster sugar

2 tsp (10 mls) honey


Method

Remove the dough from the fridge and roll out with a rolling pin on a very lightly floured workbench to a rectangle about 12 inches x 8 inches. You may need to flip the dough over once or twice to get an even, smooth sheet, but try to work with as little flour as you can so as not to dry the dough out.


Lay the rectangle length-ways in front of you and spread the tahini in a thin layer all over. Sprinkle with the halva and chopped chocolate at regular intervals on top. Finish with a few salt flakes then fold over the short edges to contain the filling before you start rolling.


Lift the long edge of the dough closest to you and start rolling it up away from you, keeping it nice and tight without stretching the dough, until you end up with a sausage about 12 inches long. If it comes out a little longer, push it in from both ends to condense it a little; if it comes out shorter, then use your hands to roll it out a little until it reaches 12 inches. Refrigerate for about 20 minutes to firm up the filling then cut into six, seven or eight even-sized slices, depending on how many buns you want.


Line a round tin with a piece of baking paper so that it comes up the sides in one piece, and lay the buns flat on the base, spiral facing upwards. This is the time to freeze the buns if you want to bake them at a later date; otherwise leave them in a warm place.


Preheat the oven to 220°C conventional. Allow the buns to continue rising until they look about ready to explode (another 20 minutes or so). The dough should have expanded to fill the gaps and it should be shiny and taut. Brush with the melted butter or cream and sprinkle the sesame seeds over the top of the buns.


Place in the centre of the oven and immediately reduce the oven temperature to 200°C. Bake for 10 minutes, and then turn the tin for an even bake. Reduce the temperature to 190°C, conventional. Bake for another 10 - 15 minutes or until the top of the buns are golden brown. Remove from the oven and pour all the sugar syrup over the buns. Allow to cool slightly before devouring.


While the buns are baking, prepare the syrup. Place all the ingredients in a small pan and stir to dissolve the sugar. Bring to the boil, skim off any foam that comes to the top and remove from the heat. If you are making a larger quantity (a litre or more), bring to the boil, skim and cook for 3–4 minutes, then allow to cool. You can make this syrup in advance — just keep it in a jar or bottle in the fridge for up to 2 weeks.


Here are a few guidelines to working with this dough from Sarit Packer:

·     Allow at least 2 hours to refrigerate it before shaping, as it can be very soft when freshly made. Ideally, if you plan ahead, make the dough the day before, place it in a large bowl, cover and refrigerate overnight.


·    Try to work it with as little additional flour as you dare. The end product will benefit greatly.


·     Have all your fillings ready before you start on the dough. It also helps if you have your tray lined in advance.


·     If you are going to bake after shaping, leave the buns at room temperature to prove. If you are preparing in advance, freeze the unbaked buns as soon as they are shaped (to preserve as much yeast activity as possible when you send it to sleep in the freezer).


·     You can shape the buns in the evening, place them on the baking tray and pop them in the fridge to proof slowly overnight and bake first thing in the morning (a good way of making your partner or guests indebted to you for the rest of the day/week/year).


·     Filled buns will keep for up to a week in the freezer but after that they start to deteriorate and lose their plumpness.


·     Always freeze unbaked dough uncovered on a tray, then (once frozen) you can transfer to a container or freezer bag or wrap the tray with plastic wrap. When you are ready to bake, thaw overnight in the fridge before taking out to proof in the morning (or if you only sleep 5–6 hours, simply leave them out at room temperature, and when you wake they should be ready to bake).


The buns are at their best still warm from the oven, so the next day I just reheat them for 10 seconds in the microwave prior to serving so the chocolate has a chance to melt a little. These buns are a bit sweet, a bit savoury and simply delicious. 

See you all again soon with some more cooking from my kitchen. 

Bye for now, 

Jillian

PRINT RECIPE

mayfield garden

8 Jul 2021

Have you been to Mayfield Garden before? One of my friend's visited the Garden a few years ago and she told me about her visit because she knows I love a good garden. It's only taken me about 3 years to finally get there.
The garden is located outside Oberon so it's a few hours drive from Sydney. When I decided to go to the Blue Mountains, visiting Mayfield was high on my list of things to do. It worked out best to visit the garden on my return journey from Orange.

I thought the garden was relatively new but as soon as I drove into the car park, it was clear to me this was a well established garden. You're given a map on arrival and it takes about 1 and 1/2 hours to complete the circuit of the garden.


You enter the garden through the hydrangea walk. I happen to love hydrangeas that are past their prime. I have a faded hydrangea in a vase on my bedside table but I can only imagine how magnificent the hydrangea walk would look in spring. 
I always find winter gardens interesting because they can't rely on colour to keep your interest. Instead you need to concentrate on the form of the gardens and an appreciation of lines and shapes.
Mayfield garden is filled with all of those things and more - bridges, walks, grottoes, arches, lakes and ponds.
Flowers may not have provided much colour but the same couldn't be said for the leaves. That copper colour is almost too good to be true.
The copper fountain topped with a Rosella.
Somehow it managed to stay still long enough for me to take a photo.
A rare glimpse of colour.
I loved the Obelisk Pond and took quite a few photos. It was very serene and reminded me a little of Washington Monument in D.C.
The red bridge is clearly an homage to Monet's Garden at Giverny but thankfully without the masses. I'd love to return to Mayfield in the Spring.
I wasn't the only visitor to Mayfield that day but I did arrive quite early and as it's such a large garden, I pretty much had the run of the place.
The water gardens are definitely one of Mayfield's highlights.
Just look at the colours! 

I hope you enjoyed my little visit to Mayfield Garden. I can't wait to revisit the garden in spring.

That's the last of my images from my mini break to Orange and the Blue Mountains. I did take some black and white film away with me but due to lock down I've been unable to finish off the roll of film. Once that's done expect a few black and white images to appear on the blog. 

Anyway, I'll see you all again next week with some more baking from my kitchen.

Bye for now,

Jillian

PRINT RECIPE

carcoar and millthorpe

7 Jul 2021

On my second day in Orange I drove to Carcoar and Millthorpe, 2 historic villages in the region. Carcoar styles itself as the town that time forgot and it's also home to Paralympian Kurt Fearnley.

Carcoar has barely changed since my last visit except for the addition of a restaurant, a coffee shop and Tomolly where I met it's delightful owner, Belinda Satterthwaite.


 Carcoar has some great old buildings to photograph but let's return to Tomolly. 


Tomolly is filled to the brim with all things lovely.

So many beautiful things, including this bouquet of dried hydrangea.
Filled with lovely home wares, linen, ceramics and gifts, Tomolly is certainly worth a detour off the highway.
I took another little wander down the main street before I drove over to Millthorpe. I stayed in Millthorpe for a few days during my last visit, so the streets were familiar to me. The town is filled with lots of lovely old commercial buildings, many of which have been turned into residences.
I was really taken with this old bank building.
The house in which I last stayed was just around the corner from the school so I dropped by. The old school house was unchanged but the school itself had grown.
Millthorpe is home to the hatted restaurant Tonic, which can be found on Pym Street.
This gorgeous old car was parked outside the restaurant.
Orange is a cool climate wine region and many cellar doors can be found in Millthorpe.
Drinking and driving don't mix so I passed them by and instead focused on the buildings in which they were housed.
I found this old bench outside an antique store
and in keeping with vintage, I found this old Citroen 2CV parked outside.
This 'fixer-upper' was for sale but I decided it was a bit too much work for me so passed.
Beautiful textures abound.
A few more to share with you.
A sign of the season.
The obligatory cute dog photo.

The holiday is long over but I have a few more photos to share with you from Mayfield Gardens, the last stop on my trip through Western NSW. 

That's for another post though so I'll see you all again soon.

Bye for now,

Jillian

PRINT RECIPE
© DELICIOUS BITES • Theme by Maira G.