SLIDER

Seasons Greetings

25 Dec 2023

I don't know about you but 2023 has been a challenging year for me and I'm hoping for a more peaceful and happy 2024. With that in mind, I'll be taking a break from the blog for a few weeks and will be back sometime in January.


Wishing all my readers a safe and happy holiday season. 
 
Bye for now,

Jillian
PRINT RECIPE

xmas 2023 - gluten free gingerbread friands with a rum butter glaze

22 Dec 2023


Welcome to the last bake for Xmas Week 2023. I know one isn't supposed to play favourites, but of all the recipes I made for Christmas, these gingerbread friands were my favourite. They were moist, delicately spiced and topped with the most delicious glaze. The friands are a Liz Prueitt recipe I bookmarked years ago, whilst the glaze came from Sweet.


Here’s the recipe for you which makes 10 friands. For all my recipes I use a 250ml cup and a 20 ml tablespoon, unsalted butter and 60g eggs. My oven is a conventional gas oven so if your oven is fan forced you may need to reduce the oven temperature by 20°C. 


Gluten free gingerbread friands with rum butter glaze – makes 10
Ingredients
130g unsalted butter
¼ cup gluten free flour mix 
3 tsp cocoa sifted
2 tsp ground ginger
½ tsp each nutmeg and allspice
1 tsp cinnamon
¼ tsp salt
125g brown sugar
100g almond meal
4 egg whites
1 tsp vanilla extract
1 tsp golden syrup

Rum-Butter Glaze
80g icing sugar
1/8 tsp ground cinnamon
15 g unsalted butter, melted and warm
1 tbsp dark rum (or lemon juice)
1 tsp warm water

To decorate (optional)
candied thyme leaves or rosemary

Method
Preheat the oven to 220°C, conventional. Brush 10 holes of a friand tin with some melted butter. Place in the fridge to chill while you make the batter.

To brown the butter, place the butter in a small saucepan and cook over a medium heat until melted. Continue to cook until the butter is foaming, gently swirling the pan from time to time, to allow the solids to brown more evenly. Continue to allow the butter to bubble away until it turns a rich golden brown and smells of toasted nuts and caramel. Remove the pan from the heat and let it stand for 5 minutes, to allow the burnt solids to collect at the bottom of the pan. Strain through a fine-mesh (or muslin-lined) sieve, discarding the solids. Allow the browned butter to cool slightly before using. It should still be warm when folding into the mix later: if it is too hot it will start to cook the egg whites; if it is too cool it will be difficult to incorporate into the mix. You will need 100g of browned butter for this recipe.

While the butter is cooling, sift the flour, cocoa, spices and salt into a bowl. Stir through the brown sugar and the almond meal. Put the egg whites in a small bowl and use a whisk or fork to froth them up for a few seconds – you do not need to whisk them completely. Pour the egg whites into the sifted dry ingredients and stir until they are incorporated. Add the vanilla, the golden syrup and the browned butter and mix until the batter is smooth.


Remove the tin from the fridge and fill the moulds just over two-thirds of the way up the sides. Reduce the temperature to 200°C conventional and bake for 10 minutes before rotating the tray. Reduce the heat to 180°C and bake for another 5 minutes or until the edges of the friands are golden brown and the centres have a slight peak and spring back when gently prodded. Set aside to cool before removing them from their moulds; you might need to use a small knife to help you release the sides. Cool on a wire rack before icing the friands with the rum butter glaze.

To make the glaze, sift the icing sugar and cinnamon into a small bowl. Add the melted butter, rum (or lemon juice) and water and mix with a spoon until smooth. The glaze will thicken slightly if it sits around, so stir through a little more warm water if you need to—it should be the consistency of runny honey. Ice each cake and allow the glaze to set before serving. If liked, you can top the friands with some candied herbs. 


To candy the herbs, simply brush the herbs with egg white (I used a small paint brush) then toss in caster sugar to coat. Place the herbs on baking paper to dry out before using. Store any leftover herbs in an airtight container.


Although the candied herbs are optional, I think they made the gingerbread friands look very festive.

That's my last post for 2023. Life is a bit topsy-turvy at the moment so I'm not sure when I'll be back in the kitchen again. Until then, all the best over the holiday season and keep safe and well.

Bye for now,

Jillian
PRINT RECIPE

xmas 2023 - toasted pecan cookies with dulce de leche

19 Dec 2023


During the year I took out a copy of the Beatrix Bakes Cookbook by Natalie Paull from my local library. I love Natalie's use of bold flavours and her clear explanations. I'd hoped to visit her bakery when I visited Melbourne this year only to find it had closed its doors for good just a few weeks earlier.

When I was looking for cookies to bake for Christmas, I immediately thought of the almond jaws or toasted almond cookies with dulce de leche that I'd found in the book. Naturally I made a few changes to the recipe. I had pecans in the fridge so I swapped out the raw almonds for pecans. I skipped the demerara sugar topping and sandwiched the biscuits with pre-made dulce de leche I had lurking in my pantry. I also made the cookies smaller so the recipe yielded 32 sandwich cookies rather than the 16 in Natalie's recipe.


Here’s the recipe for you which 
makes 32 biscuits. For all my recipes I use a 250ml cup and a 20 ml tablespoon, unsalted butter and 60g eggs. My oven is a conventional gas oven so if your oven is fan forced you may need to reduce the oven temperature by 20°C. The biscuits will keep for two weeks in the fridge or 4 days at room temperature.

Toasted pecan cookies with dulce de leche 
Filling
400g tin of dulce de leche 
pinch
 salt flakes

Ingredients
230g unsalted butter, diced and cool, not cold
80g icing sugar mixture
1 tsp vanilla extract
100g pecans roasted to golden brown and cooled
300g plain flour
5g fine sea salt
3g baking powder – around ½ tsp

To decorate
icing sugar

Method
For the dulce de leche filling, spoon the contents of the tin into a bowl and mix until smooth before stirring in the salt flakes. Set to one side.

For the biscuits, in a stand mixer, cream the butter, sugar and vanilla together until soft and white with a paddle on a medium speed. Scrape down the sides twice. This takes around five minutes.

Grind the nuts with about 50g of the total flour amount and set aside.
Mix the remaining flour with the salt and baking powder and then mix in the nut flour.

Add the dry ingredients to the creamed butter, taking care not to overwork the dough but don’t leave any butter streaks as it will cause buttery fissures (not pretty but still delicious) when baked. Do this on low speed for around one minute. Form dough into fat discs, wrap in plastic and allow to rest in the fridge for fifteen minutes.

Preheat the oven to 170°C, conventional and line 2 trays with baking paper. Roll 
out one disc of the dough on a lightly dusted surface to around 3 mm thick. You can roll the dough between two sheets of baking paper but do keep flouring so the dough moves as you roll.


Cut the cookies with a 5cm diameter cutter. Place on a baking paper lined tray and put back in the fridge to firm up before baking. Bake at 170°C, conventional until deep golden all over – around 20 to 30 minutes. Repeat with the other disc of dough. Cool for 10 minutes on the tray before removing to a wire rack. Allow to cool completely before filling. 


When cool, either pipe the dulce de leche on one cookie with a large nozzle or spoon and spread with a teaspoon, then sandwich with the top cookie, and lightly press (with a little swirly wiggle) to bring the filling just flush with the cookie edge. Just before serving dust with icing sugar.


These cookies were such a hit with my neighbour's children that they asked if I could make them for this year's Christmas cookie. I was happy to oblige.

See you all again tomorrow with some more baking from my kitchen.

Bye for now,

Jillian
PRINT RECIPE

xmas 2023 - brown butter crinkle cookies

18 Dec 2023


Welcome to Xmas Week 2023. This year I made a cookie table of sorts, though technically one of the bakes is not a cookie. I did all the bakes over 2 weekends and even though I made half batches of all the recipes and gave most of the cookies away, I still have one or two cookies left in my biscuit tin.

I went on a bit of a crinkle cookie blitz last year, making batch after batch of both chocolate and lemon crinkle cookies. This year, I decided to try a different flavour - browned butter crinkle cookies. I made 2 or 3 versions of the recipe and I think this is the best version. 


Here’s the recipe for you which makes 26 cookies. For all my recipes I use a 250ml cup and a 20 ml tablespoon, unsalted butter and 60g eggs. My oven is a conventional gas oven so if your oven is fan forced you may need to reduce the oven temperature by 20°C.

Brown butter crinkle cookies
Ingredients
125g unsalted butter
75g caster sugar
75g brown sugar 
1 tsp vanilla extract 
2 large eggs
225g plain flour
1 tsp baking powder
½ tsp sea salt

For rolling

50g raw caster sugar
100g icing sugar

Method
Place the butter in a small saucepan over medium heat and cook until foaming. Whisk for a few minutes or until the butter turns a deep golden colour then set aside to cool. You’ll need 100mls of the browned butter so if you don’t have quite enough, top up with vegetable oil. You can also do this step in a microwave safe covered bowl on high for about 4 minutes.

In a mixing bowl, beat the sugars, vanilla extract and cooled butter with an electric mixer until thick and glossy. Add the eggs one at a time, beating well. Sift in the flour, baking powder and salt, and combine until it forms into a soft, thick dough. Cover and refrigerate for 3 hours, or overnight, to firm up.

Heat the oven to 180°C conventional and line two baking trays with baking paper. Place the raw caster sugar and the icing sugar on two separate plates.


Using a dessertspoon, take about 20g of the mixture and roll into a ball between your palms. Roll in the caster sugar until lightly coated, then in the icing sugar until heavily coated. Place on the trays 5cm apart and repeat with remaining dough.


Bake for 12-14 minutes or until the tops are set and nicely cracked. Leave to cool on the tray for 5 minutes, then cool completely on a wire rack, and store in an airtight container. 


These were easy to make and a big hit at work.

See you all again tomorrow with another bake for Xmas Week 2023.

Bye for now,

Jillian


PRINT RECIPE

xmas 2023 - spiced praline meringues

12 Dec 2023


My gas oven must be about 4 or 5 years old now and whilst I've worked out how to bake bread, pastries, biscuits and cakes, I've never really mastered meringues. For this bake for Xmas Week 2023, I turned to the master of meringues,
Ottolenghi, for the recipe, then baked them on the top shelf with my gas oven on the lowest setting and voila, I had the most perfect looking meringues.

Here’s the recipe for you. For all my recipes I use a 250ml cup and a 20 ml tablespoon, unsalted butter and 60g eggs. My oven is a conventional gas oven so if your oven is fan forced you may need to reduce the oven temperature by 20°C.


Spiced Praline Meringues - makes 6 (extra-large) or 12 (regular-sized)
Ingredients
50g blanched almonds
300g caster sugar
25ml water
½ tsp ground cinnamon
pinch ground cloves
finely grated zest of 1 large orange (1 tbsp)
¼ tsp flaky sea salt
150g egg whites (from 5 large eggs)

Method
Preheat the oven to 190°C, conventional. Spread the almonds out on a small baking tray and roast in the oven for 5–7 minutes, until lightly browned. Set aside to cool. Line two large baking trays with baking paper and set aside.

Place 50g of sugar in a small saucepan with the water and stir to combine. Cook over a high heat for about 4 minutes, until it has turned a light golden brown; do not stir, just gently shake the pan to help the sugar dissolve. Add the almonds and cook for 1 minute, so the nuts are coated and the caramel turns dark, without burning. Pour the mixture on to one of the lined baking trays and set aside until cool.

Once cool, break the praline into smaller pieces, place in a food processor and blitz to form a rough powder. Remove from the machine and place in a shallow bowl with the spices, orange zest and salt. Mix, then set aside until ready to use.

Spread the remaining sugar out on the second lined baking tray and place in the oven for 7 minutes, until the sugar is hot. Remove from the oven and reduce the temperature to 130°C, conventional. As soon as the sugar is out of the oven, place the egg whites in the bowl of an electric mixer with the whisk attachment in place, and whisk on a high speed until they begin to froth up. Carefully add the hot sugar to the whisking egg whites, 1 tablespoon at a time, and continue beating for 7–8 minutes until the mixture is completely cold. At this point it should be silky and thick and keep its shape when you lift a little bit from the bowl.


Line the two large baking trays once again with baking parchment. Use an extra-large serving spoon to scoop up some meringue, and use another large spoon to help shape it into a rough ball the size of a large apple. Sprinkle some praline over half the meringue ball, then place on the baking tray. Repeat with the rest of the mixture, spacing the balls about 10cm apart to allow room for increase in size.


Place the meringues in the oven for 2–2½ hours. Check that they are done by lifting them from the tray and gently tapping to make sure the outside is completely firm and the centre is only a little soft. Remove from the oven and leave on the tray to cool completely.


They look so pretty don't they and the spiced praline is so good, I ate it by the spoonful. 


See you all again tomorrow with the final bake for Xmas Week 2023. 

Bye for now, 

Jillian
PRINT RECIPE

xmas 2023 - pistachio, almond and white chocolate amaretti


I love amaretti and I love pistachios so I wondered if you could make
the former using the latter and found the answer was a resounding 'yes'. I decided to use my favourite amaretti recipe as the starting point and went from there.

Pistachios are very expensive so I used a combination of both almond and pistachio meal. As pistachios and white chocolate have a natural affinity, I dipped the cooled amaretti in some white chocolate rather than dark chocolate. It makes the finished cookie a little sweeter than usual so you could always skip this step or of course, use dark chocolate instead.


Here’s the recipe for you which makes 20 biscuits. For all my recipes I use a 250ml cup and a 20 ml tablespoon, unsalted butter and 60g eggs. My oven is a conventional gas oven so if your oven is fan forced you may need to reduce the oven temperature by 20°C. 


Pistachio, almond and white chocolate amaretti
Ingredients
100g ground almonds
100g finely ground pistachios 
110g caster sugar 
Grated zest of one lemon 
Pinch of salt 
60g egg whites (from 2 large eggs)
2 tsp honey 
1 tsp vanilla
Plenty of icing sugar for rolling

To decorate
100g white chocolate, melted
2 tbs slivered pistachios

Method
Heat the oven to 180°C, conventional. Line two baking trays with baking paper and set to one side. 

Place the ground almonds on a small oven tray. Toast the almond meal in the oven for about 10 minutes or until lightly golden. You’ll need to stir the mixture a few times to make sure it toasts evenly. Set aside to cool.

Mix the cooled ground almonds, pistachio meal, sugar, lemon rind and salt in a large bowl with your fingertips. 
  
Whisk the egg whites until they reach a soft meringue consistency. Add the honey and vanilla whisk until firm. Gently fold into the nut mixture until it forms a soft paste. 

Place the icing sugar into a small bowl. Using a spoon, scoop out about a tablespoon of the mixture, then form the mixture into a cylindrical shape before rolling in the icing sugar. You should be able to make at least 20 from the mixture. 


Arrange the amaretti on the baking paper lined trays leaving room for expansion, and leave at room temperature for half an hour before baking. Bake for 12-15 minutes at 
180°C, conventional until they have coloured  slightly but remain relatively pale and chewy in the centre. Place on a wire rack to cool completely.


When cool, dip one half of each biscuit in melted chocolate, allowing excess to drip off, and place on a baking paper-lined baking tray. Sprinkle slivered pistachios over chocolate. Repeat with remaining biscuits, then chill for 15 minutes to firm up before serving. Leave to cool before storing in a sealed jar. 


They look so festive, don't they? 

See you all again tomorrow with another bake for Xmas Week 2023. 

Bye for now, 

Jillian
PRINT RECIPE

big sur cookies

11 Dec 2023


For my birthday a friend kindly gave me a book voucher and I used the voucher to buy a copy of Claire Ptak's new book, Love is a Pink Cake. As you know, I just love baking with fruit and nuts and the book is filled to the brim with recipes I can't wait to make.


The biscuit tin was empty so for my first bake, I adapted Claire's recipe for Big Sur cookies. I had everything in my house to make the cookies, apart from the granola, but I had unsweetened muesli so I used that to make the cookies and instead added a little extra brown sugar to the batter. Once the batter was made, I portioned it into 2 tbs balls of cookie dough which I then froze but for how long? 

The recipe didn't state a time, so for the first batch I froze the dough for one hour and when I checked at both 7 and 10 minutes the cookie dough was still raw. In the end the cookies took about 12 minutes to bake. For the second batch of cookies, the dough had been frozen for days. I let the dough balls come to room temperature for 30 minutes before baking and they were still raw at 15 minutes and in the end took 19 minutes to bake. Use the cooking time as a rough guide and look for signs of doneness - still soft in the centre and lightly coloured around the edges.


Here's the recipe for you which makes 18 large cookies or 36 
 smaller cookies. For all my recipes I use a 250 ml cup, a 20 ml tablespoon, unsalted butter and 60g eggs. My oven is a conventional gas oven so if your oven is fan forced you may need to reduce the oven temperature by 20°C.


Big Sur Cookies - makes 18 cookies or 36 small ones
Ingredients
150g (1 cup) wholemeal flour 
140g (1 cup) plain flour
1 tsp fine sea salt
1½ tsp baking powder 
135g (½ cup) soft light brown sugar
225g unsalted butter, softened
2 eggs
1 tsp vanilla extract
200g (7oz) white chocolate, chopped into chunks
400g (3¼ cups) granola
Flaky sea salt, for sprinkling

Method
Whisk the flours, baking powder and salt together and set aside. Cream the butter and brown sugar just until smooth and combined but do not aerate or make fluffy. Add the eggs and vanilla extract and mix well, then mix in the flour until just combined. Add the white chocolate and granola and mix again, just until it all comes together.

Line 1 or 2 trays with baking paper, then use an ice-cream scoop to portion out 18 balls of cookie dough onto the baking sheets. (I used 2 tbs of cookie dough for my cookies). Chill for 30 minutes, then flatten to a thickness of 1.5cm and freeze for 1 hour.


Preheat the oven to 170°C fan/190°C/375°F. Defrost the cookies for 5-10 minutes before baking. Sprinkle with the flaky sea salt and bake for 7-10 minutes. They should be just starting to colour, but still soft in the centre. 


Cool on the tray for 10 minutes before placing on a baking rack to cool completely and then store in an airtight container.


Easy to make, not too sweet and the perfect dunking cookie to go with a nice cup of tea. 

See you all again next week for Christmas week 2023.

Bye for now,

Jillian
PRINT RECIPE

cherry moon signature birthday cake

4 Dec 2023


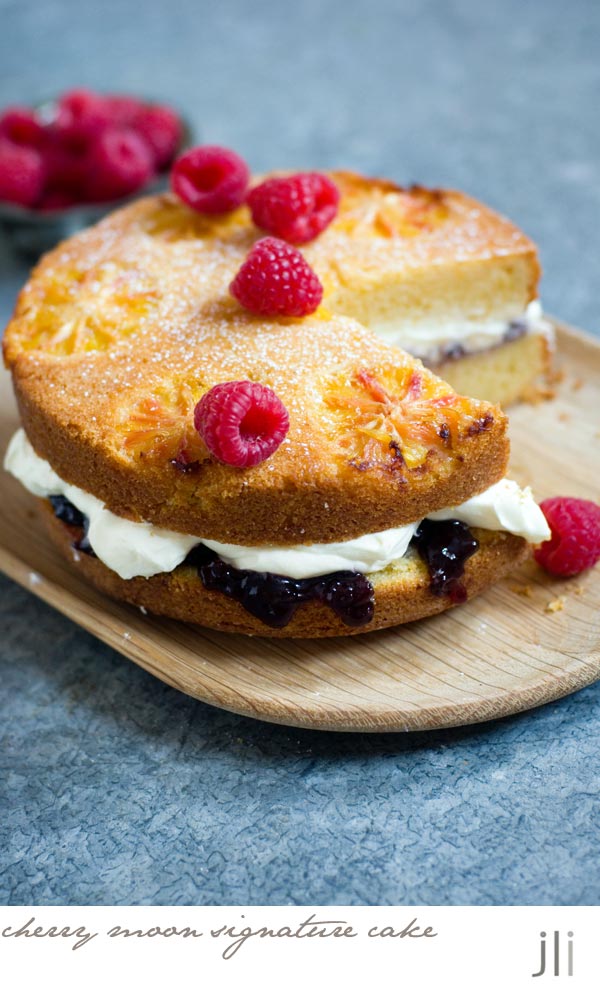
When the November issue of Delicious magazine landed in my letterbox, I spied a photo of the Cherry Moon signature birthday cake. I was only in Sydney for a fleeting visit and as I had all the ingredients to make the cake, apart from the cream and fresh raspberries to top the cake, I made a quick decision to bake the cake before I returned Brisbane.


I baked the cake and while it was cooling, made a trip to the shop for some cream and a punnet of fresh raspberries. Before you knew it the cake was cooled, filled and photo ready.

I needed to tweak the proportions of the recipe a little for my smaller cake otherwise the batter would have been too runny and slightly changed the method, otherwise it's quite faithful to the original. Here's the recipe for you which makes a 17cm cake. For all my recipes I use a 250ml cup and a 20 ml tablespoon, unsalted butter and 60g eggs. My oven is a conventional gas oven so if your oven is fan forced you may need to reduce the oven temperature by 20°C.


Cherry Moon signature birthday cake – 17cm version
Ingredients
1 small orange, rind grated and reserved, peeled and then sliced into 7 rounds
150g raw caster sugar, plus 2 extra teaspoons 
¾ cup (115g) SR flour
¼ cup (35g) Plain flour 
pinch salt 
60g unsalted butter, chopped, at room temperature
1 tsp vanilla extract
2 large eggs, at room temperature 
85ml (1/3 cup) vegetable oil 
40ml buttermilk or yoghurt, at room temperature 
Pure icing sugar, to dust 
Fresh raspberries and edible flowers (optional), to serve

Filling
200ml thickened cream, whipped 
1/2 cup (160g) raspberry or berry jam
 
Method
Preheat oven to 180°C conventional/160°C fan-forced. Grease and flour the base and side of a 17cm round springform cake pan, and then line base with baking paper.

Sprinkle both sides of orange slices with a tsp of the extra sugar and then arrange in a single layer over base of prepared pan. 

Sift flours and salt together into a bowl then set to one side.

Using a stand mixer fitted with the paddle attachment, cream the butter with the sugar, orange rind and vanilla on medium-high speed for 7 minutes until light and fluffy (the sugar won't be totally dissolved). Add the eggs, one at a time, mixing well on medium speed between each addition. Reduce speed to low, then gradually drizzle in the oil, mixing constantly until it forms a mayonnaise consistency.
 
Add sifted dry ingredients in 3 batches, mixing well after each addition, alternating with the buttermilk until well combined and a smooth and thick batter has formed (do not overmix). Carefully spoon batter over the oranges in the prepared pan, trying not to disturb their placement. Level top using a spatula.  Sprinkle top evenly with the remaining tsp extra sugar. 


Bake for 30-40 minutes on the centre rack of the preheated 180°C conventional/160°C fan-forced oven until a skewer inserted in the centre comes out clean and the top is golden. 
Let the cake cool for 10 minutes on a wire rack before releasing the cake from pan and inverting the hot cake onto the rack, orange slices facing up. Allow the cake to cool completely and develop a crust before slicing.


Once cooled, use a large serrated knife to carefully split cake horizontally into two layers. Place the cake base (without orange slices) on a serving platter, spoon over the jam and then dollop with whipped cream. Top with the other cake half, orange slices facing up. 


Serve cake scattered with raspberries and edible flowers, if using, and lightly dusted with icing sugar.


As I flew out the next day at 7.00 am, I snaffled a slice for myself and shared the rest of the cake with my neighbours. The cake was delicious - the orange topping added a touch of freshness to the cake and you can never go wrong with a filling of berry jam and cream.


See you all again next week with some more baking from my kitchen.

Bye for now,

Jillian
PRINT RECIPE
© DELICIOUS BITES • Theme by Maira G.