
florentines - the christmas collection
24 Dec 2011
Florentines are little sweet treats that I remember from my childhood. One of my workmates Cathy, contributed this really quick and easy Florentine recipe.

Feel free to alter the mix of nuts and fruit because that's exactly what I did.

I've never been a fan of glace cherries so I used some dried sweetened cranberries instead. I finely chopped crystallised ginger and mixed peel and added that in with the sultanas for a bit of variety. There were no peanuts in the house, so I used toasted flaked almonds instead. It's that kind of recipe.

Florentines are very yummy and the one you see in the picture lasted about 20 seconds after this shot was taken. The cute gift tag is from kikki-k.
Florentines (from the Australian Womens Weekly) printable version
Ingredients
1 cup cornflakes
30 gm (1 oz) red glace cherries
½ cup sultanas (golden raisins)
½ cup raw peanuts
80 ml (1/3 cup) condensed milk
60 gm (2 oz) dark chocolate
Method
Preheat oven to 180°C/350°F.Line oven trays with baking paper.
In a bowl combine the slightly-crushed cornflakes, finely-chopped cherries, sultanas, peanuts and condensed milk and mix well. Drop tablepoonfuls on to oven trays.
Bake at 180°C/350°F for 8 minutes or until edges begin to turn brown. Leave on trays to cool. Use spatula to remove when cold and place on a wire rack.
Melt chopped chocolate in top of double saucepan over simmering water. Using a spatula, spread chocolate on base of the cooled biscuit. Mark wavy lines in the chocolate with a fork. Let chocolate set before storing in an airtight container.
Makes 24.
That was the last of my Christmas posts and I do hope you enjoyed them. I'm going to take a week or so off from blogging so have a great Christmas and I'll see you all back again some time in the New Year.
Jillian
Feel free to alter the mix of nuts and fruit because that's exactly what I did.
I've never been a fan of glace cherries so I used some dried sweetened cranberries instead. I finely chopped crystallised ginger and mixed peel and added that in with the sultanas for a bit of variety. There were no peanuts in the house, so I used toasted flaked almonds instead. It's that kind of recipe.
Florentines are very yummy and the one you see in the picture lasted about 20 seconds after this shot was taken. The cute gift tag is from kikki-k.
Florentines (from the Australian Womens Weekly) printable version
Ingredients
1 cup cornflakes
30 gm (1 oz) red glace cherries
½ cup sultanas (golden raisins)
½ cup raw peanuts
80 ml (1/3 cup) condensed milk
60 gm (2 oz) dark chocolate
Method
Preheat oven to 180°C/350°F.Line oven trays with baking paper.
In a bowl combine the slightly-crushed cornflakes, finely-chopped cherries, sultanas, peanuts and condensed milk and mix well. Drop tablepoonfuls on to oven trays.
Bake at 180°C/350°F for 8 minutes or until edges begin to turn brown. Leave on trays to cool. Use spatula to remove when cold and place on a wire rack.
Melt chopped chocolate in top of double saucepan over simmering water. Using a spatula, spread chocolate on base of the cooled biscuit. Mark wavy lines in the chocolate with a fork. Let chocolate set before storing in an airtight container.
Makes 24.
That was the last of my Christmas posts and I do hope you enjoyed them. I'm going to take a week or so off from blogging so have a great Christmas and I'll see you all back again some time in the New Year.
Jillian
shortbread - the christmas collection
23 Dec 2011
I have to thank my friend Geoff for this shortbread recipe from David Herbert's 'The Perfect Cookbook'.

I've been making shortbread for as long as I can remember but I've never used rice flour before. Now that I've tried it, I realise it's what gives the shortbread it's unique texture.

I decided to make shortbread stars with my new star shaped cookie cutters.

Then I decided I needed to make a cookie garland using the shortbread stars threaded on baker's twine.
Shortbread from ‘The Perfect Cookbook’ by David Herbert (printable version)
Ingredients
250 gram (8oz) unsalted butter, softened
½ cup caster (superfine) sugar
2 cups plain (all purpose) flour
½ cup rice flour
Method
Preheat the oven to 150ºC/300ºF. Line 2 oven trays with baking paper.
Beat the butter in a bowl with a wooden spoon until soft and smooth. Add the sugar, plain flour and rice flour and work the mixture with a spoon until well blended. Knead the dough lightly on a floured surface to form a firm dough, wrap in plastic wrap then chill for 20 minutes.
Divide the dough into 2 portions and roll out each half between 2 sheets of baking paper to a thickness of 5 -7 mm (¼ - ⅓ inch). Cut the dough into shapes with cookie cutters.
Place the shapes onto the prepared oven trays and bake for 15-20 minutes or until pale and dry. Store shortbread in an airtight tin for up to 1 week.
Makes 35-40 biscuits.

I bought this shortbread mould in Edinburgh many years ago and it's been in my kitchen drawer unused ever since. I put a bit of the shortbread mixture aside and used the press for the first time and it turned out perfectly. Shortbread keeps really well, so I've put it aside for the cook to eat in the New Year.
Bye for now,
Jillian
fruit mince pies - the christmas collection
22 Dec 2011
For those of you who've followed my blog for a while, each year my fruit mince pies appear here. I really do make them every year as they're a great favourite both at work and at home. They fill the kitchen with the smell of Christmas baking.

I like to dredge icing sugar over the little pies just before serving.

I couldn't resist buying the little red reindeer when I was in Noosa last month. You can see him lurking in the background.

I normally make the pies using bottled fruit mince but this year I made my own. Fruit mince can be a bit cloying so adding grated apple and lemon rind to the mix helps to tone it down. That hint came from Maureen Simpson, who was formerly the food editor of Australian House and Garden magazine. The pastry recipe is my own and I've never ever shared it with any-one before, so consider this my Christmas gift to you.
MINCE PIES (makes 15) (printable version)
Pastry
125 gm (4 oz) butter
⅓ cup sifted icing sugar
1 egg, lightly beaten
1⅓ cup plain flour
⅓ cup self raising flour
⅓ cup corn flour (cornstarch)
Filling
1¼ cups fruit mince (home made or bottled)
1 green apple, peeled and grated
1 teaspoon finely grated lemon rind
30 gm (1 oz) melted butter
1 tablespoon thick cut marmalade
1 tablespoon coarsely chopped toasted blanched almonds or macadamia nuts
Topping
1 additional egg, lightly beaten
Caster sugar
Icing sugar
Shallow round based patty tins
Method
Cream the butter with the icing sugar. Add the egg and beat well. Sift the flours together and stir into the creamed mixture. Knead lightly on a floured board. Wrap dough in plastic wrap and chill for 1 hour.
Put the fruit mince into a mixing bowl. Add the apple, the grated rind, the marmalade then the melted butter and mix until well combined. You’ll need about half of the fruit mince mixture for this recipe. Store the rest in a tightly sealed jar in the fridge. It will keep for ages.
Preheat the oven to 190°C/375°F. Roll the pastry out thinly between 2 sheets of greaseproof paper and cut into rounds. Line the lightly greased patty tin with the pastry rounds. Cut the same number of slightly smaller circles to fit the tops of the pies.
Put 1 teaspoon of fruit mince into each pie then moisten the edges with the beaten egg. Make a small slit in each pastry lid or cut out with a small star cutter. Top each filled pie with a lid and press edges of pastry well to seal. Glaze with the remaining beaten egg and sprinkle caster sugar over the top of the pies.
Bake the pies in the preheated oven for 20 – 30 minutes or until pale golden brown. Cool the pies for 10 minutes before placing on a wire cooling rack.
When completely cool, store the pies in an airtight container. Dust with icing sugar before serving.
I'll be back again tomorrow so see you all then,
Jillian
I like to dredge icing sugar over the little pies just before serving.
I couldn't resist buying the little red reindeer when I was in Noosa last month. You can see him lurking in the background.
I normally make the pies using bottled fruit mince but this year I made my own. Fruit mince can be a bit cloying so adding grated apple and lemon rind to the mix helps to tone it down. That hint came from Maureen Simpson, who was formerly the food editor of Australian House and Garden magazine. The pastry recipe is my own and I've never ever shared it with any-one before, so consider this my Christmas gift to you.
MINCE PIES (makes 15) (printable version)
Pastry
125 gm (4 oz) butter
⅓ cup sifted icing sugar
1 egg, lightly beaten
1⅓ cup plain flour
⅓ cup self raising flour
⅓ cup corn flour (cornstarch)
Filling
1¼ cups fruit mince (home made or bottled)
1 green apple, peeled and grated
1 teaspoon finely grated lemon rind
30 gm (1 oz) melted butter
1 tablespoon thick cut marmalade
1 tablespoon coarsely chopped toasted blanched almonds or macadamia nuts
Topping
1 additional egg, lightly beaten
Caster sugar
Icing sugar
Shallow round based patty tins
Method
Cream the butter with the icing sugar. Add the egg and beat well. Sift the flours together and stir into the creamed mixture. Knead lightly on a floured board. Wrap dough in plastic wrap and chill for 1 hour.
Put the fruit mince into a mixing bowl. Add the apple, the grated rind, the marmalade then the melted butter and mix until well combined. You’ll need about half of the fruit mince mixture for this recipe. Store the rest in a tightly sealed jar in the fridge. It will keep for ages.
Preheat the oven to 190°C/375°F. Roll the pastry out thinly between 2 sheets of greaseproof paper and cut into rounds. Line the lightly greased patty tin with the pastry rounds. Cut the same number of slightly smaller circles to fit the tops of the pies.
Put 1 teaspoon of fruit mince into each pie then moisten the edges with the beaten egg. Make a small slit in each pastry lid or cut out with a small star cutter. Top each filled pie with a lid and press edges of pastry well to seal. Glaze with the remaining beaten egg and sprinkle caster sugar over the top of the pies.
Bake the pies in the preheated oven for 20 – 30 minutes or until pale golden brown. Cool the pies for 10 minutes before placing on a wire cooling rack.
When completely cool, store the pies in an airtight container. Dust with icing sugar before serving.
I'll be back again tomorrow so see you all then,
Jillian
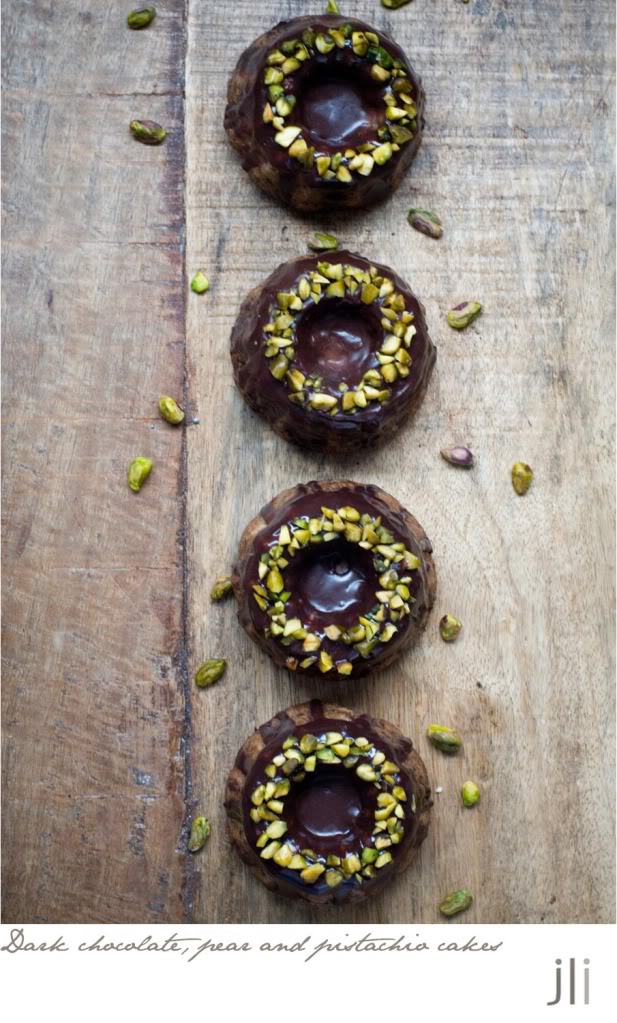
dark chocolate, pear and pistachio cakes - the christmas collection
21 Dec 2011
I love letterpress and Alischa from Bespoke Press is an expert in the field. Alischa sent along this recipe for Dark Chocolate Pear and Pistachio cake and mentioned she often baked individual cakes for Christmas gifts. I thought that was a great idea and baked the cake in little bundt tins.
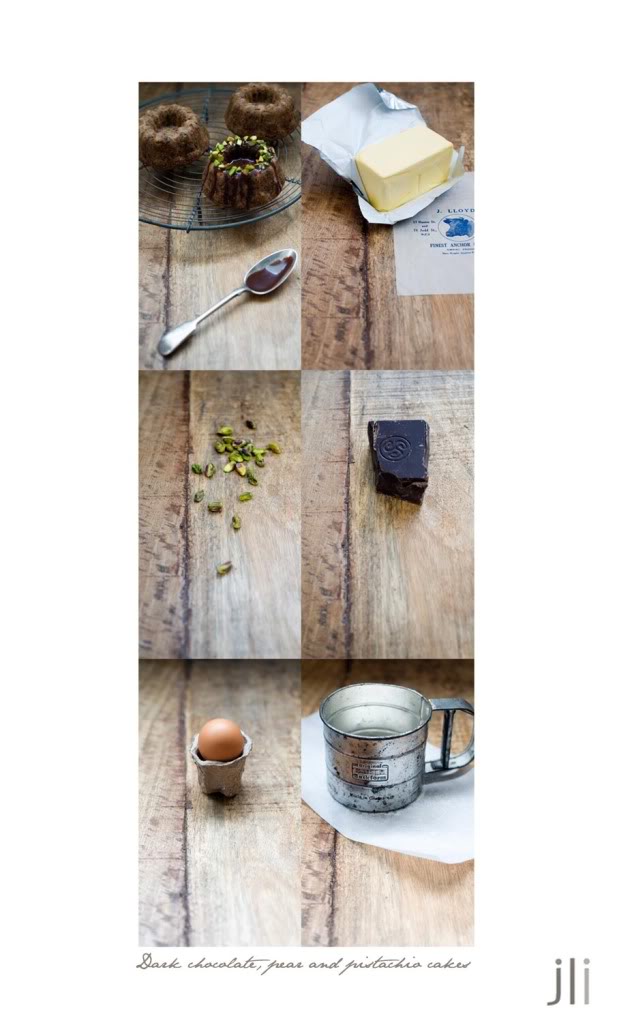
I'm not sure what it is about mini cakes but they just look so appealling!

Topping the cakes with the ganache was a bit of a labour of love. I was covered in chocolate and went out for dinner last Saturday night with chocolate stained fingers. Actually they're not looking that much better today.
Mini Dark Chocolate, Pear and Pistachio cakes (printable version)
adapted from Gourmet Traveller magazine, April 2010 - makes 4
Ingredients
150 gm (5 oz) dark chocolate, coarsely chopped
½ cup pistachio kernels, plus extra to serve
100 gm (3½ oz) softened butter
100 gm (3½ oz) caster sugar
½ tsp vanilla essence
2 eggs
100 g (⅔ cup) plain flour, sieved
Scant 1 teaspoon baking powder
½ Packham pear, peeled, cored and coarsely chopped
Chocolate ganache
75 gm (2½ oz) dark chocolate, chopped
75 ml (⅓ cup) pouring cream
Method
Preheat the oven to 160ºC/325ºF.
Grease and flour 4, 1 cup mini bundt tins. Process chocolate and pistachios in a food processor until coarse crumbs form and then set aside.
Beat the butter, sugar and vanilla essence in a bowl until light and fluffy. Add the eggs one at a time, beating until well combined, then stir in the plain flour and baking powder. Stir through the chocolate and pistachio mixture then the pear before spooning the mixture into the prepared tins.
Bake until an inserted skewer withdraws clean (35-40 minutes) then cool in the tin for 10 minutes. Turn out and cool on a wire rack.
For the chocolate ganache, place chopped chocolate in a heatproof bowl. Heat the cream in a small saucepan over medium heat to just below boiling, add to the chocolate and stand until the chocolate melts, then stir until smooth.
Set aside until slightly thickened before pouring over the top and sides of the cakes. Scatter with the remaining pistachios before putting the cakes aside to set.
Cakes will keep stored in an airtight container for up to 3 days.
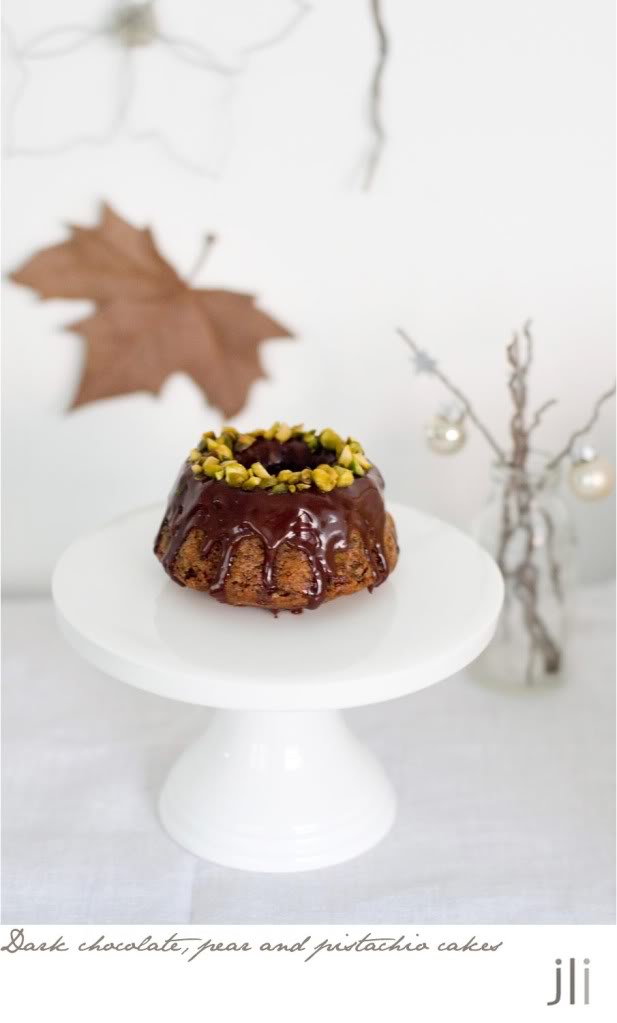
I don't really 'do' Christmas so here's one of the little cakes in front of my version of a Christmas tree.
I hope you're enjoying the daily posts. See you all again tomorrow,
Jillian
I'm not sure what it is about mini cakes but they just look so appealling!
Topping the cakes with the ganache was a bit of a labour of love. I was covered in chocolate and went out for dinner last Saturday night with chocolate stained fingers. Actually they're not looking that much better today.
Mini Dark Chocolate, Pear and Pistachio cakes (printable version)
adapted from Gourmet Traveller magazine, April 2010 - makes 4
Ingredients
150 gm (5 oz) dark chocolate, coarsely chopped
½ cup pistachio kernels, plus extra to serve
100 gm (3½ oz) softened butter
100 gm (3½ oz) caster sugar
½ tsp vanilla essence
2 eggs
100 g (⅔ cup) plain flour, sieved
Scant 1 teaspoon baking powder
½ Packham pear, peeled, cored and coarsely chopped
Chocolate ganache
75 gm (2½ oz) dark chocolate, chopped
75 ml (⅓ cup) pouring cream
Method
Preheat the oven to 160ºC/325ºF.
Grease and flour 4, 1 cup mini bundt tins. Process chocolate and pistachios in a food processor until coarse crumbs form and then set aside.
Beat the butter, sugar and vanilla essence in a bowl until light and fluffy. Add the eggs one at a time, beating until well combined, then stir in the plain flour and baking powder. Stir through the chocolate and pistachio mixture then the pear before spooning the mixture into the prepared tins.
Bake until an inserted skewer withdraws clean (35-40 minutes) then cool in the tin for 10 minutes. Turn out and cool on a wire rack.
For the chocolate ganache, place chopped chocolate in a heatproof bowl. Heat the cream in a small saucepan over medium heat to just below boiling, add to the chocolate and stand until the chocolate melts, then stir until smooth.
Set aside until slightly thickened before pouring over the top and sides of the cakes. Scatter with the remaining pistachios before putting the cakes aside to set.
Cakes will keep stored in an airtight container for up to 3 days.
I don't really 'do' Christmas so here's one of the little cakes in front of my version of a Christmas tree.
I hope you're enjoying the daily posts. See you all again tomorrow,
Jillian
gingerbread - the christmas collection
20 Dec 2011
I've always loved gingerbread men. If I find myself in a cake shop that has gingerbread men on the shelf, one always seems to come home with me. I think I may have made them once when I was still at school but that was a long time ago. I vowed I was going to make them this year so hunted for a recipe. The first one I tried was a bit of a disaster as the addition of the baking soda turned the mixture into honeycomb. I found another recipe and tried again.

This one worked like a charm and in a short while I was using my new gingerbread cutter to turn out some of these little men.

I didn't want to ice the gingerbread men so I used currants for eyes and glace cherries for the mouth then placed them into cellophane bags sealed with bakers twine. All my friends will be getting one of these tucked into their Christmas gifts this year.

Gingerbread Men (makes 14)
Adapted from Good Taste Magazine December 2007 (printable version)
Ingredients
50 g butter
100g (½ cup) firmly packed brown sugar
125 mls (½ cup) golden syrup
1 egg, lightly whisked
300 g (2 cups) plain flour
75 g (½ cup) self raising flour
2 teaspoons ground ginger
2 teaspoons ground cinnamon
¾ teaspoon ground cloves
¼ teaspoon ground white pepper
½ teaspoon bicarbonate of soda
Glace cherries and currants to decorate
Method
Place the butter, sugar and golden syrup in a small saucepan over a low heat.
Stir until the butter melts and the sugar dissolves. Set aside for 10 minutes to cool slightly.
Combine the butter mixture and egg in a large bowl. Sift the combined flour, ginger, cinnamon, cloves, pepper and bicarbonate of soda over the butter mixture. Stir until well combined.
Turn onto a lightly floured surface and gently knead until smooth. Shape into a disc. Cover with plastic wrap and place in the fridge for 1 hour to rest.
Preheat the oven to 180ºC/350°F. Line 2 baking trays with non-stick baking paper. Roll out the dough on a lightly floured surface until 5 mm thick. Use a 12 cm gingerbread man shaped cutter to cut out shapes. Re-knead offcuts and chill before rolling out again.
Place the gingerbread men on the lined trays leaving room to spread. To decorate, press in currants to make eyes and buttons and a sliver of glace cherries for a mouth. Return trays to the fridge for a further hour before baking.
Bake the gingerbread men for 10-15 minutes or until golden. Set aside on the trays for 5 minutes to cool before transferring to a wire rack to cool completely.
The gingerbread men will harden as they cool.

See you all again tomorrow for Day 3 of the Christmas Collection.
Jillian
This one worked like a charm and in a short while I was using my new gingerbread cutter to turn out some of these little men.
I didn't want to ice the gingerbread men so I used currants for eyes and glace cherries for the mouth then placed them into cellophane bags sealed with bakers twine. All my friends will be getting one of these tucked into their Christmas gifts this year.
Gingerbread Men (makes 14)
Adapted from Good Taste Magazine December 2007 (printable version)
Ingredients
50 g butter
100g (½ cup) firmly packed brown sugar
125 mls (½ cup) golden syrup
1 egg, lightly whisked
300 g (2 cups) plain flour
75 g (½ cup) self raising flour
2 teaspoons ground ginger
2 teaspoons ground cinnamon
¾ teaspoon ground cloves
¼ teaspoon ground white pepper
½ teaspoon bicarbonate of soda
Glace cherries and currants to decorate
Method
Place the butter, sugar and golden syrup in a small saucepan over a low heat.
Stir until the butter melts and the sugar dissolves. Set aside for 10 minutes to cool slightly.
Combine the butter mixture and egg in a large bowl. Sift the combined flour, ginger, cinnamon, cloves, pepper and bicarbonate of soda over the butter mixture. Stir until well combined.
Turn onto a lightly floured surface and gently knead until smooth. Shape into a disc. Cover with plastic wrap and place in the fridge for 1 hour to rest.
Preheat the oven to 180ºC/350°F. Line 2 baking trays with non-stick baking paper. Roll out the dough on a lightly floured surface until 5 mm thick. Use a 12 cm gingerbread man shaped cutter to cut out shapes. Re-knead offcuts and chill before rolling out again.
Place the gingerbread men on the lined trays leaving room to spread. To decorate, press in currants to make eyes and buttons and a sliver of glace cherries for a mouth. Return trays to the fridge for a further hour before baking.
Bake the gingerbread men for 10-15 minutes or until golden. Set aside on the trays for 5 minutes to cool before transferring to a wire rack to cool completely.
The gingerbread men will harden as they cool.
See you all again tomorrow for Day 3 of the Christmas Collection.
Jillian
hazelnut cookies - the christmas collection
19 Dec 2011
As promised, I'll be bringing you 6 days of recipes and here is the first recipe from the 'The Christmas Collection'. The lovely Juliana sent me this recipe for hazelnut cookies from 'A Piece of Cake' by Leila Lindholm.

I made the cookies a few weeks ago and they still taste great, so they store well. Best of all, they're really easy to make.

Hazelnut Cookies (printable version)
Ingredients
50 gm butter
200 gm ground hazelnuts
80 gm sugar
1 egg
Toasted hazelnuts for garnish
Optional – icing sugar
Method
Preheat the oven to 175°C. Cover a baking sheet with baking paper.
Melt the butter. Mix the ground hazelnuts with the melted butter, the sugar and the egg. Make little balls and place on the lined baking sheet. Gently press one hazelnut on top of each cookie.
Bake in the middle of the oven for about 18 minutes until golden. Cool on the baking sheet. Roll in icing sugar if desired.
Store in an airtight jar. Makes about 18 cookies.

Wouldn't a big jar of these cookies make a great gift especially if they came with one of Kylie's lovely porcelain ornaments?
See you all again tomorrow and thanks once again for the recipe Juliana,
Jillian
I made the cookies a few weeks ago and they still taste great, so they store well. Best of all, they're really easy to make.
Hazelnut Cookies (printable version)
Ingredients
50 gm butter
200 gm ground hazelnuts
80 gm sugar
1 egg
Toasted hazelnuts for garnish
Optional – icing sugar
Method
Preheat the oven to 175°C. Cover a baking sheet with baking paper.
Melt the butter. Mix the ground hazelnuts with the melted butter, the sugar and the egg. Make little balls and place on the lined baking sheet. Gently press one hazelnut on top of each cookie.
Bake in the middle of the oven for about 18 minutes until golden. Cool on the baking sheet. Roll in icing sugar if desired.
Store in an airtight jar. Makes about 18 cookies.
Wouldn't a big jar of these cookies make a great gift especially if they came with one of Kylie's lovely porcelain ornaments?
See you all again tomorrow and thanks once again for the recipe Juliana,
Jillian
the christmas collection
16 Dec 2011
Do you remember a month or so ago I asked if you could send in some of your favourite Christmas baking goodies? Well a few of you did, so I've been madly baking and photographing the past few weekends.

I'm going to contribute one or two of my own closely guarded recipes as well, so there'll be a recipe a day from Monday through to Christmas Eve. I've been double checking quantities and re-writing text and I can confirm I'll be including the recipes for you as a special Christmas treat.

I've included a sneak peek of some of the goodies I'll be sharing with you next week.
So until then,
Jillian
I'm going to contribute one or two of my own closely guarded recipes as well, so there'll be a recipe a day from Monday through to Christmas Eve. I've been double checking quantities and re-writing text and I can confirm I'll be including the recipes for you as a special Christmas treat.
I've included a sneak peek of some of the goodies I'll be sharing with you next week.
So until then,
Jillian
centennial parklands
14 Dec 2011
Last weekend I met my friend Jenny and Miss. B for a stroll/cycle through Centennial Park. The weather had other plans and after 10 minutes the heavens opened and we ran back to my car and huddled inside waiting for the weather to clear. The weather didn't clear and there's only so much you can do to entertain a 5 year old inside a car, so soon after we admitted defeat and went our separate ways. I did manage to take a few photos before the heavens opened.

I'm very lucky to live so close to this amazing park founded by Sir Henry Parkes, the stern looking gentleman you see above.

Notice the threatening skies?

Even the dogs were looking noticeably windswept.

For a split second the sun came out to illuminate the calla lillies then just as quickly disappeared again. Is summer ever going to arrive in Sydney?
I'll try popping back later in the week with a sneak peek of what's in store for you every day next week. It's a bit of a Christmas baking bonanza.
So until then,
Jillian
I'm very lucky to live so close to this amazing park founded by Sir Henry Parkes, the stern looking gentleman you see above.
Notice the threatening skies?
Even the dogs were looking noticeably windswept.
For a split second the sun came out to illuminate the calla lillies then just as quickly disappeared again. Is summer ever going to arrive in Sydney?
I'll try popping back later in the week with a sneak peek of what's in store for you every day next week. It's a bit of a Christmas baking bonanza.
So until then,
Jillian
sweet and spicy souvenirs - antique chopping board and spinach and ricotta tart
12 Dec 2011
When I went overseas this year, I had a very short shopping list. It went something like this - antique wooden board and ceramic spoons. I found the bread board in Van Weerde at Herenstraat 17 in Amsterdam and posted it back home to Australia. Jeroen packaged the board so carefully it arrived without a single dint or scratch but you should have seen me struggling to get it back home from the post office.

I now have quite a collection of boards but none quite so large or distressed as this one. But what to cook? I work in a hospital and our waiting room is filled with out of date magazines. Whilst leafing through one of them I found this recipe for a spinach and ricotta tart. I knew I had some puff pastry and spinach in the freezer so I went down to the local fruit shop to buy the fresh herbs.

It's very quick and simple to make and my dinner was on the table in no time at all.

The finished product topped with some extra dill and mint. I only made one of the tarts so I had leftover filling and with a bit of smoked salmon it makes a very tasty sandwich filling. Next time though I think I'll crumble in some feta cheese to make the filling a bit more spanakopita like.
I had such a busy weekend. I went to 2 Christmas parties; I've arranged all the Christmas presents and written half of the cards and managed to complete most of my Christmas baking. You should have seen me up to my elbows in chocolate, butter and nuts. Can you believe Christmas is almost here?
How are you going with your Christmas preparations?
Jillian
I now have quite a collection of boards but none quite so large or distressed as this one. But what to cook? I work in a hospital and our waiting room is filled with out of date magazines. Whilst leafing through one of them I found this recipe for a spinach and ricotta tart. I knew I had some puff pastry and spinach in the freezer so I went down to the local fruit shop to buy the fresh herbs.
It's very quick and simple to make and my dinner was on the table in no time at all.
The finished product topped with some extra dill and mint. I only made one of the tarts so I had leftover filling and with a bit of smoked salmon it makes a very tasty sandwich filling. Next time though I think I'll crumble in some feta cheese to make the filling a bit more spanakopita like.
I had such a busy weekend. I went to 2 Christmas parties; I've arranged all the Christmas presents and written half of the cards and managed to complete most of my Christmas baking. You should have seen me up to my elbows in chocolate, butter and nuts. Can you believe Christmas is almost here?
How are you going with your Christmas preparations?
Jillian
min and sharon's wedding
7 Dec 2011
The weather in Sydney has been pretty ordinary so far considering it's supposed to be summer. I've been wearing my winter pyjamas most nights. Thankfully Saturday was a gorgeous day, which was a good thing, as Min and Sharon had chosen to marry outdoors.Their wedding was held in the Eternal Garden at Curzon Hall in Sydney.

The groom looked very dapper and didn't stop smiling the whole day.

Here comes the bride.

Doesn't she look gorgeous walking down the aisle on the arm of her father?

A few images in black and white.

Getting married in the Eternal Garden.

Doesn't Sharon look like a little China Doll?

Sharon's very pretty sister Karen was her bridesmaid.

Some details in black and white.

Just a few more of the bride.

I put down my cameras down at this point and concentrated on being a guest. It's quite interesting attending a wedding as a guest when you're used to being the photographer up at the front of the pack. I knew I wouldn't get my usual access so I bought along my long lens, which I rarely use. It does give you quite a different perspective of the day.
Min and Sharon are now in Malaysia having another celebration with their Malaysian relatives. We're looking forward to seeing them both back at work following their honeymoon in Saba.
Another weekend filled with Christmas parties so I'll see you all again next week.
Bye for now,
Jillian
The groom looked very dapper and didn't stop smiling the whole day.
Here comes the bride.
Doesn't she look gorgeous walking down the aisle on the arm of her father?
A few images in black and white.
Getting married in the Eternal Garden.
Doesn't Sharon look like a little China Doll?
Sharon's very pretty sister Karen was her bridesmaid.
Some details in black and white.
Just a few more of the bride.
I put down my cameras down at this point and concentrated on being a guest. It's quite interesting attending a wedding as a guest when you're used to being the photographer up at the front of the pack. I knew I wouldn't get my usual access so I bought along my long lens, which I rarely use. It does give you quite a different perspective of the day.
Min and Sharon are now in Malaysia having another celebration with their Malaysian relatives. We're looking forward to seeing them both back at work following their honeymoon in Saba.
Another weekend filled with Christmas parties so I'll see you all again next week.
Bye for now,
Jillian
little lemon polenta cakes
5 Dec 2011
I made this sweet little cakes a few weeks ago but haven't had a chance to show them on the blog. I used a recipe by Manna from Heaven.

I'd just bought some pistachios and decided to pretty up the cakes with a little splash of green.

I only used half the recipe but it still made lots of these little cakes. I was meeting a friend for lunch and took a few with me and still managed to take plenty to work the next day.

These little cakes have loads of flavour and an interesting texture and best of all, they're gluten free.
Here's the original recipe for you.
LEMON POLENTA CAKE
225 g (8 oz) butter, at room temperature, plus extra for greasing
225 g (8 oz) caster (superfine) sugar
3 55 g eggs, lightly beaten
110 g (4 oz) ground almonds
110 g (4 oz) shredded coconut (long thread)
110 g (4 oz) fine polenta
finely grated zest of 2 lemons
2½ tbsp lemon juice (2 small lemons)
1 tsp baking powder
1 tsp vanilla bean paste
Variation: you can make this cake as 24 small cakes using mini muffin trays or silicone flexipans. Bake for 20–30 minutes, or until golden.
I've had a really busy weekend and next weekend will more of the same. I've been out and about, baking and photographing like crazy so hope to bring you a full week of Christmas baking treats in the week leading up to Christmas.
See you all again soon,
Jillian
I'd just bought some pistachios and decided to pretty up the cakes with a little splash of green.
I only used half the recipe but it still made lots of these little cakes. I was meeting a friend for lunch and took a few with me and still managed to take plenty to work the next day.
These little cakes have loads of flavour and an interesting texture and best of all, they're gluten free.
Here's the original recipe for you.
LEMON POLENTA CAKE
225 g (8 oz) butter, at room temperature, plus extra for greasing
225 g (8 oz) caster (superfine) sugar
3 55 g eggs, lightly beaten
110 g (4 oz) ground almonds
110 g (4 oz) shredded coconut (long thread)
110 g (4 oz) fine polenta
finely grated zest of 2 lemons
2½ tbsp lemon juice (2 small lemons)
1 tsp baking powder
1 tsp vanilla bean paste
Icing
225 g (8 oz) icing (confectioners) sugar, sieved
2–3 tsp lemon juice
Method
Set the oven to 150°C (300°F). Grease and line a 24 cm (9 ½inch) round cake tin. Cream the butter and sugar in an electric mixer for 2 minutes, or until lump free (the mixture does not need to be light and fluffy). Slowly beat in the eggs, then fold in the ground almonds, coconut, polenta, lemon zest, lemon juice, baking powder and vanilla. Pour into the cake tin and use the back of a spoon to spread the mixture and flatten the top. Bake for 30–50 minutes, or until the cake is golden and just coming away from the side of the tin. Cool in the tin then turn out onto a serving plate.
For the icing, mix the sugar and lemon juice in a bowl until smooth. Spoon over the cake, letting the icing dribble down the sides a little. Leave the icing to set before gobbling up with your friends.
Variation: you can make this cake as 24 small cakes using mini muffin trays or silicone flexipans. Bake for 20–30 minutes, or until golden.
See you all again soon,
Jillian
Subscribe to:
Posts (Atom)