SLIDER

Gluten free banana bread with passionfruit cream cheese icing

29 Jul 2023


When I was home in Brisbane, Dad had what seemed like kilos of over ripe bananas. I froze some and also used a few to make a loaf of
Flour Bakery's famous banana bread. I'd forgotten just how delicious it was and ate most of the loaf myself, slathering each slice with cream cheese. The following day my gluten free friend visited and I had nothing to offer her. I was sorry I hadn't thought to make a gluten free version of the banana bread.


With that in mind, I took some of the manky bananas home with me to Sydney just so I could work on creating a gluten free version. I made a half batch of the mixture and the loaf was so tiny, I didn't feel I could post that to the blog so I made a second, larger version.

Not all bakes run smoothly and my gas oven went out during the first 30 minutes of the bake and I was left with a slightly sunken cake. I'd always planned to ice the cake and made some passionfruit cream cheese icing to fill in the depression. 


Here's the recipe for you which makes a standard loaf. For all my recipes I use a 250 ml cup, a 20 ml tablespoon, unsalted butter and 60g eggs. My oven is a conventional gas oven so if your oven is fan forced you may need to reduce the oven temperature by 20°C.


Gluten free banana bread with passionfruit cream cheese icing
Ingredients
150g GF self raising flour 
10g potato starch/corn flour or tapioca starch
½ tsp bicarb soda
¼ tsp ground cinnamon
½ tsp sea salt flakes 
50g almond meal
150g caster sugar
2 eggs
100g vegetable oil 
340g mashed over ripe bananas 
30 mls sour cream or yoghurt
1 tsp rum

Passionfruit Cream Cheese Icing
40g unsalted butter
50g room temperature cream cheese
150g icing sugar
Pinch salt
pulp of 1-2 passionfruit

Method
Preheat the oven to 170°C conventional, with the rack in the centre of the oven. Grease and line a standard loaf tin with baking paper. 

Sift together the flour, cornstarch, bicarb soda, cinnamon and salt in a bowl. Stir through the almond meal then set aside.

With a stand mixer fitted with the whisk attachment, beat together the sugar and eggs on medium speed until light and fluffy, about 5 minutes. Switch to low speed and slowly drizzle in the oil, taking your time. Add the bananas, sour cream and rum, and continue to mix on low speed just until combined.


Use a rubber spatula to fold in the flour mixture until thoroughly combined. No flour streaks should be visible. Pour the batter into the prepared loaf pan and bake for 1 to 1¼ hours. The loaf should be golden brown on top and a skewer inserted into the cake should come out clean. Let cool in the pan on a wire rack for 30 minutes, the remove from the pan and let cool completely on the wire rack before topping with the cream cheese icing. 


Icing
Place all the icing ingredients, except for the passionfruit, into the bowl of a stand mixer then beat for 10 minutes on low speed until the icing is fluffy and ultra-creamy. It should hold its shape and not be melty or slack. If it slumps, chill and re-beat. Just before using, stir through the pulp of 1 passionfruit. You can drizzle a little more passionfruit pulp over the icing just before serving if you like.


Well as expected, this banana bread was a hit and every-one loved the passionfruit cream cheese icing.

See you all again next week with some more baking from my kitchen.

Bye for now,

Jillian

PRINT RECIPE

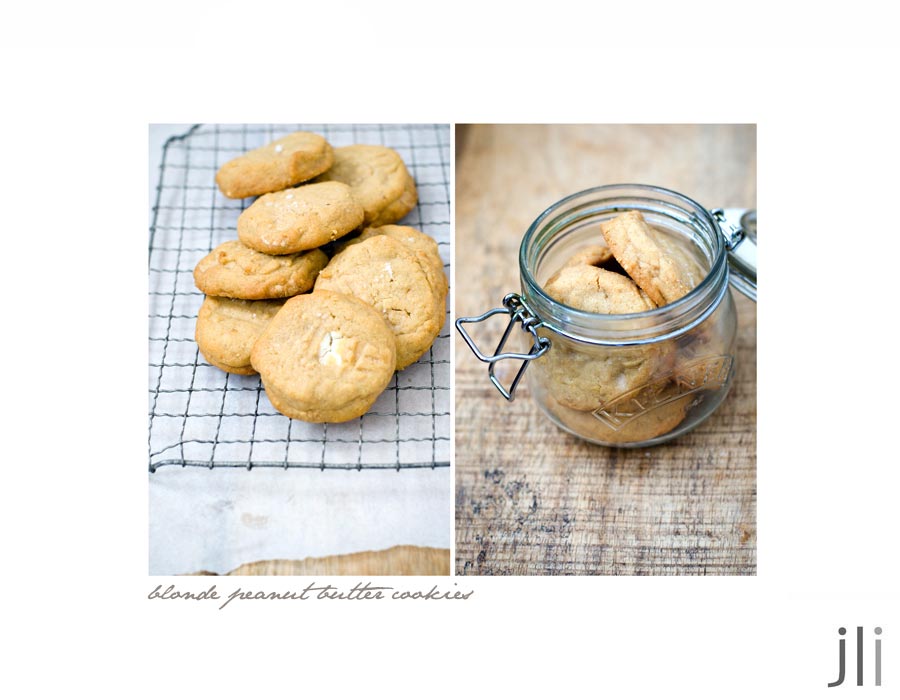
Blonde Peanut Butter Cookies

23 Jul 2023


For my birthday a friend kindly gave me a book voucher and I used the voucher to buy a copy of Claire Ptak's new book, Love is a Pink Cake. As you know, I just love baking with fruit and nuts and the book is filled to the brim with recipes I can't wait to make.

When I returned from one of my flying visits to Brisbane, the biscuit tin was empty so for my first bake, I adapted Claire's recipe for Big Sur cookies. They were delicious but by Saturday the tin was empty and needed to be refilled. For my second bake I made a batch of the blonde peanut butter cookies from the book. I had to buy some some caramelised white chocolate first, which I love so no hardship there, but everything else was already in the cupboard.


The batch made sixteen 30ml cookies and I baked half and froze the rest. My cookies took way longer than 10 minutes to bake though, more like 15 minutes so use the time as a guide only. I reduced the sugar in the recipe, as is my wont, from 250g to 150g and they were plenty sweet but that may have affected the baking time.

If you'd like to make a batch of these cookies, here's the original recipe for you which makes 12 large cookies or 16 medium size cookies. For all my recipes I use a 250ml cup and a 20 ml tablespoon, unsalted butter and 60g eggs. My oven is a conventional gas oven so if your oven is fan forced you may need to reduce the oven temperature by 20°C. 


Blonde Peanut Butter Cookies - makes 12 cookies 
Ingredients
115g unsalted butter 
250g (I reduced the sugar to 150g) soft light brown sugar
155g crunchy peanut butter 
1 egg 
1½ tsp vanilla extract
1 tsp lemon juice
100g plain flour 
75g wholemeal flour
½ tsp baking powder 
½ tsp fine sea salt
150g blonde chocolate or white chocolate, chopped 
Flaky sea salt, for sprinkling

Baker's tip: If you can't find blonde chocolate, you can bake white chocolate (at least 30% cocoa solids) in the oven at 100°C fan/120°C/250°F/gas 2, stirring every 15 minutes until golden and nutty. Spread into a tray to set, then break up and use as chips.

Method
In the bowl of a stand mixer fitted with the paddle attachment, cream the butter, sugar and peanut butter together. Add the egg, lemon juice and vanilla and beat well.

Whisk together the flours, baking powder and sea salt in a separate bowl, then add these dry ingredients to the butter and egg mixture along with the chocolate and mix until combined.


Scoop individual portions of cookie dough onto a tray. If using spoons, pat each portion into a little ball then flatten to about 2.5cm (1in) thick. Use a fork dipped in water and press the tines down into the tops of the cookies in a hashtag pattern. Cover and chill or freeze for at least 1 hour. (You can bake them straightaway, but the cookies will be slightly flatter, or freeze them for up to a month, baking off as and when you want them.)


When you are ready to bake, preheat the oven to 190°C, conventional, and line a large baking sheet with baking paper. If you are baking from frozen, allow the cookies 5-10 minutes out of the freezer before placing in the oven. Arrange the cookies evenly on the sheet, leaving enough space between each one so they have room to expand during baking.


Sprinkle with a small amount of flaky sea salt and bake for 8 - 10 minutes (my cookies took 16 minutes) until the centre of each cookie is slightly soft and underbaked but the edges are turning crisp and golden. Remove from the oven and allow to cool on the tray for 5-10 minutes before enjoying.


My brother dropped by unexpectedly for afternoon tea and immediately ate 2 of the cookies and said they were good. I've just eaten one of the cookies and I can concur, these are really good cookies and best of all, just perfect for dunking. I'll definitely be making these cookies again.


These cookies were just fabulous and I'll definitely be making these again.

See you all again soon with some more baking from my kitchen.

Bye for now,

Jillian
PRINT RECIPE

rhubarb custard crumble cake

16 Jul 2023


A few weeks ago, I bought a bunch of rhubarb to make a Danish rhubarb marzipan cake. However whilst hunting on the internet, I fell down a rabbit hole
 of rhubarb custard crumble cake recipes and before I knew it, I was making custard, crumble and parcooking rhubarb and the marizipan cake idea went straight out of window.


I took the idea and ran with it. I used my blackberry and apple crumble cake recipe as the base and winged it from there. I don't like the texture of rhubarb when it's baked on top of a cake, so I decided to parcook the rhubarb topping first. I was delighted to find it could be done in a few minutes in the microwave rather than 30-40 minutes in the oven. Such a timesaver and I know I'll be using the technique again very soon.


It's a bit of a process making this cake, but the crumble, custard and the rhubarb can all be made ahead of time and refrigerated. I put the cake together, baked it and kept my fingers crossed that all the different elements would work together.


Here's the recipe for you which makes a 17cm cake. For all my recipes I use a 250ml cup and a 20 ml tablespoon, unsalted butter and 60g eggs. My oven is a conventional gas oven so if your oven is fan forced you may need to reduce the oven temperature by 20°C. 


Rhubarb Custard Crumble Cake
Custard
1½ tbs custard powder
1½ tbs caster sugar
2/3 cup (170ml) milk
1½ tsp vanilla essence

Rhubarb
150g rhubarb, washed, trimmed and cut into 5cm and 10cm pieces, to fit the tin
20g caster sugar
1/2 tsp grated orange rind
2 tsp water or orange juice

Crumble

50g unsalted butter
50g plain flour
a pinch of salt
50g raw sugar
2 heaped tbsp (20g) rolled oats
pinch of cinnamon

Cake
100g unsalted butter, room temperature
100g caster sugar
1 tsp grated orange rind
2 eggs, room temperature
75g plain flour
1 tsp baking powder
Pinch salt
50g almond meal
½ cup (60g) diced rhubarb

Custard
Combine custard powder and sugar in a small saucepan; gradually stir in the milk. Stir over heat until the mixture boils and thickens. Remove from heat; stir in the butter and the vanilla essence. Press plastic wrap over the surface; cool. Just before using, stir the custard to loosen.

Rhubarb
Toss the ingredients together in a bowl then place the rhubarb pieces in a single layer in a microwave safe container. Cover and microwave on medium high for 2-3 minutes. The rhubarb should be partially cooked and should still hold its shape. The cooking time will depend on the thickness of your rhubarb. Cool completely before using.

Crumble
Rub the butter, flour and a pinch of salt together in a small bowl then stir in the sugar, oats and cinnamon to make large crumbs. Place in the fridge until needed.

Cake
Preheat the oven to 180°C, conventional. Grease and line the base and sides of a deep 17 cm round springform tin with baking paper. Set to one side.

Cream the butter, sugar and orange rind together in a bowl until light and smooth. Add the eggs one at a time, and beat together until well combined. Sift the flour, baking powder and salt together in a small bowl then stir through the almond meal. Add the flour mixture to the butter mixture in two or three lots to make a smooth batter before folding in the diced rhubarb.


Spoon the cake mixture into the prepared pan and level the top then spoon over the custard. Top the custard with the parcooked rhubarb pieces then scatter the crumble on top of the rhubarb. Place the cake on the centre rack of the preheated 180°C, conventional oven and bake for about an hour or until a skewer inserted into the cake comes out moist but relatively clean. If the crumble browns too quickly, then cover with a piece of foil whilst it finishes cooking through.


Cool in the pan for 30 minutes to allow the custard to set before removing from the tin. Serve warm or at room temperature.


I was worried the cake might be a bit too sweet but it wasn't at all. Rhubarb and custard are a natural pairing and the oaty crunchy topping, makes for a nice textural contrast. 


All in all, I was pretty pleased with the cake and I think it would be even better topped with a good dollop of cream.

See you all again next week with some more baking from my kitchen.

Bye for now,

Jillian
PRINT RECIPE

glazed chocolate olive oil cake

3 Jul 2023


A few posts back I mentioned I was working on a chocolate pound cake recipe and here it is. I've made the cake twice now - the first time I made a loaf cake and topped it with dark chocolate ganache, which my Dad found a bit rich. 
This time I made a bundt cake and used some 'just about to expire' sour cream instead of yoghurt. 

I topped the cake with some old fashioned chocolate icing, only because I'd run out of cream with which to make the ganache, then added a handful of chopped toasted almonds for decoration. I'm not sure which version I prefer.


Making this cake takes no time at all. It takes way more time to prepare the tin and weigh out and measure the ingredients. Here's the recipe for you which makes a small bundt or a small loaf cake. For all my recipes I use a 250 ml cup, a 20 ml tablespoon, unsalted butter and 60g eggs. My oven is a conventional gas oven so if your oven is fan forced you may need to reduce the oven temperature by 20°C.


Glazed chocolate, olive oil cake
Cake
65g brown sugar
65g caster sugar
⅓ cup (50g) plain flour
⅓ cup (35g) cocoa powder
2 tsp baking powder
Pinch table salt
⅔ cup (65g) almond meal
2 tsp vanilla extract
2 eggs
⅓ cup (80g) extra-virgin olive oil
Scant ⅓ cup (75g) full fat yoghurt or sour cream

Chocolate Icing
1 tsp butter or oil
20g dark chocolate, coarsely chopped
½ cup sifted icing sugar
5g (3 tsp) cocoa powder, sifted
½ tsp vanilla extract
¼ cup (60 ml) milk

Method
Preheat the oven to 180°C, conventional. If making the bundt cake, grease 
a 5 cup bundt tin and dust with cocoa powder. If making the loaf cake then line a small loaf pan with baking paper, allowing some overhang for easy removal.

Place the sugars in a large bowl. Sift the flour, cocoa, baking powder and salt into a small bowl. Stir through the almond meal and set to one side. Add the vanilla and eggs to the sugar mix, then slowly drizzle in the olive oil. Whisk until the mixture thickens. Whisk in the dry ingredients in thirds alternating with the yoghurt or sour cream and mix until the batter is smooth. 


Pour the batter into the prepared pan and bake on the centre rack for 40-45 minutes or until a toothpick inserted in the centre comes out clean. Cool the cake in the pan for 15 minutes, then invert onto a wire rack. Let the cake cool completely before icing.


Chocolate Icing
Melt the butter and chocolate in a medium heatproof bowl over a saucepan of simmering water. Stir sifted icing sugar and cocoa into the chocolate. Add the vanilla extract and enough milk to make an icing of a coating consistency. Put a tray or baking sheet under the wire rack and pour the glaze over the cake, letting it run over the edges. If you like, you could decorate the top of the cake with some coarsely chopped toasted almonds and chocolate shards. The cake will keep at room temperature for 3 days.


The cake has a high cocoa content so it makes a deeply dark, moist, though not particularly sweet cake, if that's your thing. 


See you all again next week with some more baking from my kitchen.

Bye for now,

Jillian

PRINT RECIPE
© DELICIOUS BITES • Theme by Maira G.