SLIDER

chocolate easter egg marble cake

28 Mar 2022


A few months ago I found a Malteser marble cake recipe by Edd Kimber and decided to rework the recipe to make it into an Easter egg cake.
 
 
Instead of the original loaf tin I decided to use my favourite copper bundt cake pan. Because the central funnel transmits heat to the centre of the cake, cakes baked in a bundt tin take less time than cakes baked in a loaf tin, another reason why I love them.


I topped the cake with a rich sour cream chocolate ganache then used a variety of Easter eggs for decoration, some whole, some crumbled and some white chocolate shards I had lurking in my fridge. Here's the recipe for you which makes a small bundt or loaf cake. if you make a loaf cake, you will need to bake the cake for about 70 minutes. For all my recipes I use a 250 ml cup, a 20 ml tablespoon, unsalted butter and 60 g eggs. My oven is a conventional oven so if you have a fan-forced oven you may need to reduce the temperature by 20°C. 
 
 
Chocolate Easter Egg Marble Cake inspired by an Edd Kimber recipe
Ingredients
115g unsalted butter, room temperature
185g caster sugar
1 tsp vanilla extract
2 large eggs, lightly whisked
200g plain flour
1¼ tsp baking powder
Pinch salt
115g soured cream, room temperature
15g cocoa powder
30mls strong coffee, cooled
 
Chocolate glaze
50g milk chocolate, finely chopped
50g dark chocolate, finely chopped
50g soured cream, room temperature
1 tsp maple syrup
 
To decorate
Easter eggs
 
Method
Heat the oven to 180⁰C conventional. Grease and flour a 5 cup bundt tin and place in the fridge until needed.  
 
Place the butter, sugar and vanilla into the bowl of a stand mixer and cream together for 5 minutes or until light and fluffy. Add the eggs a little at a time, mixing until combined before adding more. Meanwhile, sift the flour, baking powder and salt in a bowl. Add the flour mixture in three additions, alternating with the soured cream and starting and finishing with the flour. Divide the batter equally into two bowls. Sift the cocoa powder over one portion, add the coffee and beat together until smooth and combined. 
 

Alternately spoon the plain and chocolate batters into the tin in blobs, layering them almost like a chess board. Lightly tap the tin on a work surface to help eliminate any air pockets. Use a chopstick or skewer to swirl the batters together – do this briefly as you still want to keep definition between the layers.  
 
Bake for 50 minutes or until a skewer inserted into the middle of the cake comes out clean. Cool for 15 minutes in the tin before inverting the cake onto a wire rack to cool completely. 
 

Glaze 
Place the chocolate into a stainless steel or glass bowl and place over a pan of simmering water. Stir until the chocolate has melted. You can also do this step in a microwave. Remove from the heat and whisk in the sour cream and maple syrup. The glaze should be smooth and glossy. Cool for a few minutes in the fridge to thicken a little before pouring over the cake, allowing the excess to drip down the sides. Once the glaze has begun to set, decorate the cake with the Easter eggs, pushing in slightly to stick. The cake will keep, covered, for 3-4 days

I'm not a huge chocolate fan so I didn't try the cake but when I shared this with my neighbours it inspired cartwheels and tumble turns but then again that may just have been the sugar working on a 5 year old!

See you all again next week with some more baking from my kitchen. 

Happy Easter,

from Jillian


PRINT RECIPE

apple rye fruit loaf


My sourdough adventure continues. So far I've had some successes but I've had a few failures as well. A few weeks ago I adapted the Apple, Yoghurt, Rye and Cinnamon Sourdough Loaf from The Bourke Street Bakery Cookbook. I made this bread many years ago and the original recipe used a tiny quantity of yeast which I discarded because, well I'm on a sourdough kick you know. As it's quite some time since I last made the bread, I'd quite forgotten the recipe makes 2 loaves and instead made one giant loaf which was way too big for me to finish. I halved the loaf, wrapped the bread in brown paper and offered it to friends and after treating myself to too many slices of freshly baked fruit loaf, froze the remainder for another day. What's left is safely stored in the freezer.

 
Here's the recipe for you, just remember either halve the quantities to make a single loaf or make two loaves otherwise you'll end up with the biggest loaf of fruit bread you ever did see. For all my recipes I use a 250 ml cup, a 20 ml tablespoon, unsalted butter and 60 g eggs. My oven is a conventional oven so if you have a fan-forced oven you may need to reduce the temperature by 20°C.


Apple rye sourdough bread - adapted from the recipe for Apple, Yoghurt, Rye and Cinnamon Sourdough Loaf from The Bourke Street Bakery Cookbook – makes 2 medium loaves

Fruit soak
140ml boiling water
1 Earl grey tea bag
50g dates
50g raisins
50g sultanas
90g green apple cut into 1 cm dice (reserved)

Pour the boiling water over the tea bag and let infuse for 10 minutes. Place the dried fruit into a small container. Remove the tea bag then pour the tea to cover the dried fruit. Soak the fruit overnight at room temperature.

Starter Build
40g white sourdough starter
20g white flour
20g wholemeal flour
40g water

Method
Around 4–6 hours before you plan to mix your dough, combine the starter, flours and water for the starter build, mixing well to combine. After a few hours (I like to do this overnight) the starter should be bubbly and doubled in size. You will use 90g of this for the dough; retain the rest for maintaining your starter.

Dough
360g white baker’s flour
50g wholemeal flour
200g water
50g plain yoghurt
90g starter
1 tbs soft brown sugar
7g sea salt
1 tsp ground cinnamon

Method
At least 30 minutes before you plan to mix the dough, combine the flours, water and yoghurt in the bowl of a stand mixer. Mix with your hands until thoroughly combined, then cover the bowl with a damp cloth and set aside for 30 minutes. This process will hydrate the flour

Add the ripe starter to the flour and water mixture with the remaining dough ingredients then using the dough hook mix on low-medium speed for 5 minutes to form a slightly sticky dough. Remove the dough hook then cover the bowl with a damp cloth and set aside in a warm place for at least 30 minutes, before your do your first set of folds

Thoroughly drain the soaked fruit and pat dry with paper towels. Add the fruit soak and the apple pieces as you do the first turn and fold in the bowl, ensuring they are evenly distributed. If the fruit seems a bit wet, you can throw a little extra flour in. You want a slightly sticky dough, but not a wet dough.


Complete four sets of folds resting the dough in between each one for 30–45 minutes. After your last set of folds, cover the dough with plastic and leave to prove at room temperature for 2–3 hours. After the 2 hour prove I like to place the covered dough in the fridge for a few hours to firm before shaping the dough.

Divide the dough in 2. Lightly flour the bench before pre-shaping the dough, cover with a damp cloth and leave it to rest on the bench for 15–20 minutes. When the dough has relaxed, shape the dough as desired, then place it seam side up into 2 lightly floured proving baskets. Cover with a damp cloth and leave in the fridge overnight, until ready to bake.

An hour before baking the loaf, place a Dutch oven on the centre rack then preheat the oven to its maximum temperature. Just before baking reduce the heat to 240°C, conventional then invert the dough onto a piece of baking paper. Lightly dust the top of the loaf with some semolina then score the top of the loaf with a razor blade or a sharp knife. Using the baking paper as a handle carefully place the loaf into the preheated Dutch oven and place the lid on top. 


Bake the loaf for 20 minutes with the lid on, and then remove the lid and reduce the temperature to 200°C and bake for a further 20–25 minutes, until the top is a lovely dark brown. Once baked, tip the bread out of the pan onto a wire rack to cool completely before slicing. If making 2 loaves then repeat the process.


Excellent toasted, buttered then topped with jam.

I know it's hard to believe but next week will be Passover week 2022. I have 5 Passover friendly recipes for you to tackle so I'll see you all again next week with lots of baking from my kitchen.

Bye for now,

Jillian


PRINT RECIPE

passover week 2022 - strawberry and cream cakes

27 Mar 2022


Yes these may look very familiar because I made the non Passover version last year. The non-P cakes barely rose and contained such a small amount of flour I knew they could be easily converted to a Passover friendly version. 


To make up for the lack of raising agent, I separated the eggs and used the beaten egg whites to lighten the batter. That made the baked cakes a bit more delicate than their non-P counterparts but I don't think that's a bad thing. As you can't buy kosher for Passover cream cheese here, I went with a simple vanilla bean flavoured whipped cream topping.


Here’s the recipe for you which makes 6 small cakes. For all my recipes I use a 250ml cup and a 20ml tablespoon, unsalted butter and 60g eggs. My oven is a conventional gas oven so if your oven is fan forced you may need to reduce the oven temperature by 20°C.


Passover strawberry and cream cakes – makes 6  adapted from here
Cake 
60g Passover baking mix (equal quantities Potato starch and superfine matzo meal)
¼ tsp sea salt flakes
70g almond meal
125g unsalted butter at room temperature, plus extra for greasing
125g caster sugar 
1 tsp finely grated lemon rind
1 tsp vanilla essence 
2 eggs, separated
40-60mls milk
100g strawberries, washed hulled and cut into 1 cm dice sprinkled with 2 tsp caster sugar

Topping 
250mls cream
Seed of ½ a vanilla bean
1 tbs caster sugar
3 strawberries, halved lengthways

Method
Preheat the oven to 180ºC conventional. Grease and line the base of 6 Texas muffin tins with baking paper. Dust with superfine matzo meal. 

Sift the baking mix into a bowl and then stir in the salt and the almond meal. Set to one side.

Place the butter, sugar, lemon rind and vanilla in a large bowl and beat with a wooden spoon or hand mixer until light and creamy. Add the egg yolks, one at a time, beating well after each addition and scraping down the sides of the bowl to ensure even mixing. Don’t worry if it looks a little curdled at this stage, it will come together again later. 

Add the sifted dry ingredients in three batches, alternating with enough milk to make a smooth batter. Scrape down the sides of the bowl with a flexible spatula to make sure the batter is evenly mixed. In a clean dry bowl whip the egg whites until soft peaks form. Gently fold in the egg whites followed by the diced strawberries.

Spoon the mixture into the prepared tins, levelling the tops with a small metal spatula or spoon to ensure they are smooth and even. The batter should come about three-quarters of the way up the sides of the tin. Place the muffin tin on the middle shelf of the preheated oven and bake for 25 minutes or until the cakes are golden and a skewer inserted into the middle of the cakes comes out clean.


Remove the tin from the oven then run a knife around the cakes. The cakes are delicate so allow the cakes to cool for 15 minutes before easing the cakes out of the moulds with a small knife or an offset spatula. Transfer to a wire rack to cool completely before decorating.


Topping
Whip the cream with the vanilla seeds until soft peaks form then sweeten to taste. Spoon or decoratively pipe the cream onto the top of the cakes. Place the halved strawberries on top of each mini cake, pressing just lightly to embed them into the cream. Any leftovers will keep, refrigerated, for up to two days.
 
These were just as tasty as their non-P version and disappeared in a thrice.

That's the last bake for Passover Week 2022. I'll see you all again next week with a little something for Easter.

Bye for now,

Jillian


PRINT RECIPE

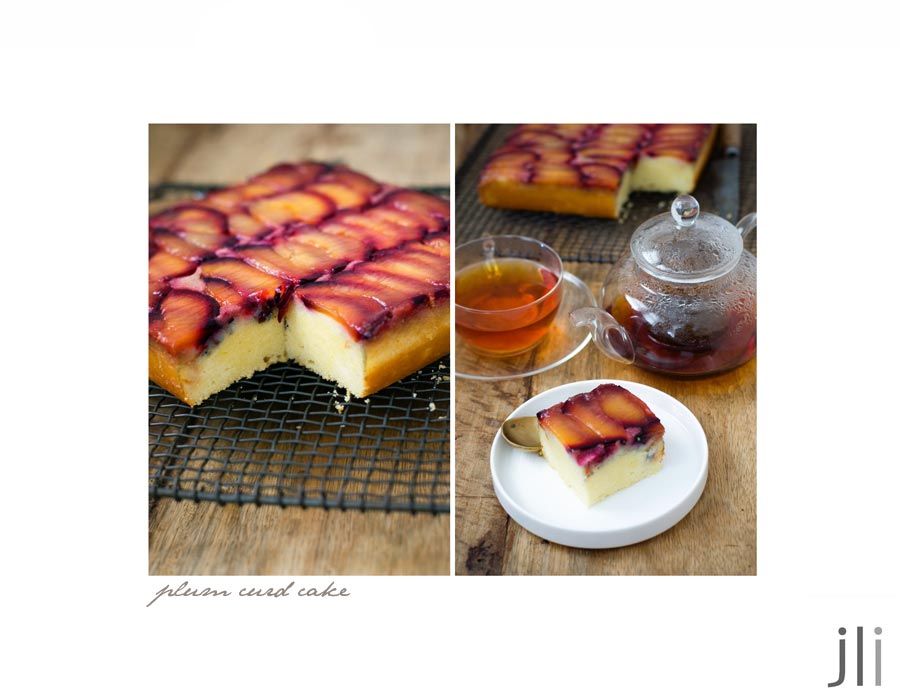
curd cake with plums

20 Mar 2022


With the ongoing conflict in Ukraine I thought I'd share a Ukrainian recipe with you. Olia Hercules is a British based chef and food writer who was born in Ukraine and she shares the recipes of her homeland. Today's recipe is adapted from her recipe for curd cake with caramelised apples.


The cake should be made with dry cottage cheese which is hard to find in Sydney and expensive, so at Olia's suggestion I made the cake with ricotta. Ricotta is a little bland compared to cottage cheese so I added a little bit of lemon rind to get that tang I associate with cottage cheese.
 

I went out and bought apples to make the cake but as it's plum season here, I decided to use plums instead. I thought I'd bought black plums so was a bit surprised and disappointed when I sliced the plums and found they had yellow flesh. All was forgiven when the plums turned this delicious shade of pink when cooked.


Here's the recipe for you which makes a 7 inch square or round cake. For all my recipes I use a 250 ml cup, a 20 ml tablespoon, unsalted butter and 60 g eggs. My oven is a conventional oven so if you have a fan-forced oven you may need to reduce the temperature by 20°C. 
 

Curd Cake with Plums inspired by this Olia Hercules recipe
Topping
20g melted unsalted butter
¼ cup brown sugar
3-4 plums, halved pitted and sliced
 
Cake
115g room temperature unsalted butter
135g caster sugar
1 teaspoon vanilla extract
½ tsp grated lemon rind
350g ricotta cheese or good-quality cottage cheese
2 eggs, separated
80g fine semolina or polenta
pinch of salt

Method
Preheat the oven to 200°C, conventional. Grease, flour and line the base of a 17.5 cm/7 inch square square or round cake tin with baking paper. Pour the melted butter into the base of the tin followed by the brown sugar. Evenly spread the sugary slurry over the base of the tin then decoratively arrange the plum slices over the sugar, overlapping the slices.

Place the softened butter, 115g of the caster sugar, the vanilla extract and lemon rind into a food processor and process until well combined. Add the ricotta and the egg yolks and process until smooth. Transfer the mixture to another bowl and then fold in the semolina or polenta (the latter will result in a cake with more texture).

Place the egg whites with a pinch of salt in a clean dry bowl and whisk until they form soft peaks. Add the remaining 20g of caster sugar and keep whisking until the sugar has dissolved. Now take a large spoonful of the egg white mixture and fold it quite vigorously into the butter and cheese mixture to loosen it up. Add the rest of the egg white mixture and fold in gently. Pour the mixture over the plum slices in the cake tin and bake for 30 minutes, or until the cake has puffed up and is still a little wobbly, but not liquid. The cake will continue to set as it cools. 


Leave the cake in its tin to rest and cool down before turning out, then slice and serve.


Some unsweetened tea with lemon goes perfectly with this, which is exactly what I did. It was indeed the perfect accompaniment to this very tasty cake, somewhat reminiscent of my Mum's cheesecake. 

See you all again next week with some more baking from my kitchen. 

Bye for now,

Jillian

PRINT RECIPE

chocolate hazelnut ricotta cake

11 Mar 2022

 
I've had this Ottolenghi and Helen Goh recipe bookmarked ever since I purchased Sweet. This recipe is adapted from the Baked hazelnut ricotta cheesecake recipe in the book. 
 
They describe it as a cheesecake but really it's just a cake that's has ricotta as an ingredient, hence the name change. I decided to make a single cake rather than the small cakes in the book so changed the proportions a little and added a little bit of baking powder to ensure the cake rose. This is my second time making the water ganache. The first time I made it the mixture seized but this time it worked like a charm.


Here's the recipe for you which makes a 17cm cake. For all my recipes I use a 250 ml cup, a 20 ml tablespoon, unsalted butter and 60 g eggs. My oven is a conventional oven so if you have a fan-forced oven you may need to reduce the temperature by 20°C.
 
Ottolenghi chocolate hazelnut ricotta cheesecake – makes one 17cm cake
Ingredients
150g toasted skinned hazelnuts
20g (1½ tbs) plain flour
80g dark chocolate, coarsely chopped
50g almond meal
½ tsp baking powder
113g (4oz) room temperature unsalted butter, cubed
125g caster sugar
1 tsp vanilla extract
3 eggs, separated
200g ricotta cheese 
pinch salt 
 
Water ganache  
50g 70% dark chocolate roughly chopped into 2 cm pieces
20g sugar
20g light corn syrup or glucose
35mls water
¼ tsp vanilla bean paste
20g unsalted butter, at room temperature, cut into cubes. 
 
To serve 
Icing sugar 
 
Method 
Preheat the oven to 180ºC, conventional. Grease and line the base and sides of a 17cm cake tin with baking paper, which should rise 2cm above the sides of the pan, then set aside. 

Roughly chop 25g of the cooled nuts and set aside—they will be used to garnish—and place the remainder in the bowl of a food processor, along with the flour. Process until finely ground, then tip into a medium bowl. Place the chocolate in the food processor, pulse to form large crumbs and add these to the hazelnuts and flour. Add the almond meal and the baking powder mix together and set aside; the texture is a bit rustic here, which is what you want.

Place the butter, sugar and vanilla in the bowl of an electric mixer with the paddle attachment in place. Beat on medium-high speed for about 3 minutes, until light and creamy. Add the egg yolks, one at a time, beating well after each addition. Turn the speed to low, add the chocolate-nut-flour mixture and continue to mix until just combined. Remove the bowl from the machine and stir in the ricotta and salt. Transfer the cake mixture to a separate large bowl and set aside. 


Wash and dry the bowl of the electric mixer very well before adding the egg whites to it. Beat the whites on medium-high speed until stiff and then use a large spatula to fold the egg whites, in two or three batches, into the cake mixture. Scrape the mixture into the prepared tin, leveling the top. Bake for 45-50 minutes, rotating the baking sheet halfway through, until golden brown and a skewer inserted into the middle comes out more or less clean; it might have a few crumbs attached but should not be wet. Remove from the oven and set aside to cool completely. Remove the cake from the pan, peel away the paper and set aside. If you are making one large cake and it is a bit cracked on top, don’t worry; just turn it upside down leveling the base of the cake if needed. 

To make the water ganache, place the chocolate in a medium bowl and set aside. Put the sugar and corn syrup in a small saucepan and place over medium-low heat. Stir to combine and, when the sugar has melted, increase the heat to medium and bring to a boil, stirring gently from time to time. Continue to boil for about 5 minutes, until the color is a pale amber. Remove from the heat and carefully pour in the water; don’t worry if the mixture seizes. Return the pan to the heat, add the vanilla bean paste and stir gently and continuously until it returns to a boil.

Remove from the heat and wait for a minute before pouring the water-caramel over the chocolate. Allow to stand for 5 minutes and then whisk to combine. Add the butter, a couple of cubes at a time, whisking after each addition. Continue until all the butter has been added, whisking to combine until the mix is smooth and shiny. I needed to warm the mixture over a double boiler to ensure the butter melted. Set aside to cool and thicken before using. 


Just before serving sprinkle the top of the cake with icing sugar then spoon the ganache over half the cake, letting it drip down the sides. Sprinkle with the reserved hazelnuts and serve. 


The cake will keep for 3 days covered in the fridge. Bring back to room temperature just before serving. 

The cake was very well received at work with one colleague saying it tasted like a light and fluffy Ferrero Rocher.

See you all again next week with some more baking from my kitchen.

Bye for now,

Jillian
 

PRINT RECIPE

lemon yoghurt and olive oil cake

1 Mar 2022


Last weekend I had a date with my friend's 2 year old twins. The girls
are both cake connoisseurs so I knew I needed to bring along something that was quick to make, not too sugary and would stand up to their scrutiny. 
 
 
Aran Goyoaga is the Queen of Gluten Free baking but I didn't want to make a gluten free cake. I find rice flour a bit chalky so I decided to adapt her glazed lemon yoghurt and olive oil pound cake recipe by putting the gluten back in. I changed the technique a little and also changed the proportions as I wanted to make a smaller cake. As expected the cake turned out perfectly and the girls loved the cake though I suspect it was the icing they were really keen on.
 

Here's the recipe for you which makes a small loaf cake. If you'd like to make a gluten free version please refer to Aran's original recipe or just swap the plain flour with a gluten free flour blend. For all my recipes I use a 250 ml cup, a 20 ml tablespoon, unsalted butter and 60 g eggs. My oven is a conventional oven so if you have a fan-forced oven you may need to reduce the temperature by 20°C.


Lemon yoghurt and olive oil cake – adapted from an Aran Goyaga recipe
Ingredients 
Cake
100g (⅔ cup) plain flour
2 tsp baking powder
pinch table salt
65g (⅔ cup) almond meal, any lumps broken up
135g
(scant ⅔ cup) caster sugar
3 tsp finely grated lemon rind
2 eggs
80g extra-virgin olive oil
2 tsp vanilla extract
75g whole-milk yoghurt

Icing 
10g melted butter
120g (⅔ cup) sifted icing sugar
2 to 3 tbs freshly squeezed lemon juice
20g finely chopped pistachios, for topping

Method
Preheat the oven to 180°C, conventional. Grease and line the base and sides of a small loaf pan with baking paper.

Sift the flour, the baking powder and salt into a small bowl. Stir through the almond meal and set to one side. In a large bowl, rub together the sugar and lemon rind until fragrant. Add the eggs to the bowl and stir to combine. Drizzle in the oil and the vanilla extract and mix until incorporated. Add the flour in batches alternating with the yoghurt and stir until a smooth batter has formed. 
 

Pour the batter into the prepared pan and bake for 45 to 50 minutes or until a toothpick inserted in the centre comes out clean. Cool the cake in the pan for 15 minutes, then using the baking paper remove the cake from the tin and place onto a wire rack. Let the cake cool completely before icing. 
 

Icing
In a small bowl, whisk together the butter, icing sugar and lemon juice until smooth and lump-free. The icing should be pourable but not runny. Pour the icing over the top of the cake, letting it run over the edges. Wait a few minutes for the icing to set before sprinkling with the pistachios. The cake will keep at room temperature for 3 days.


I've already made this cake twice now and I took the second loaf into work. It was moist and delicious with a perfect crumb and no-one knew just how little effort was involved in its making. 
 
See you all again next week with some more baking from my kitchen. 
 
Bye for now,
 
Jillian
PRINT RECIPE
© DELICIOUS BITES • Theme by Maira G.