SLIDER

xmas 2022 - chocolate crinkle cookies

23 Dec 2022


Last year I wanted to make a batch of lemon crinkle cookies for the cookie box but ran out of time. In the end I'm glad, because when I made the lemon crinkle cookies a few weeks ago, I was underwhelmed with their flavour. Even though there was 1 tbs of lemon rind in the mix, they barely tasted of lemon, so it's back to the drawing board. 


Undefeated I turned to option number 2 - chocolate crinkle cookies. I'd already bookmarked 
a Jill Dupleix recipe and made a teeny addition to the recipe by adding some espresso powder. I also made the cookies a little smaller but otherwise they were made as written. As the cookies are made with oil, they're dairy-free and take no time to put together. Please note, the chilling time is not optional so it's best to start this recipe a few hours before baking or the day before.


Here's the recipe for you which makes 24 cookies. For all my recipes I use a 250ml cup and a 20 ml tablespoon, unsalted butter and 60g eggs. My oven is a conventional gas oven so if your oven is fan forced you may need to reduce the oven temperature by 20°C.


Jill Dupleix – Chocolate crinkle cookies - makes 24
Ingredients
180g caster sugar 
50g unsweetened cocoa powder
1/2 tsp espresso powder
1 tsp vanilla extract 
100ml vegetable oil
2 large eggs
180g plain flour
1 tsp baking powder
½ tsp sea salt

For rolling
50g caster sugar
100g icing sugar

Method
In a mixing bowl, beat the sugar, cocoa powder, espresso powder, vanilla extract and oil with an electric mixer until thick and glossy.  Add the eggs one at a time, beating well.
Sift in the flour, baking powder and salt, and combine until it forms into a soft, thick dough. Cover and refrigerate for 3 hours, or overnight, to firm up.

Heat the oven to 180°C conventional and line two baking trays with baking paper. Place the caster sugar and the icing sugar on two separate plates.

Using a dessertspoon take about 24 grams of the mixture and roll into a ball between your palms. Roll in the caster sugar until lightly coated, then in the icing sugar until heavily coated. Place on the trays 5cm apart and repeat with remaining dough.


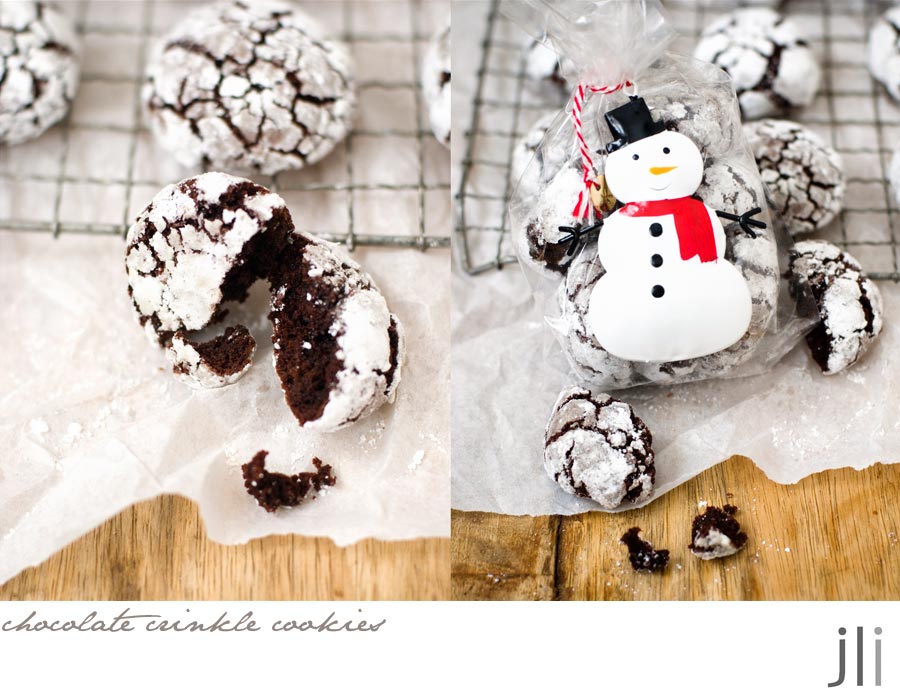
Bake for 12-14 minutes or until the tops are set and nicely cracked. Leave to cool on the tray for 5 minutes, then cool completely on a wire rack before storing in an airtight container.


Now I've nibbled on a few of these cookies and I can assure you that they're very, very good and best of all, deeply chocolatey.

That's the final post for me for the year and what a year it has been. I'm going to take a few weeks break from the blog and will see you again mid-January 2023.

Bye for now,

Jillian


PRINT RECIPE

xmas 2022 - gluten free Roasted Almond and Chocolate Chunk Cookies

22 Dec 2022


Today's Christmas cookie box recipe is for these salt flecked gluten free r
oasted almond and chocolate chunk cookies, slightly adapted from an Aran Goyoaga recipe. If you've not read or heard about Aran, she is the queen of gluten free baking.


The cookies use buckwheat flour and almond meal instead of regular flour. The cookies can be made directly after mixing but I prefer to refrigerate my cookie dough overnight before baking.

Here’s the recipe for you which makes 15 cookies, adapted from an Aran Goyaga recipe. For all my recipes I use a 250 ml cup, a 20 ml tablespoon, unsalted butter and 60 g eggs. My oven is a conventional oven so if you have a fan-forced oven you may need to reduce the temperature by 20°C. 


Roasted Almond and Chocolate Chunk Cookies – m
akes 15 cookies 
Ingredients
Scant ½ cup (120g) almond butter
55g unsalted butter or dairy-free butter, room temperature
Scant ½ cup (100g) caster sugar 
¼ cup (55g) light brown sugar 
2 tsp vanilla extract 
1 large egg 
¾ cup (105g) light buckwheat flour 
1½ tbs (12g) almond meal 
½ tsp sea salt flakes 
½ tsp bicarb soda 
90g 70% dark chocolate, coarsely chopped, divided 
90g roasted and salted almonds, coarsely chopped, divided
Flaky sea salt (optional) 

Method
In the bowl of a stand mixer fitted with a paddle attachment, combine the almond butter, butter, caster sugar and brown sugar. Beat on medium speed until creamy and light, about 3 minutes. Add the vanilla extract and the egg then beat until combined. 

In a small bowl, stir together both flours, the salt and bicarb soda. Add to the mixer and beat until it nearly comes together. Add about three quarters of the chopped almonds and chocolate and continue beating until combined. The dough will be sticky and spread a bit. The cookies can be baked right after mixing however I wrapped the dough in plastic wrap then refrigerated the dough overnight. 


The following day preheat oven to 190°C, conventional. Line two baking trays with baking paper. Portion out 40g of dough per cookie (about 1½ tbs of mixture). You should be able to make 15 cookies. Place 6 cookies onto a tray, as the cookies will spread. Dot the tops of the cookies with some of the remaining chopped almonds and chocolate chunks. Sprinkle a small pinch of sea salt on top.

Bake the cookies until the edges are golden brown but the centre still appears soft, 9 to 12 minutes. The tops will puff up slightly. I like to bake one tray of cookies at a time and I rotate the tray mid bake to ensure even browning. Cool the cookies on the baking tray until you can lift them without falling apart, at least 10 minutes. Repeat with the second tray then bake the remaining 3 cookies on the now cool first baking tray. Store the cookies in an airtight container for up to 5 days. 


I found the flavour of the buckwheat flour a little intense and next time I'd swap some of it for GF plain flour. Otherwise the cookies were easy to make, baked up well and were very tasty and best of all, my friends loved them.

See you all again tomorrow with my last Christmas cookie recipe.

Bye for now,

Jillian
PRINT RECIPE

xmas 2022 - chocolate peppermint cookies

21 Dec 2022


Growing up, my favourite biscuits were chocolate biscuits with a baked on white peppermint flavoured topping. With that in mind, I 
decided I needed to make some chocolate peppermint cookies to place in my cookie box. I adapted an Erin Jean McDowell recipe, which you can find here, and used my own filling recipe. 


The recipe made loads of cookies so I made some small star shaped biscuits and some filled cookies. Best of all, the cookies last for ages in an airtight container.


Here's the recipe for you which makes either 24 2 inch cookies or 40 small star sandwich cookies. For all my recipes I use a 250ml cup and a 20 ml tablespoon, unsalted butter and 60g eggs. My oven is a conventional gas oven so if your oven is fan forced you may need to reduce the oven temperature by 20°C.


Chocolate Peppermint cookies – makes 24 2 inch cookies or 40 small star cookies
Cookies
113g unsalted butter, at room temperature
½ cup (100g) caster sugar
1 large egg yolk
1 tsp pure vanilla extract
175g plain flour
⅓ cup (35g) cocoa 
¼ tsp bicarb soda
¼ tsp fine sea salt

Filling
45g unsalted butter, at room temperature
45g cream cheese, at room temperature
1½ cups (150g) icing sugar, sifted
pinch salt
¾ tsp vanilla extract
⅓ tsp natural peppermint extract
2 tsp milk
2 tbs very finely chopped candy cane (if making the 2 inch cookies)

Method
In the bowl of an electric mixer fitted with the paddle attachment, cream the butter and sugar until light and fluffy, 4 to 5 minutes. Add the egg yolk and vanilla; mix to combine.

Sift the flour, cocoa, bicarb soda and salt into a medium bowl. Transfer to the bowl of the mixer and mix until the dough comes together. Form into a 1-inch-thick disk and wrap tightly in plastic wrap. Refrigerate for 20 to 30 minutes.

Preheat the oven to 180⁰C, conventional. Line a tray with baking paper and set to one side.

Roll out the dough between two sheets of baking paper until the dough is ½ cm thick. Use a 2 inch round or a small star shaped cookie cutter to cut the dough into shapes and then transfer the cookies to the prepared baking tray. (You can place the cookies close together; they won’t spread much.)

Repeat until all the dough is used, rerolling the dough several times if needed. Press the tips of a fork into the centre of each cookie to keep them from puffing up too much while baking.

Bake the cookies until they appear set, 6 to 9 minutes. Cool a little before transferring to a wire rack to cool completely. Turn half of the cookies over so the fork marks are facing down.


Icing
In the bowl of an electric mixer, cream the butter, cream cheese and icing sugar until light and fluffy, 4 to 5 minutes. Add the salt, the vanilla and peppermint extract to taste and the milk; mix until well combined. 


Pipe the icing into a mound in the middle of each turned-over cookie using a ¼ inch piping tip or a teaspoon. If making the circle cookies, sprinkle a little candy cane dust over the top of the icing, then top with another cookie and gently press together. If making the star shaped cookies, skip the candy cane dust. Let the cookies sit for about 1 hour to allow the icing to set before serving.


The cookies were so tasty - delicate intensely chocolate cookies paired with a creamy peppermint filing. Yum!

I'll be back tomorrow with another cookie recipe from the cookie box, so see you all again soon.

Bye for now,

Jillian


PRINT RECIPE

xmas 2022 - not quite bonnie's rugelach

20 Dec 2022


Last year in the lead up to Christmas, I saw lots of cookie boxes on Instagram. As I was in lockdown with nowhere to go, I decided to give one a try. My cookie selection included a gluten free cookie, a chocolate cookie, a nut based cookie and a jam filled cookie. I got a little ahead of myself though and I've already shared my recipe for 
pistachio rose shortbreads, the nut based cookie, so I had to quickly come up with another cookie recipe to share with you.


I thought I'd make some rugelach as part of the selection. I have a confession to make though. Until I'd made these rugelach I'd never eaten one before. I made the rugelach from a recipe in Sweet by Ottolenghi and Helen Goh. I used 2 different fillings, a pecan and raspberry jam filling and a filling made with chopped pistachios and coarsely chopped dried sour cherries. Each filling recipe is sufficient to make 24-36 rugelach. The recipe in Sweet was adapted from Bonnie's Stern's original recipe. I didn't have any quince paste in my cupboard so I used raspberry jam just like Bonnie did.

 
Here's the recipe for you which makes 24 - 32 rugelach. For all my recipes I use a 250ml cup, a 20ml tablespoon, unsalted butter and 60 g eggs. My oven is a conventional oven so if you have a fan-forced oven you may need to reduce the temperature by 20°C.

Not Quite Bonnie’s Rugelach from Sweet
Pastry
160g plain flour
1/8 tsp salt
1/4 tsp baking powder
3/4 tsp finely grated lemon rind
½ tsp vanilla bean paste
125g unsalted butter, fridge-cold, cut roughly into 3-cm cubes
125g cream cheese, fridge-cold 
 
Pecan Filling 
40g pecan halves
100g light brown sugar
½ tsp ground cinnamon
175g raspberry jam 
1 tsp lemon juice

Pistachio Filling 
50g unsalted butter at room temperature 
100g light brown sugar 
2 tsp ground cinnamon 
1 tsp vanilla paste
40g dried sour cherries, coarsely chopped 
40g chopped pistachios
 
Topping
1 large egg, lightly beaten
½ tbsp raw sugar 
 
Method
To make the pastry, place the flour, salt, baking powder, lemon zest and vanilla bean paste in a food processor and pulse for about 15 seconds to combine. Add the butter and pulse for a few seconds more, until the mixture has the texture of fresh breadcrumbs. Add the cream cheese and process just until the dough comes together in a ball around the blade; be careful not to over process or the pastry will be tough. Tip the dough onto a lightly floured work surface and knead for a few seconds, just to bring it together. Divide the pastry in two; cover each half loosely in plastic wrap, then press to flatten into discs. Transfer to the fridge for 1 hour. While the dough is chilling, prepare the filling. 
 
Pecan Filling
Preheat the oven to 180°C, conventional. Line two baking trays with baking paper and set aside. Spread the pecans on a separate tray and roast for 5 minutes. Remove from the oven, set aside to cool, then chop finely and place in a small bowl with the brown sugar and cinnamon. Mix together and set aside. In a separate bowl, combine the jam and lemon juice to form a smooth paste. 
 
Pistachio Filling
Mix the butter, sugar, cinnamon and vanilla in a small bowl until well combined. 
 
Assembly
Take one of the pieces of dough from the fridge and roll out on a lightly floured work surface to form a 24-cm circle, about 3 mm thick. Use a small spatula or the back of a spoon to spread the jam evenly over the surface and then sprinkle with the sugar-nut mixture. Using a sharp knife or a pizza wheel, if you have one, cut the dough as though you are slicing a cake into twelve or 16 equal triangles. 
  

One at a time, roll each wedge quite tightly, starting from the wide outside edge and working toward the point of the triangle, so that the filling is enclosed. Place them on the lined baking sheets, seam side down, spaced about 3 cm apart. Repeat the rolling and filling process with the second disc of dough.
 
If you're making the pistachio filling, spread the butter evenly over the surface of the dough then sprinkle the cherries and pistachios over the butter. Slice into 12 or 16 and roll as above. Repeat the process with the second disc. Once rolled, chill the rugelachs in the fridge for 30 minutes before baking. Increase the oven temperature to 200°C, conventional. Just before baking lightly brush the tops of the rugelachs with the beaten egg and sprinkle with the raw sugar. Bake for 20–25 minutes, rotating the sheets halfway through, until golden brown all over. Don’t worry if some of the filling oozes out; this will add a lovely toffee taste to the edges of the cookies. Remove from the oven and rest on the sheets for 5 minutes before transferring to a wire rack to cool completely. 
 
Storage
These will keep for up to 4 days in an open container, separated by pieces of baking paper, and the whole thing wrapped loosely in aluminum foil. Don’t keep in an airtight container; the sugar will weep if you do and turn the rugelach soft and sticky. 
 
 
See you all again tomorrow with some more cookie recipes.

Bye for now,

Jillian

 
PRINT RECIPE

xmas month 2022- layered watermelon and strawberry pavlova

19 Dec 2022


Each year for Christmas, I declare I will make Christopher Tse's famous watermelon cake and so far it hasn't happened. It wasn't even on my radar this year until I saw a photo on instagram of a layered turkish delight
 pavlova from Kepos and Co.  


Inspired by 
Christopher Tse's famous confection, I decided to make a watermelon and strawberry version of the pavlova.


Instead of Turkish delight and grapefruit segments, I used watermelon cubes and rosewater scented strawberries then topped the pavlova with grapes, pistachios and rose petals. The pavlova is very fragile but once assembled it looked gorgeous and the pavlova base was far easier to make than an almond dacquoise! 

Here's the recipe for you which makes a 10 x 20cm pavlova. For all my recipes I use a 250ml cup and a 20 ml tablespoon, unsalted butter and 60g eggs. My oven is a conventional gas oven so if your oven is fan forced you may need to reduce the oven temperature by 20°C.


Layered watermelon and berry pavlova  - serves 4
Pavlova
4 egg whites, at room temperature
210g icing sugar mixture
20ml white vinegar
10ml rosewater
 
Filling
200 gm hulled strawberries 
5 ml rosewater 
1 tsp caster sugar
100g seedless watermelon, cubed
2½ ml rosewater 
½ tsp caster sugar
150g mascarpone
150 ml pouring cream
25g icing sugar
½ tsp vanilla paste

Topping
7 seedless red grapes, halved
3 tsp slivered pistachios
3 tsp dried rose petals, optional 

Method
Preheat the oven to 160°C, conventional. Spray a 20 x 20cm square baking dish with oil and line with baking paper.

Using an electric mixer fitted with the whisk attachment, whisk the egg whites for 2 to 3 minutes until soft peaks form. With the machine running, add the icing sugar mixture, the vinegar, and rosewater and then whisk for a further 8 to 10 minutes, until glossy and firm.

Spoon the mixture into the prepared tin and make the top smooth.  Bake for exactly 20 minutes, then remove from the oven and set aside to cool completely. Don’t worry if the meringue looks a bit rustic when you take it out of the oven.  


Filling
20 minutes before assembling the pavlova, halve the strawberries and place in a bowl with 5 ml rosewater and 1 tsp caster sugar. Stir to combine then set aside. Place the cubed watermelon in a separate bowl with 2
½ ml rosewater and ½ tsp caster sugar. Stir to combine then set aside.

Put the mascarpone, cream, icing sugar and vanilla a large bowl and whisk until soft peaks form.


To assemble
Cut the meringue in half so there are two 20 x 10 cm pieces. Put one piece on a serving plate and top with half the mascarpone mixture, half the cubed watermelon and half the strawberries. Gently top with the remaining meringue, then the  mascarpone mixture, the watermelon cubes and the strawberries. Just before serving, scatter over the grapes, pistachios and rose petals.


The pavlova looked so pretty and the combination of the berries, watermelon with just a hint of rosewater was delicious. I can see I'll be making many different versions of this layered pavlova in my future.

I'll be back tomorrow some cookie recipes to tide you over until 2023.

Bye for now,

Jillian
PRINT RECIPE

xmas month 2022 - blueberry frangipane tart

15 Dec 2022


Welcome to the 4th bake for Xmas month 2022. Today I'm sharing with you my blueberry frangipane tart recipe.
Whilst the tart looks impressive, the pastry isn't blind baked so it's pretty easy to put together. To speed up the process even more, I made both the pastry and the filling in the food processor, but you could make both by hand.


It's blueberry season here in Sydney so I used a combination of fresh and frozen berries to make the tart. Having 2 kinds of berries - baked and fresh makes for a nice contrast but if you can't find any fresh berries just use unthawed frozen berries to make the tart then serve with a dollop of cream and a drizzle of burnt honey.


Here’s the recipe for you which makes a deep 17cm tart. For all my recipes I use a 250ml cup and a 20 ml tablespoon, unsalted butter and 60g eggs. My oven is a conventional gas oven so if your oven is fan forced you may need to reduce the oven temperature by 20°C.


Blueberry Frangipane Tart
Pastry
¼ 
cup (45g) icing sugar
¼ cup (25g) almond meal
175g plain flour
Pinch salt
110g cold unsalted butter, diced
1 egg, lightly beaten

Frangipane
100g unsalted butter
100g caster sugar
1 tsp vanilla extract
2 beaten eggs
100g almond meal
Pinch salt
1 tbs flour
1 tbs rum or orange juice

Topping 
150g blueberries (all fresh or 100g frozen and 50g fresh)

Burnt honey (optional)
50g honey
50 mls water

To serve
cream 
burnt honey (optional)

Pastry
To make the pastry, combine all the dry ingredients in a food processor, and whiz for a few seconds until well combined and free of lumps. Add the cold butter and whiz until the mixture resembles breadcrumbs. Add the egg gradually and whiz until a soft dough just starts to form around the blade. Remove the dough from the food processor and gather the pastry into a ball; flatten slightly before wrapping in plastic and placing in the fridge. You’ll only need about half of the pastry dough to make a 17cm tart. The pastry freezes well so just wrap the remaining pastry in plastic wrap and store in the freezer.

Refrigerate the pastry for an hour and then roll out thinly - 3mm thick. Line a greased 17 cm flan tin with the pastry then return to the fridge for another 30 minutes. Trim any excess pastry.
 

Frangipane
Cream together the unsalted butter, sugar and vanilla until light and fluffy. Add the eggs followed by the almond meal, salt, flour and rum or juice. You should end up with a soft paste. Refrigerate until required.

Tart
Preheat the oven to 190°C, conventional. Fill the pastry shell with the frangipane mixture stopping about ½ cm from the top, then level the surface with a knife. Sprinkle 100g of the blueberries over the filling then place the tart on an oven tray and bake at 190°C/375°F for 30 minutes. Rotate the tart then bake for a further 30 minutes or until the frangipane filling has puffed and is golden brown. Let the tart cool in the switched off oven for 30 minutes, with the door left slightly ajar. 

Remove from the oven, place on a rack and let the tart cool completely. Place in the fridge until serving time then top with the remaining fresh blueberries. Serve with cream and a drizzle of burnt honey, if desired.
 

Burnt honey
Place the honey in a small saucepan and cook over a medium heat until dark brown, about 5 minutes. Pour in 50 mls of boiling water and stir to dissolve the honey. Lower the heat and simmer for a few minutes until the honey has thickened a little, then take off the heat to cool. It will thicken as it cools. Store in the fridge in a sealed container until needed. If the burnt honey is too thick you might need to warm it for a few seconds in the microwave.
 

The pastry crumbled a bit when cut which just shows how nice and 'short' the  pastry was.


The tart was absolutely delicious - crisp pastry, smooth almond flavoured filling topped with both fresh and cooked berries. Best of all, the tart can be made the day ahead then served on Christmas Day.

See you all again next week with a full week of Christmas baking from my kitchen.

Bye for now,

Jillian


PRINT RECIPE

xmas month 2022 - cranberry cheesecake

12 Dec 2022


I am quite the fan of Adam Liaw and watch his cooking show,
The Cook-Up, most nights. I've had his wife Asami's cheesecake recipe bookmarked for a few years but until now hadn't found the time to make it.

As is my way, I changed the recipe a little. When I lived in Canada, cheesecake always came topped with berries so I decided to make the cheesecake look a little more festive by topping it with a layer of cranberry compote. It also helped use up the bag of frozen cranberries I had lurking in my freezer.


The original cheesecake recipe had a crushed biscuit base but I'm not a fan of biscuit bases so I made a wholemeal shortbread base instead. Adam used whiskey in the filling but I used rum instead, as did Asami in the orginal recipe.


Here's the recipe for you which makes a 10 x 20cm cheesecake. Please note you will have to start this recipe the day before serving. For all my recipes I use a 250ml cup and a 20 ml tablespoon, unsalted butter and 60g eggs. My oven is a conventional gas oven so if your oven is fan forced you may need to reduce the oven temperature by 20°C.

Cranberry cheesecake – start this recipe the day before serving
Base
50g unsalted butter
1 and 1/2 tbs (25g) caster sugar
¼ cup (35g) plain flour
¼ cup (35g) wholemeal plain flour
pinch salt
½ tsp vanilla essence

Filling
125g sour cream
250g cream cheese
1 egg 
50g soft brown sugar
50g caster sugar 
100ml thickened cream
1 tsp good-quality dark rum 
2 tbs (25g) cornflour
1 tsp vanilla paste or vanilla extract

Topping
250g fresh or frozen cranberries, thawed
¼ cup orange juice
⅓ cup (80g) caster sugar
¼ cup water
3 tsp orange rind, divided

Method
Preheat the oven to 180°C, conventional. Line a 10 x 20cm rectangular loaf pan with baking paper. To make the base, cream the butter, sugar and vanilla together in a small bowl until light and creamy. Mix in the flours and salt and combine until the mixture forms a soft dough. Press the mixture into the base of the tin, (the base should not go up the sides of the tin). Bake for 15-20 minutes until lightly golden. Remove from the oven and cool completely.

While the base is baking and cooling, make the filling. In a large bowl, mix the sour cream and cream cheese together with a wooden spoon or spatula. Stir in the egg and sugars, then add the cream, rum and vanilla and fold everything together. Stir in the cornflour (there's no need to sieve it first) and then allow the mixture to drain through a fine sieve (don't push it through or you may get small lumps). You can also save some time by making the filling in the food processor but don't skip the sieving process.

Pour the mixture over the cooled base in the pan. Tap the pan on the bench firmly a few times to remove any air bubbles. This step is very important, as air bubbles will expand with baking and affect the texture of the filling.

Place the pan in a larger baking tray and fill the large baking tray with boiling water halfway up the sides of the cheesecake pan. Bake the cheesecake for 1 hour, or until the cheesecake has set. Turn off the oven, keeping the door closed and leave the cheesecake undisturbed for about 3 hours. Removing it from the oven before that time will cool it too quickly and you may get cracks in your filling. After 3 hours, remove the cheesecake from the oven, cover with foil and refrigerate overnight to allow it to set further. 


Topping
Combine cranberries in a small saucepan with the juice, sugar, the water and 2 tsp orange rind. Bring to the boil, then reduce heat to medium-low. Simmer, stirring occasionally, until berries are soft and the sauce turns syrupy, about 8 to 10 min. Cool the compote completely before topping the cheesecake. 


Just before serving, sprinkle the remaining rind over the top then cut the cheesecake into bars to serve.  The cheesecake is very rich, so it's best to serve it in small slices. 


Look how smooth that baby is and best of all, it received rave reviews as well. The cranberry compote was really delicious and when I can track down frozen cranberries again I'll be making some more.

See you all again on Friday with another Xmas month post. 

Bye for now, 

Jillian

PRINT RECIPE

xmas month 2022 - tiramisu layer cake

4 Dec 2022


I promised you lashings of whipped cream and mascarpone this Christmas, which this tiramisu layer cake delivers. 

I'm no fan of coffee so I've never eaten Tiramisu before but I quite fancied making a cake inspired by the flavours. I found this recipe which I used as a springboard but as I wanted to avoid using uncooked eggs, I ended up using a different cake recipe, a different syrup recipe and a different mascarpone cream recipe. I kept my fingers crossed that the 3 different elements would all come together to make one delicious cake. Thankfully, my neighbours and workmates assured me that I'd nailed the tiramisu flavours.


Here’s the recipe for you which makes a 16cm triple layer cake. For all my recipes I use a 250ml cup and a 20 ml tablespoon, unsalted butter and 60g eggs. My oven is a conventional gas oven so if your oven is fan forced you may need to reduce the oven temperature by 20°C.


Tiramisu layer cake
Cake
2 eggs
85g caster sugar
50g wheaten cornflour
15g custard powder
½ tsp cream of tartar
¼ tsp bicarb soda

Coffee Syrup 
1/4 cup water
1/4 cup sugar
3 tsp instant espresso powder
2 tsp marsala, optional 

Mascarpone Cream 
250g room temperature mascarpone 
35g caster sugar
1 tsp vanilla bean paste
150ml thickened cream

To serve
Dutch-process cocoa 

Method
Preheat oven to 180°C, conventional. Grease, flour and line the bases of three 16cm cake tins with baking paper. Beat eggs and caster sugar in a stand mixer for about 5 minutes or until thick and creamy; transfer to a large bowl. Sift dry ingredients twice onto paper, then over egg mixture; gently fold ingredients together.

Divide mixture evenly between prepared pans; bake uncovered, in a moderate oven for about 15 minutes or until golden and cake springs back when lightly pressed with fingertip. Turn sponges immediately onto baking-paper-lined wire rack; turn top-side up to cool and let cool completely before icing.

Coffee Syrup
Bring sugar, water and the espresso powder to a boil in a small saucepan over med-high heat. Simmer for 2 minutes. Remove from heat and stir in the marsala if using. Set aside to cool.


Mascarpone Cream
Using an electric mixer, beat mascarpone, caster sugar and vanilla until smooth and combined. Gradually beat in thickened cream until firm peaks just form and mixture has thickened (don't over-beat). 

To assemble
Level the top of the cakes if necessary. Place one cake on a serving plate then brush the top of the cake with syrup. Pipe or spread a layer of mascarpone cream on top then top with the second cake round and brush with syrup before piping a layer of whipped mascarpone. Brush the base of the third layer with syrup, before placing on the mascarpone layer. 


Transfer the remaining cream into a piping bag fitted with a large piping tip of your choice and piping a design on the top of your cake. Cover and refrigerate for 2 hours. Just before serving, dust the top of the cake with cocoa.


The cake will keep for up to 3 days in an airtight container in the refrigerator so can be made ahead of Christmas Day.


I had a piece of the cake and it was delightful - a light as a feather sponge sandwiched with delicate mascarpone cream flavoured with just the hint of coffee and marsala. Maybe I'll have to give tiramisu a go in the future.

See you all again soon with some baking for Xmas month 2022.

Bye for now,

Jillian


.


PRINT RECIPE
© DELICIOUS BITES • Theme by Maira G.