SLIDER

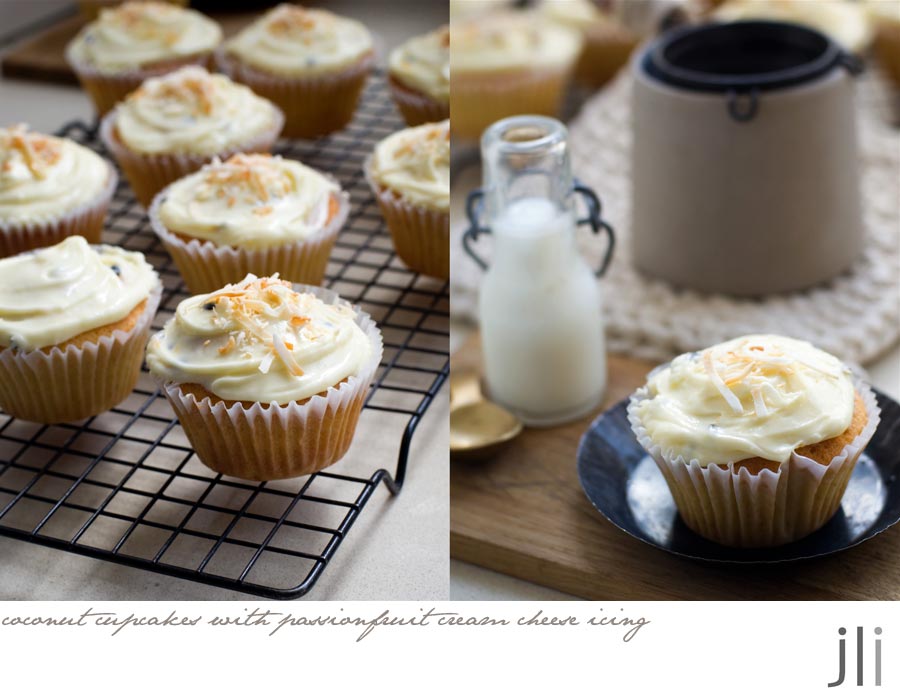
coconut cupcakes with passionfruit cream cheese icing

31 Jul 2022


As you know I'm a Claire Saffitz fan and a subscriber to her 
Youtube channel. A few weeks ago she adapted her coconut layer cake recipe from Dessert Person into a cupcake recipe. I had everything in the cupboard that I needed so I whipped up a batch of coconut cupcakes. As passionfruit goes so well with coconut I decided to top the cupcakes with some passionfruit flavoured cream cheese icing. 

 
I decided to halve the original recipe and managed to make 10 cupcakes from the batter. If  you'd like to make 12 cupcakes you'll need to increase the batter recipe by 50% but you should have enough icing and coconut for 12 cupcakes.

 
Here's the recipe for you. For all my recipes I use a 250ml cup and a 20 ml tablespoon, unsalted butter and 60g eggs. My oven is a conventional gas oven so if your oven is fan forced you may need to reduce the oven temperature by 20°C.

 
Coconut Cupcakes with passionfruit cream cheese icing – adapted from Claire Saffitz Dessert Person. 
Ingredients
165g plain flour
15g cornflour
1½ tsp baking powder
pinch salt
114g unsalted butter, at room temperature
20g olive oil or virgin coconut oil, at room temperature
175g caster sugar
1 tsp vanilla extract
2 eggs, at room temperature
½ cup unsweetened full-fat coconut milk, well shaken

Icing
30g unsalted butter at room temperature
60g cream cheese, at room temperature
Pinch salt
150g sifted icing sugar
2 tsp passionfruit pulp

To finish
2 tbs toasted shredded coconut

Method
Preheat the oven to 180⁰C, conventional. Line a 12 cup muffin tin with paper liners then set to one side.

Sift the dry ingredients into a small bowl and set to one side. Combine the butter, oil, sugar and vanilla extract in the bowl of a stand mixer and mix on low speed for 5 minutes until the mixture is light and fluffy. Add the eggs one at a time and mix until well incorporated. Add the dry ingredients to the bowl in the thirds, alternating with the coconut milk until you have a nice smooth batter.


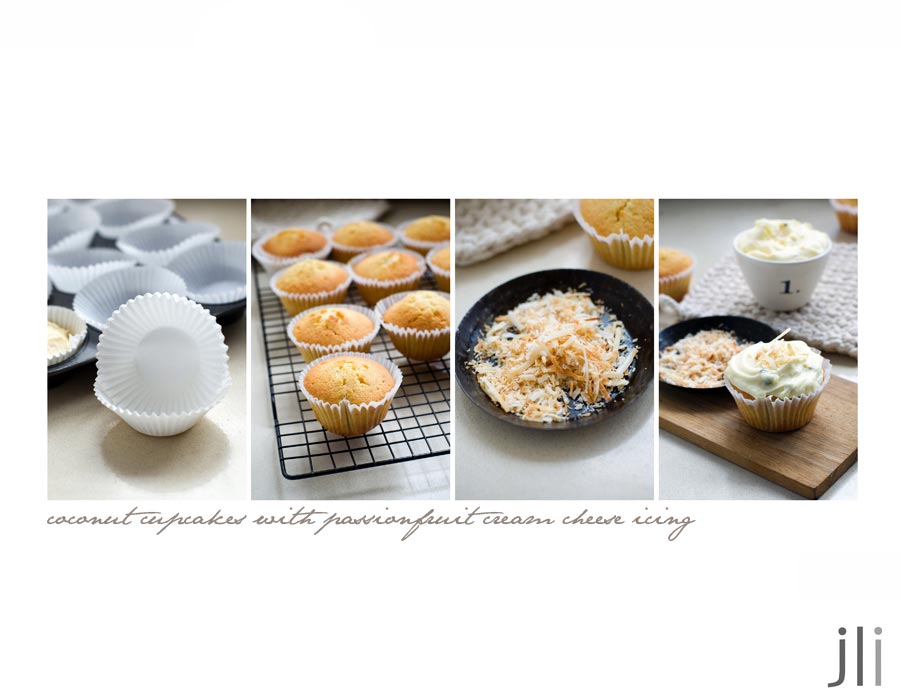
Spoon ¼ cup of the batter into one of the cupcake liners – you should be able to make 10 cupcakes. Place in the preheated oven and bake for 20-25 minutes until risen and golden brown. Remove the tray to a wire cooling rack and allow to completely cool before decorating.

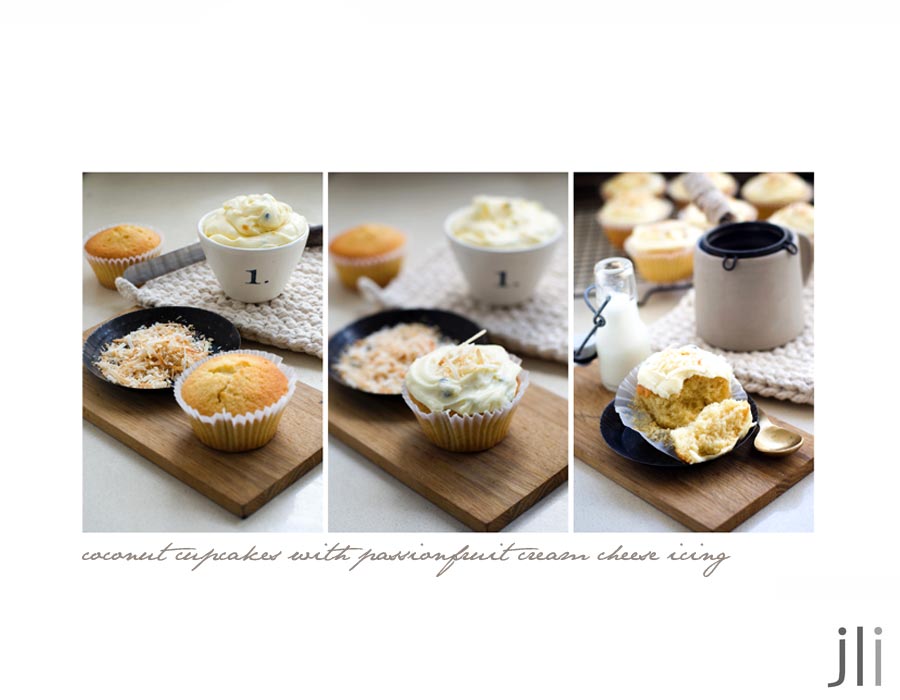
Passionfruit cream cheese icing
Combine the butter, cream cheese, salt and icing sugar in a small bowl. Using a hand mixer, beat the mixture for a few minutes until you form a light and fluffy icing. Using a spoon or spatula, gently stir in the passionfruit pulp, trying to maintain some of the whole pulp.


Top each cupcake with 1-2 tbs of the icing then sprinkle over some toasted coconut threads. Allow the icing to set before serving. Keep the decorated cupcakes in an airtight container and serve at room temperature.


I rarely make cupcakes but as these were so light, fluffy and delicious, I might have to change my ways.

See you all again next week with some more baking from my kitchen.

Bye for now,

Jillian
PRINT RECIPE

upside down rhubarb and ginger cake

25 Jul 2022


It's been quite a cold wet winter here in Sydney and I've been craving wintery puddings. Last night I fancied a rhubarb pudding and when I looked online I had loads of recipes to choose from but as I've had this Gill Meller recipe bookmarked for quite some time, I decided to make an upside down rhubarb and ginger cake. Gill mentioned that the cake was best served warm topped with custard or double cream, so who was I to disagree and I went down the custard route.
 

The recipe calls for stem ginger which is really hard to find in Sydney. I usually make my own but I'd run out. Luckily when searching through my fridge I found a small bottle of stem ginger I'd bought some years ago in South Africa. I also found a bottle of ginger marmalade during my search and I think a few tablespoons of that would be an excellent substitute for stem ginger. Otherwise just chop up some crystallized ginger and use golden syrup instead of ginger syrup.
 

Here's the recipe for you which makes an 8 inch cake. I accidentally used a 7 inch cake tin instead of an 8 inch cake tin so the cake took a bit longer to bake, about 50 minutes. For all my recipes I use a 250ml cup and a 20 ml tablespoon, unsalted butter and 60g eggs. My oven is a conventional gas oven so if your oven is fan forced you may need to reduce the oven temperature by 20°C.


Rhubarb and ginger upside-down cake inspired by a Gill Meller recipe
Base 
10g melted butter
1 tbs raw caster sugar
200g (6–8) rhubarb stalks

Cake 
65g self raising flour
60g whole meal plain flour, plus extra for dusting
1⁄2 tsp baking powder
pinch of fine sea salt
125g unsalted butter, softened and cut into small pieces
135g raw caster sugar
2 eggs
10g stem ginger preserved in syrup, chopped or 2 tbs ginger marmalade
1 tbsp ginger syrup (from the stem ginger jar)
2 tbs milk


Method
Heat the oven to 180°C/160°C fan. Cut a circle of baking paper to fit the base of a 20cm (8in) springform cake tin.

Generously brush the baking paper with melted butter, remove the lined base from the ring of the tin and sprinkle over the tbs caster sugar. Arrange the rhubarb stalks over the base side by side, trim the edges so you’re left with a nice disc of stalks that covers the base. Grease the ring of the cake tin with the remaining butter and dust with flour, then pop the base (complete with rhubarb in place) into the ring and secure with the clip.

Sift the flours together with the baking powder and salt. Beat the butter and 135g caster sugar together until light and fluffy. (Alternatively, you can do this in a stand mixer.) Beat in the eggs one at a time, sprinkling in 1 heaped teaspoon of flour mixture with each addition of egg.

Using a spoon, fold in the remaining flour mixture, the chopped ginger and syrup or ginger marmalade if using and enough milk to make a smooth batter. Spoon the mixture carefully over the rhubarb in the tin, spreading it out lightly and evenly.


Place the cake in the oven and bake for 40-50 minutes or until a skewer inserted into the centre comes out clean. Allow the cake to cool in the tin for 5–10 minutes and then turn out onto a serving plate, so that the rhubarb is on the top. Sprinkle with a little caster sugar and serve topped with custard or cream
 

I got a little fancy cutting the rhubarb but next time I won't bother because the rhubarb all turned to mush during the baking process. The cooked rhubarb lost most of it's vibrant colour as well so I glossed it up with some thinned raspberry jam just before serving. It still tasted delicious though!

See you all next week with some more baking from my kitchen.

Bye for now,

Jillian

PRINT RECIPE

oatmeal and pecan brittle cookies

18 Jul 2022

Long before I bought my copy of Dessert Person, I saw this recipe for Claire Saffitz's oatmeal and pecan brittle cookies on David Lebovitz's blog. I just love nut brittle so these cookies were high on my list of things to make.
As my household is small, I only made a half batch of cookie dough and I also made smaller cookies than suggested in the recipe. I used 2 tablespoons of dough per cookie, about 48 grams, rather than ¼ cup of dough. The cookies spread a lot during the baking process so I can’t imagine how huge the original sized cookies would be. To rein in the size of the cookies, after baking I 'scooted' them with a larger cookie cutter while they were still warm to reduce the cookie size from 12cm to about 7 cm. Next time I make these cookies I might just use an egg yolk rather than a whole egg and see if that lessens the spread.
This recipe requires a lot of steps and the cookie dough needs to rest for 12 hours before baking so this is not a spur of the moment cookie. To speed up the process you can prepare a few items ahead of time. The pecan brittle can be made in advance and stored in an air-tight container at room temperature for up to a week. The brown butter can also be made ahead of time then brought to room temperature. Whilst the cookie dough can be made with a bowl and wooden spoon, you’ll need a food processor to blitz the oats and pecan brittle. Here's a video of the whole process.
Here’s the recipe for you which makes 13 cookies. For all my recipes I use a 250 ml cup, a 20ml tablespoon, unsalted butter and 60 g eggs. My oven is a conventional oven so if you have a fan-forced oven you may need to reduce the temperature by 20°C.
Oatmeal and Pecan Brittle Cookies - adapted from Dessert Person: Recipes and Guidance for Baking with Confidence by Claire Saffitz
Pecan brittle
70g coarsely chopped pecans
75g (⅓ cup) caster sugar
27g (1 oz) unsalted butter
1 tbs water
¼ tsp bicarb soda
pinch salt 
 
Dough 
113g (4 oz) unsalted butter, divided (half should be cold) and cubed
105g (⅔ cup) plain flour
Pinch salt
½ tsp bicarb soda
1 cup (100g) rolled oats, (not instant or quick-cooking)
75 g brown sugar
¼ cup (55g) caster sugar
1 cold egg
1½ tsp vanilla extract
 
Pecan brittle  
Preheat the oven to 180º C, conventional and line a small baking sheet with baking paper or a silicone baking mat. Spread the chopped pecans on another baking tray and toast in the oven, stirring midway during baking until they're light golden brown and smell toasty, 8 to 10 minutes. Remove from the oven and set aside to cool.
 
Have the bicarb soda and salt measured out and close by. In a small saucepan, combine the sugar, the butter and the water. Bring to a boil over medium heat, stirring occasionally with a heatproof spatula, until the sugar has dissolved. Continue to cook, without stirring, but swirling the pan to keep the mixture cooking evenly until it turns a deep amber colour which will take 8 to 10 minutes.
 
Remove from heat and immediately stir in the pecan pieces and mix until well coated, then quickly stir in the bicarb soda and salt. Quickly scrape the mixture on the prepared baking tray and spread it as evenly as possible. Set aside to cool completely. Once cool, chop the brittle into pieces the size of large peas with a chef's knife. If you plan to finish making the cookie dough later, store the brittle bits in an airtight container. You want to use all the brittle, including all the little tiny bits left on the cutting board too.
 
Cookie dough 
Place the cold cubed butter into a large bowl. Put the remaining butter into a microwave safe bowl. Cover and cook on high for about 4 minutes or until the butter has browned and smells nutty. Pour the browned butter over the cubed butter in the bowl, scraping any and all brown bits in the pan into the butter. Let cool for about 30 minutes, until the two butters start to become solid again.
 
While the butter is cooling, put the flour, salt and bicarb soda into the bowl of a food processor. Pulse it once or twice then add ½ cup (50g) of the oats and half of the chopped pecan brittle. Pulse until the ingredients are finely ground together.
 
Add the sugars to the bowl containing the butter mixture and mix until thoroughly combined and smooth. Scrape down the sides of the bowl with a spatula then add the egg and vanilla, then stir in the flour/oat/brittle mixture and continue to mix until there are no dry spots. Add the remaining chopped pecan brittle and oats and stir until they are well combined. Refrigerate the dough for about an hour before scooping out the dough into 2 tbs mounds or just under 50g per cookie by weight. Cover the dough tightly and refrigerate for 12 hours, or up to 4 or 5 days.
 
Baking
The next day, preheat the oven to 180ºC, conventional. Place the oven racks on the bottom and top third of the oven and line two baking sheets with baking paper. Place 6 rounds of dough on the baking sheets, about 3 inches apart because these cookies spread a great deal. Flatten each dough ball a little.
Bake the cookies, rotating the baking sheets midway during baking, turning them from front to back, and switching the baking sheets from the top to bottom racks in the oven, until they are light golden brown across the top and deep golden brown around the edges, about 16 - 20 minutes. Let the cookies cool for 5 minutes, then transfer to a wire cooling rack. When completely cool store in an airtight container.
As expected, these cookies were absolutely delicious and so nice that I've made them twice now. Best of all, my biscuit tin is full!
 
See you all again next week with some more baking from my kitchen.
 
Bye for now,
 
Jillian
 
 
PRINT RECIPE

upside down lemon, maple and vanilla pudding

11 Jul 2022


I was given a copy of OTK Shelf Love for Christmas and I'm slowly making my way through the recipes in the book. My friend Amanda made the upside down lemon, vanilla and maple pudding and told me how tasty it was, so I decided to give it a go.
 
 
I had to play with the proportions a little and because it's a pain lining a square tin I decided to line the base of the cake with baking paper instead of the whole tin. Always listen to Ottolenghi because the maple syrup welded the lemon slices to the tin so in retrospect, just follow the instructions.


Here's the recipe for you which makes a 7 inch (17cm) square cake. For all my recipes I use a 250 ml cup, a 20 ml tablespoon, unsalted butter and 60 g eggs. My oven is a conventional oven so if you have a fan-forced oven you may need to reduce the temperature by 20°C. 
 
Upside down lemon, vanilla and maple pudding inspired by a recipe from OTK Shelf Love

Ingredients
1 medium lemon
1/4 cup (60ml) maple syrup, plus 1½ tbs extra
1 vanilla bean
112g plain flour
1 tsp baking powder
pinch salt flakes
112g unsalted butter, cut into small cubes, at room temperature
2 eggs
110g light brown sugar
30mls milk
120g creme fraiche, to serve

Lemon-maple butter
20ml lemon juice 
1/4 cup (60ml) maple syrup
50g unsalted butter, cut into small cubes, refrigerated

Method
Preheat oven to 180°C conventional. Trim the lemon, slicing and discarding the tips, then cut the lemon into very thin (2mm thick) rounds to get 16 slices. Discard the seeds. Place a large non-stick pan over high heat. Working in about 2 batches, add lemon slices in a single layer and cook until nicely charred on both sides, 1-2 minutes per side. Repeat with the remaining slices and set aside.

Line a baking dish about 17 x17cm in size with a piece of baking paper large enough to cover the base and sides, and enough overhang to later fold over the batter. Pour ¼ cup maple syrup into the prepared dish. Halve the vanilla bean lengthwise, scrape the seeds into a small bowl and then add the pod to the prepared dish. Top with the charred lemon slices, spreading out so they cover the entire base while overlapping slightly in spots.

Sift the flour, baking powder and salt into the bowl of a stand mixer fitted with the whisk attachment, and whisk on medium speed to combine. Add the room-temperature butter, eggs, brown sugar, milk, reserved vanilla seeds and the extra 1½ tbs maple syrup, and mix on medium-low speed for 2 minutes until combined. The mixture will look like its split a little with some smaller cubes of butter, but that’s okay. You can also prepare the batter in a food processor

Gently spoon the mixture directly on top of lemons in the baking dish trying to avoid moving the lemons around too much. Using the back of a spoon, smooth over the mixture to create an even layer. Fold over the excess baking paper to cover, then wrap the dish tightly in foil.

Place the baking dish into a larger roasting. Carefully add about 3cm of boiling water to the pan, transfer to the oven and bake for 1 hour - 1 hour 10 minutes until a toothpick inserted into the centre comes out clean. Lift the baking dish from the water, remove foil and baking paper. Set aside for 5 minutes before carefully inverting onto a platter, carefully removing baking paper to expose the lemons.

During the final 10 minutes of baking, prepare the lemon-maple butter: add the lemon juice and maple syrup to a small saucepan and bring to a simmer over medium-high heat. Cook for about 2 minutes, then turn down heat to low. Once the mixture is no longer simmering, gradually whisk in chilled butter a little at a time until you have an emulsified sauce.


Drizzle half the lemon-maple butter all over the warm sponge cake and serve warm, with the remaining lemon-maple butter and crème fraiche alongside.


You may have noticed the absence of lemon maple butter in all the pictures but I ran out of maple syrup so I just served the pudding with the crème fraiche. I did make a small amount of the lemon maple butter and it was delicious so don't skip this step.

See you all again next week with some more baking from my kitchen.

Bye for now,

Jillian

PRINT RECIPE

blueberry lemon scrolls

3 Jul 2022


I have a love/hate relationship with Instagram. I came late to the Instagram party and whilst it doesn't seem to benefit me or my blog in any measurable way, it does introduce me to new people and new recipes.
 
 
Last week I saw a photo of a blueberry cinnamon roll on Instagram and instantly knew I needed such a thing in my life. I have a killer cinnamon roll recipe thanks to Sarah Kieffer and a good cream cheese icing recipe; I just needed to find a blueberry filling. Blueberry jam would have been perfect but it wasn't available in the supermarket and I didn't want a gloopy starch thickened filling so I went on the hunt for a blueberry filling made with blueberries, sugar and lemon.


Once I found a filling recipe I went into action. The filling was quite liquid and I was a bit concerned
I would lose all the filling during the rolling process so at the last minute I brushed the dough with melted butter (because why ever not?) and sprinkled the butter with some almond meal to thicken the filling a little. I then refrigerated the roll for an hour or so before cutting it into pieces and it seemed to do the trick.


Here's my recipe for blueberry lemon scrolls which makes 8-10 scrolls depending on how large you like your scrolls. For all my recipes I use a 250ml cup, a 20ml tablespoon, unsalted butter and 60g eggs. My oven is a conventional oven so if you have a fan-forced oven you may need to reduce the temperature by 20°C. 


Blueberry lemon scrolls - inspired by Broma Bakery; scroll recipe adapted from Sarah Kieffer and the filling came from Bread by Elise.
Dough

2 eggs at room temperature

90 mls milk, lukewarm

30 mls honey

1 tsp vanilla extract

2 cups (300g) plain flour 

1 tsp yeast

½ tsp salt

75g room temperature unsalted butter, cut into small pieces 


Blueberry lemon filling  

200g fresh or frozen blueberries

100g sugar

2 tsp lemon juice 

1 tsp lemon rind

30g unsalted butter, melted and cooled 

1 tbs almond meal

Pinch salt


Lemon cream cheese icing

30g unsalted butter, room temperature 

60g cream cheese, room temperature 

1/2 tsp vanilla bean paste

Pinch salt

1 tsp lemon rind

1 cup icing sugar, sifted 


Method

Grease a large bowl. Combine the eggs, milk, honey and vanilla in a large measuring cup.


In the bowl of a stand mixer fitted with a paddle, mix the flour, yeast, and salt and stir on low to combine. Add the egg mixture and mix on low to combine. With the mixer on low, add the butter, one piece at a time. When all the butter has been added, increase the speed to medium and beat the butter into the dough, until all the little butter pieces are incorporated, 1 minute. Transfer the dough to the prepared bowl. The dough will be very sticky and you will need a spatula to scrape the dough into the bowl.

Cover the bowl with plastic wrap and let rise for 30 minutes. Place your fingers or a spatula underneath the dough and gently pull the dough up and fold it back over itself. Turn the bowl and repeat this folding again. Continue 6 to 8 more times, until all the dough has been folded over on itself. Re-cover the bowl with plastic and let rise for 30 minutes. Repeat this series of folding 3 more times, for a rise time of 2 hours and a total of 4 foldings. Tightly cover the bowl with plastic wrap and refrigerate overnight or up to 72 hours

Blueberry Lemon Filling

Place the blueberries, sugar, lemon juice and rind into a small saucepan. Bring the mixture to a boil while constantly stirring. Taste to see if it's sweet enough for your liking and add more sugar if desired. Once the mixture has come to a boil, reduce the heat to med-low, and let it simmer for 10-20 minutes until it is very thick and jam-like. Transfer the filling to a bowl, cover, and let it cool to room temperature before placing it in the fridge.


Shape the dough

Flour a work surface and knead the dough 10 to 12 times to activate the gluten. Shape the dough into a ball, cover the top lightly with flour, and cover with a tea towel and let come to room temperature. 


Grease and line a 26cm pan with baking paper and set to one side. On a well-floured surface roll the dough out into a long rectangle about 16 x 12 inches. Brush the dough with the melted butter, sprinkle over the almond meal and the salt, and then spread the blueberry filling all the way to the edge of the dough, using an offset spatula or the back of a spoon to spread it evenly. From the long end, roll the dough away from you into a tight roll, sealing the bottom edge down by pinching the dough together. Refrigerate the roll for an hour to firm up the dough and the filling.
 
 
Remove the dough from the fridge and use scissors or a sharp knife to cut the dough into 8-10 equal pieces. Transfer the pieces to the prepared pan and place them cut side up. I tucked the loose ends of the roll underneath. Cover the pan loosely with plastic wrap and let the dough rise until doubled, 1 to 1 and 1/2 hours. 


Preheat the oven to 180°C, conventional. Remove the plastic and bake the rolls for 25-30 minutes on the centre rack or until the rolls are golden brown, rotating the pan halfway through. While the rolls are baking, prepare the icing. 


Icing

Place the butter, cream cheese, vanilla, salt and lemon rind into a medium size bowl. Using a hand beater, mix on medium until smooth and creamy. Add the icing sugar and mix on low until combined. Scrape down the sides of the bowl and mix on medium until the icing is light and fluffy, 3 to 4 minutes. 


When the rolls are ready, transfer the pan to a wire rack and let cool for 5 minutes. Using an offset spatula or table knife, apply a thin layer of the cream cheese icing, using about one-third of the mixture. Let the rolls cool for another 15 to 20 minutes then top with the rest of the icing and serve. 


If you’d like to make overnight rolls then prepare the rolls (roll out dough, fill them, roll them up, cut them, and put them in the prepared pan,) then cover them loosely with plastic and refrigerate for up to 18 hours. 


When ready to bake, preheat the oven, and let the rolls sit at room temperature (still covered in plastic) until puffy. Bake as directed (they might take slightly longer to bake).


I had one of the rolls for my breakfast and it was fluffy, filled to the brim with blueberries and so tasty. I shared the goodies with my neighbours but I do have 2 scrolls tucked away in the freezer for a rainy day.
 
See you all again next week with some more baking from my kitchen. 
 
Bye for now, 
 
Jillian
PRINT RECIPE
© DELICIOUS BITES • Theme by Maira G.