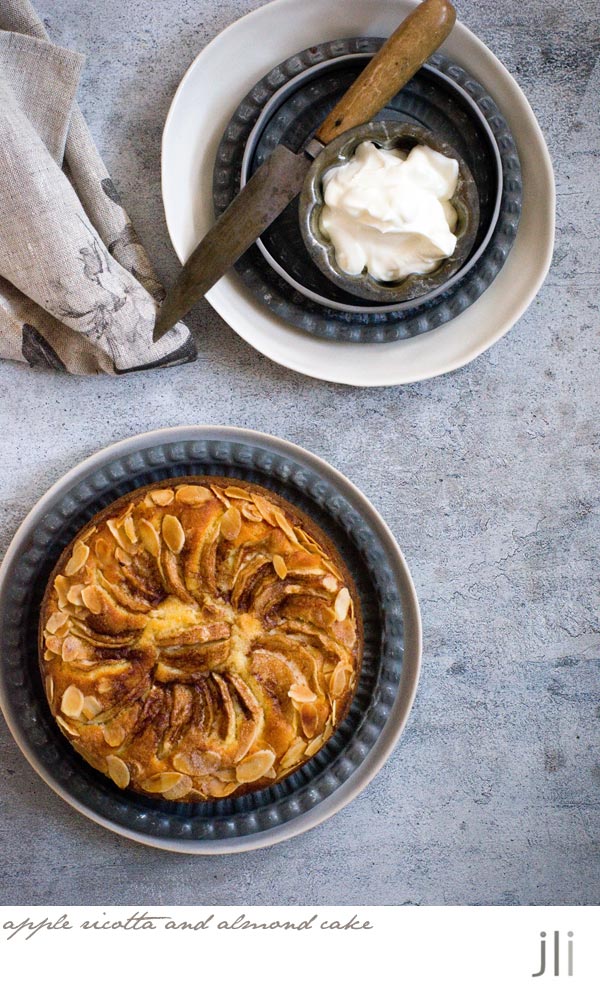
apple ricotta and almond cake
29 Apr 2023


I made a few tiny tweaks to the recipe and as I was meeting friends for lunch that day, I was a bit time poor. I made the cake batter in the food processor and once all the ingredients were measured, it all came together very quickly. Slicing the apples and arranging them over the cake batter was probably the most time consuming part of the process.

I really think nut based cakes taste better the day after they're made. You end up with a lovely cake with a soft texture that's full of flavour. That being said, I had my piece on the day and it tasted mighty fine.
Here's the recipe for you which makes a 17 cm cake. For all my recipes I use a 250ml cup and a 20 ml tablespoon, unsalted butter and 60g eggs. My oven is a conventional gas oven so if your oven is fan forced you you may need to reduce the oven temperature by 20°C. If you'd like to make a 23cm cake, just double all the ingredients and the baking time should stay the same.

Apple, ricotta and almond cake
Ingredients
75g unsalted butter, softened
75g fresh full-fat ricotta
80g caster sugar
½ tsp vanilla extract
1½ tsp lemon rind
2 eggs
112g ground almonds
50g self-raising flour
Pinch salt
1/2 tsp baking powder
Ingredients
75g unsalted butter, softened
75g fresh full-fat ricotta
80g caster sugar
½ tsp vanilla extract
1½ tsp lemon rind
2 eggs
112g ground almonds
50g self-raising flour
Pinch salt
1/2 tsp baking powder
Topping
1 small apple
1 tsp melted butter
3 tsp sugar
⅛ tsp ground cinnamon
1-2 tbs flaked almonds
Double cream, to serve
1 small apple
1 tsp melted butter
3 tsp sugar
⅛ tsp ground cinnamon
1-2 tbs flaked almonds
Double cream, to serve
Method
Preheat the oven to 180°C, conventional. Grease and line the base of a round 17cm cake tin with baking paper.
Place the butter, ricotta, sugar, vanilla and lemon rind in the bowl of a stand mixer fitted with a paddle attachment and beat until pale and fluffy. Alternatively cream in a bowl with a wooden spoon. Add the eggs, one at a time, beating between each addition. Gently stir through the ground almonds, flour, salt and baking powder by hand and mix until just combined. Spoon into the prepared tin and smooth the top of the batter.

Peel and core the apple and slice thinly. Arrange the apple slices on top of the batter then drizzle the melted butter over the apple slices. Combine the sugar and cinnamon in a small bowl then sprinkle over the apple slices, avoiding the very edge of the cake as the sugar tends to burn as the cake cooks. Scatter the almond flakes around the edge of the cake, then place the cake on the centre rack of the preheated oven.

Bake for 45-50 minutes or until a skewer comes out clean when tested and the apple slices have softened. Slide a knife around the edge of the cake to loosen it then let it cool for 10 minutes in the tin before turning out. Allow the cake to finish cooling on a wire rack before serving. Serve with double cream.

Another nice simple cake to add to your repertoire.
See you all again next week with some more baking from my kitchen.
Bye for now,
Jillian