SLIDER

pistachio and rose shortbreads

22 Aug 2022


I saw a picture of some almond cookies decorated with rose petals and pistachios in 'A Year of Simple Family Food' by Julia Busuttil Nishimura. They looked so pretty they inspired me to make these pistachio and rose shortbreads.
 

I'm quite fond of Mexican wedding cakes, little morsels of nutty shortbread enrobed in icing sugar, usually made with pecans. 
I went to my standby recipe from Caroline Velik, changed the nuts, added a dash of rosewater, rolled the mixture into balls, pinched the decoration idea from Julia and voila, I had a batch of pistachio and rose shortbreads. 
 

The recipe can be made entirely in a food processor. I
f you don't have a food processor then chop the nuts very finely rather than using nut meal as you want the crunch from the nuts. I was a bit hesitant about the rosewater so I erred on the side of caution so you may want to increase the quantity in your shortbreads.
 

Here's the recipe for you which makes 36 shortbread cookies. For all my recipes I use a 250 ml cup, a 20 ml tablespoon, unsalted butter and 60 g eggs. My oven is a conventional oven so if you have a fan-forced oven you may need to reduce the temperature by 20°C.
 
Rose and pistachio shortbreads – inspired by Julia Busutill Nishimura
Ingredients 
60g toasted natural almonds 
60g raw pistachios 
90g caster sugar 
Pinch salt 
250g unsalted butter, chilled and cubed 
300g plain flour 
1 tsp vanilla extract or paste 
½ tsp rosewater 
125g sifted icing sugar 
Optional - A few slivered pistachios and rose petals for decoration
 
Method 
Put the nuts, sugar and a pinch of fine sea salt in a food processor and whiz until the nuts are ground, but not too fine – it should be about the texture of coarse sand. Add the butter and continue to whiz until the mixture is well combined. Add the flour, rosewater and vanilla seeds/paste and pulse until everything just comes together, scraping down the bowl with a spatula as you go if needed. The mixture should be soft but not sticky – add a little more flour if necessary. Refrigerate the mixture for 30 minutes to allow the dough to firm a little. 
 
Preheat oven to 170ºC (conventional) and line 2 trays with baking paper. Roll the mixture into 20g balls then arrange the biscuits on the prepared trays, allowing room for them to spread a little as they cook. 
 
Bake the cookies in the preheated oven for 20 minutes or until lightly coloured. Remove from oven and rest on the tray for about 10 minutes then roll the shortbreads in icing sugar while still warm. Transfer the cookies to a cooling rack to cool completely. 
 

Just before serving, dust the tea cakes with more icing sugar. If you like, you can decorate the top of the biscuits with a few pistachio pieces and some rose petals.


These shortbread are just delicious. The 
shortbread is buttery, heavy on the vanilla, crunchy from the nuts and sweet from the icing sugar. 
 
See you all again next week with some more baking from my kitchen.
 
Bye for now,
 
Jillian
 
PRINT RECIPE

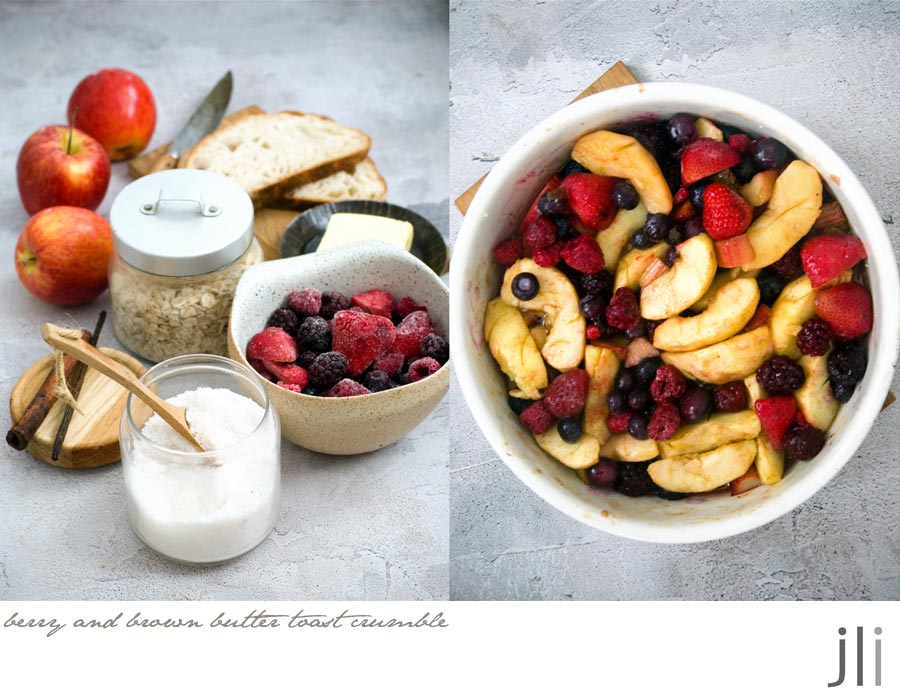
berry and brown butter toast crumble

8 Aug 2022


We've had a pretty cold winter this year so I've been indulging in wintery puddings. Not seen on the blog but enjoyed have been rice custard and lemon delicious pudding and 
I also made an excellent bread and butter pudding a few weeks ago using slices of sourdough fruit loaf

I know I haven't mentioned sourdough for a while but after a bit of a rocky patch in April where everything went pear shaped I went back to the drawing board. I sorted out my starter, worked out a schedule that fitted into my life and it's been good ever since. I usually bake a loaf of bread each week and I alternate between white, wholemeal or mixed grain tin loaves with a sourdough fruit loaf every month or so. 


With all this bread baking it does mean I have a few bread ends tucked away in the freezer and I'm always looking for ways to use up the excess so when I saw this Ottolenghi recipe for a berry crumble made using sourdough crumbs in an old Delicious magazine, I knew I had to make it.


I had a stalk of rhubarb in the fridge so I put that into the apple mix and as rhubarb is very tart I increased the sugar in the fruit mix. It did not go astray and the berry component was my favourite part of the dish. My other change? I don't eat cream so I mixed vanilla bean paste in with some Greek yoghurt and drizzled that over the crumble and it was delicious.


Here's the recipe for you adapted from
here. For all my recipes I use a 250ml cup and a 20 ml tablespoon, unsalted butter and 60g eggs. My oven is a conventional gas oven so if your oven is fan forced you may need to reduce the oven temperature by 20°C.

Berry and brown butter toast crumble - serves 4
Ingredients
3 Gala apples peeled, cored and cut into 8 wedges
1 stalk (75g) rhubarb cut into 1 cm slices
75g caster sugar
65g unsalted butter
¾ tsp vanilla bean paste or vanilla extract
¾ tsp ground cinnamon or star anise 
60g stale, crustless sourdough bread, roughly torn into 1cm pieces
50g rolled oats
pinch flaky sea salt
250g frozen mixed berries

To serve
1/3 cup (80mls) Greek yoghurt, cream or custard

Method
Heat the oven to 200°C. Place the apples and rhubarb, 50g of sugar, 15g butter, ½ tsp vanilla and 1/4 tsp ground cinnamon into a 20cm ovenproof dish and stir to combine. Transfer to the oven to bake for about 20 minutes, stirring halfway, until the apples have softened but still retain their shape.


While the apples are baking add the remaining 50g butter to a medium frypan over medium-high heat. Once melted, cook for about 4 minutes, swirling the pan often, until nicely browned and nutty, adjusting the temperature as needed to avoid burning. Transfer the browned butter to a large heatproof bowl and return the pan to the heat. Add the torn sourdough and cook, stirring often, for 2 minutes or until lightly toasted, then add to the bowl with the butter. Return the pan to the heat and add the oats and cook, stirring often, until lightly toasted, another 2 minutes. Add the oats to the bowl, along with the flaky sea salt, remaining 25g sugar and 1/2 tsp cinnamon or star anise, and stir to combine.


When the apples are ready, stir in the frozen mixed berries plus 1 tbs water, then top evenly with the bread mixture. Return to the oven, turning the heat down to 180°C, conventional and bake for 30 minutes or until golden and bubbling. Remove from the oven and stand for about 5-10 minutes to cool.

Add the cold yoghurt or cream and remaining ¼ tsp vanilla to a small bowl and stir to combine. Serve the crumble warm with the cold yoghurt or cream drizzled over the top.

See you all again next week with some more baking from my kitchen.

Bye for now,

Jillian
PRINT RECIPE

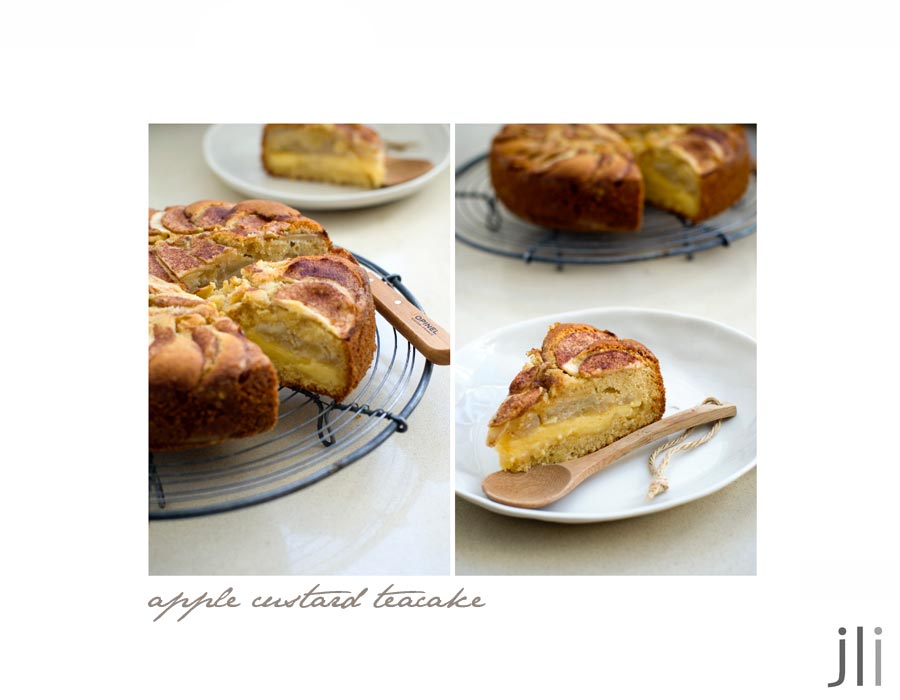
apple custard teacake

7 Aug 2022


This is not the first time an apple custard teacake recipe has appeared on the blog. It's one of my favourite cakes and as I figure you can never have too much apple in an apple teacake, I decided to up the ante by adding a layer of stewed apple to the centre of the cake. I used Granny Smith apples for the stewed apple centre and Gala apples for the topping.


I always stew apple in the microwave and did this the day before baking the cake to allow it plenty of time to cool. I also made the custard the day before for the same reason so
on Sunday morning it didn't take too long to put the cake together.
 
 
Here's the recipe for you which makes an 8 inch cake. For all my recipes I use a 250 ml cup, a 20 ml tablespoon, unsalted butter and 60g eggs. My oven is a conventional gas oven so if your oven is fan forced you may need to reduce the oven temperature by 20°C. 


Apple Custard Tea Cake 
Custard 
2 tbs (20g) custard powder
1/4 cup (55g) caster sugar
1 cup (250ml) milk
20g unsalted butter
2 tsp vanilla extract
 
Apple Filling 
2 large green apples (440g), peeled cored and thinly sliced
1 tbs lemon juice or water
1-2 tbs caster sugar
 
Cake 
135g room temperature unsalted butter
½ cup (110g) firmly packed brown sugar
1 tsp vanilla
2 eggs
200g self-raising flour sifted with a pinch salt
⅓ cup (80ml) buttermilk
 
Topping
2 apples, peeled, thinly sliced
20g unsalted butter extra, melted
1½ tsp caster sugar
¼ tsp ground cinnamon
 
Method  
To make the custard, combine the custard powder and sugar in a small saucepan; gradually stir in the milk. Stir over heat until the mixture boils and thickens. Remove from heat; stir in the butter and essence. Press plastic wrap over the surface; cool.
 
To make the apple filling, combine all the ingredients into a microwave safe bowl. Cover and cook on high for 10-12 minutes until the apples are soft. Cool completely before gently mashing into a pulp.
 
Preheat the oven to 180°C, conventional. Grease and flour a deep 20m round cake pan then line the base with baking paper.
 
Beat butter, brown sugar and the vanilla in a medium bowl with an electric mixer until light and fluffy. Add eggs, one at a time, beating until combined between each addition. Stir in the sifted flour and buttermilk, in two batches.


Spread half of the cake mixture into the prepared pan; Stir the custard to loosen then gently spoon over the batter then top the custard with a layer of apple puree. Spread the remaining cake mixture over the apple layer until completely covered. Overlap apple slices on top; brush with the extra melted butter, then sprinkle with combined caster sugar and cinnamon.
 
 
Bake for 1 hour or until firm. A skewer inserted into the cake will come out a little damp. Let cool for 10-15 minutes before unmoulding. Once cool, store the cake in an airtight container at room temperature.


I shared a few slices with my neighbours, kept a slice for myself and took the leftovers into work. The cake was just as good as I remembered and the extra apple made the cake even more delicious.

See you all again next week with some more baking from my kitchen.

Bye for now,

Jillian


PRINT RECIPE

coconut cupcakes with passionfruit cream cheese icing

31 Jul 2022


As you know I'm a Claire Saffitz fan and a subscriber to her 
Youtube channel. A few weeks ago she adapted her coconut layer cake recipe from Dessert Person into a cupcake recipe. I had everything in the cupboard that I needed so I whipped up a batch of coconut cupcakes. As passionfruit goes so well with coconut I decided to top the cupcakes with some passionfruit flavoured cream cheese icing. 

 
I decided to halve the original recipe and managed to make 10 cupcakes from the batter. If  you'd like to make 12 cupcakes you'll need to increase the batter recipe by 50% but you should have enough icing and coconut for 12 cupcakes.

 
Here's the recipe for you. For all my recipes I use a 250ml cup and a 20 ml tablespoon, unsalted butter and 60g eggs. My oven is a conventional gas oven so if your oven is fan forced you may need to reduce the oven temperature by 20°C.

 
Coconut Cupcakes with passionfruit cream cheese icing – adapted from Claire Saffitz Dessert Person. 
Ingredients
165g plain flour
15g cornflour
1½ tsp baking powder
pinch salt
114g unsalted butter, at room temperature
20g olive oil or virgin coconut oil, at room temperature
175g caster sugar
1 tsp vanilla extract
2 eggs, at room temperature
½ cup unsweetened full-fat coconut milk, well shaken

Icing
30g unsalted butter at room temperature
60g cream cheese, at room temperature
Pinch salt
150g sifted icing sugar
2 tsp passionfruit pulp

To finish
2 tbs toasted shredded coconut

Method
Preheat the oven to 180⁰C, conventional. Line a 12 cup muffin tin with paper liners then set to one side.

Sift the dry ingredients into a small bowl and set to one side. Combine the butter, oil, sugar and vanilla extract in the bowl of a stand mixer and mix on low speed for 5 minutes until the mixture is light and fluffy. Add the eggs one at a time and mix until well incorporated. Add the dry ingredients to the bowl in the thirds, alternating with the coconut milk until you have a nice smooth batter.


Spoon ¼ cup of the batter into one of the cupcake liners – you should be able to make 10 cupcakes. Place in the preheated oven and bake for 20-25 minutes until risen and golden brown. Remove the tray to a wire cooling rack and allow to completely cool before decorating.

Passionfruit cream cheese icing
Combine the butter, cream cheese, salt and icing sugar in a small bowl. Using a hand mixer, beat the mixture for a few minutes until you form a light and fluffy icing. Using a spoon or spatula, gently stir in the passionfruit pulp, trying to maintain some of the whole pulp.


Top each cupcake with 1-2 tbs of the icing then sprinkle over some toasted coconut threads. Allow the icing to set before serving. Keep the decorated cupcakes in an airtight container and serve at room temperature.


I rarely make cupcakes but as these were so light, fluffy and delicious, I might have to change my ways.

See you all again next week with some more baking from my kitchen.

Bye for now,

Jillian
PRINT RECIPE

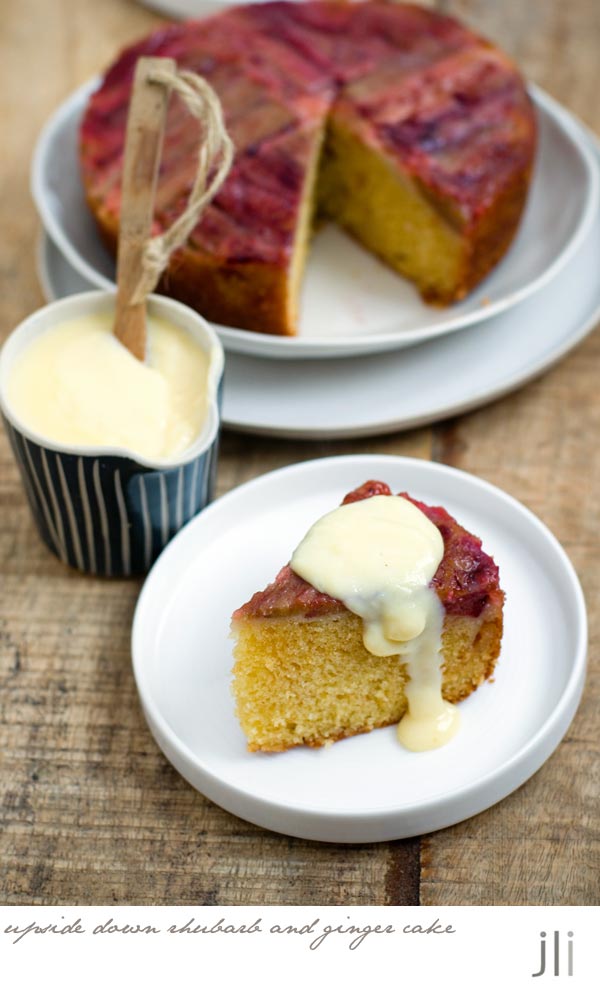
upside down rhubarb and ginger cake

25 Jul 2022


It's been quite a cold wet winter here in Sydney and I've been craving wintery puddings. Last night I fancied a rhubarb pudding and when I looked online I had loads of recipes to choose from but as I've had this Gill Meller recipe bookmarked for quite some time, I decided to make an upside down rhubarb and ginger cake. Gill mentioned that the cake was best served warm topped with custard or double cream, so who was I to disagree and I went down the custard route.
 

The recipe calls for stem ginger which is really hard to find in Sydney. I usually make my own but I'd run out. Luckily when searching through my fridge I found a small bottle of stem ginger I'd bought some years ago in South Africa. I also found a bottle of ginger marmalade during my search and I think a few tablespoons of that would be an excellent substitute for stem ginger. Otherwise just chop up some crystallized ginger and use golden syrup instead of ginger syrup.
 

Here's the recipe for you which makes an 8 inch cake. I accidentally used a 7 inch cake tin instead of an 8 inch cake tin so the cake took a bit longer to bake, about 50 minutes. For all my recipes I use a 250ml cup and a 20 ml tablespoon, unsalted butter and 60g eggs. My oven is a conventional gas oven so if your oven is fan forced you may need to reduce the oven temperature by 20°C.


Rhubarb and ginger upside-down cake inspired by a Gill Meller recipe
Base 
10g melted butter
1 tbs raw caster sugar
200g (6–8) rhubarb stalks

Cake 
65g self raising flour
60g whole meal plain flour, plus extra for dusting
1⁄2 tsp baking powder
pinch of fine sea salt
125g unsalted butter, softened and cut into small pieces
135g raw caster sugar
2 eggs
10g stem ginger preserved in syrup, chopped or 2 tbs ginger marmalade
1 tbsp ginger syrup (from the stem ginger jar)
2 tbs milk


Method
Heat the oven to 180°C/160°C fan. Cut a circle of baking paper to fit the base of a 20cm (8in) springform cake tin.

Generously brush the baking paper with melted butter, remove the lined base from the ring of the tin and sprinkle over the tbs caster sugar. Arrange the rhubarb stalks over the base side by side, trim the edges so you’re left with a nice disc of stalks that covers the base. Grease the ring of the cake tin with the remaining butter and dust with flour, then pop the base (complete with rhubarb in place) into the ring and secure with the clip.

Sift the flours together with the baking powder and salt. Beat the butter and 135g caster sugar together until light and fluffy. (Alternatively, you can do this in a stand mixer.) Beat in the eggs one at a time, sprinkling in 1 heaped teaspoon of flour mixture with each addition of egg.

Using a spoon, fold in the remaining flour mixture, the chopped ginger and syrup or ginger marmalade if using and enough milk to make a smooth batter. Spoon the mixture carefully over the rhubarb in the tin, spreading it out lightly and evenly.


Place the cake in the oven and bake for 40-50 minutes or until a skewer inserted into the centre comes out clean. Allow the cake to cool in the tin for 5–10 minutes and then turn out onto a serving plate, so that the rhubarb is on the top. Sprinkle with a little caster sugar and serve topped with custard or cream
 

I got a little fancy cutting the rhubarb but next time I won't bother because the rhubarb all turned to mush during the baking process. The cooked rhubarb lost most of it's vibrant colour as well so I glossed it up with some thinned raspberry jam just before serving. It still tasted delicious though!

See you all next week with some more baking from my kitchen.

Bye for now,

Jillian

PRINT RECIPE

oatmeal and pecan brittle cookies

18 Jul 2022

Long before I bought my copy of Dessert Person, I saw this recipe for Claire Saffitz's oatmeal and pecan brittle cookies on David Lebovitz's blog. I just love nut brittle so these cookies were high on my list of things to make.
As my household is small, I only made a half batch of cookie dough and I also made smaller cookies than suggested in the recipe. I used 2 tablespoons of dough per cookie, about 48 grams, rather than ¼ cup of dough. The cookies spread a lot during the baking process so I can’t imagine how huge the original sized cookies would be. To rein in the size of the cookies, after baking I 'scooted' them with a larger cookie cutter while they were still warm to reduce the cookie size from 12cm to about 7 cm. Next time I make these cookies I might just use an egg yolk rather than a whole egg and see if that lessens the spread.
This recipe requires a lot of steps and the cookie dough needs to rest for 12 hours before baking so this is not a spur of the moment cookie. To speed up the process you can prepare a few items ahead of time. The pecan brittle can be made in advance and stored in an air-tight container at room temperature for up to a week. The brown butter can also be made ahead of time then brought to room temperature. Whilst the cookie dough can be made with a bowl and wooden spoon, you’ll need a food processor to blitz the oats and pecan brittle. Here's a video of the whole process.
Here’s the recipe for you which makes 13 cookies. For all my recipes I use a 250 ml cup, a 20ml tablespoon, unsalted butter and 60 g eggs. My oven is a conventional oven so if you have a fan-forced oven you may need to reduce the temperature by 20°C.
Oatmeal and Pecan Brittle Cookies - adapted from Dessert Person: Recipes and Guidance for Baking with Confidence by Claire Saffitz
Pecan brittle
70g coarsely chopped pecans
75g (⅓ cup) caster sugar
27g (1 oz) unsalted butter
1 tbs water
¼ tsp bicarb soda
pinch salt 
 
Dough 
113g (4 oz) unsalted butter, divided (half should be cold) and cubed
105g (⅔ cup) plain flour
Pinch salt
½ tsp bicarb soda
1 cup (100g) rolled oats, (not instant or quick-cooking)
75 g brown sugar
¼ cup (55g) caster sugar
1 cold egg
1½ tsp vanilla extract
 
Pecan brittle  
Preheat the oven to 180º C, conventional and line a small baking sheet with baking paper or a silicone baking mat. Spread the chopped pecans on another baking tray and toast in the oven, stirring midway during baking until they're light golden brown and smell toasty, 8 to 10 minutes. Remove from the oven and set aside to cool.
 
Have the bicarb soda and salt measured out and close by. In a small saucepan, combine the sugar, the butter and the water. Bring to a boil over medium heat, stirring occasionally with a heatproof spatula, until the sugar has dissolved. Continue to cook, without stirring, but swirling the pan to keep the mixture cooking evenly until it turns a deep amber colour which will take 8 to 10 minutes.
 
Remove from heat and immediately stir in the pecan pieces and mix until well coated, then quickly stir in the bicarb soda and salt. Quickly scrape the mixture on the prepared baking tray and spread it as evenly as possible. Set aside to cool completely. Once cool, chop the brittle into pieces the size of large peas with a chef's knife. If you plan to finish making the cookie dough later, store the brittle bits in an airtight container. You want to use all the brittle, including all the little tiny bits left on the cutting board too.
 
Cookie dough 
Place the cold cubed butter into a large bowl. Put the remaining butter into a microwave safe bowl. Cover and cook on high for about 4 minutes or until the butter has browned and smells nutty. Pour the browned butter over the cubed butter in the bowl, scraping any and all brown bits in the pan into the butter. Let cool for about 30 minutes, until the two butters start to become solid again.
 
While the butter is cooling, put the flour, salt and bicarb soda into the bowl of a food processor. Pulse it once or twice then add ½ cup (50g) of the oats and half of the chopped pecan brittle. Pulse until the ingredients are finely ground together.
 
Add the sugars to the bowl containing the butter mixture and mix until thoroughly combined and smooth. Scrape down the sides of the bowl with a spatula then add the egg and vanilla, then stir in the flour/oat/brittle mixture and continue to mix until there are no dry spots. Add the remaining chopped pecan brittle and oats and stir until they are well combined. Refrigerate the dough for about an hour before scooping out the dough into 2 tbs mounds or just under 50g per cookie by weight. Cover the dough tightly and refrigerate for 12 hours, or up to 4 or 5 days.
 
Baking
The next day, preheat the oven to 180ºC, conventional. Place the oven racks on the bottom and top third of the oven and line two baking sheets with baking paper. Place 6 rounds of dough on the baking sheets, about 3 inches apart because these cookies spread a great deal. Flatten each dough ball a little.
Bake the cookies, rotating the baking sheets midway during baking, turning them from front to back, and switching the baking sheets from the top to bottom racks in the oven, until they are light golden brown across the top and deep golden brown around the edges, about 16 - 20 minutes. Let the cookies cool for 5 minutes, then transfer to a wire cooling rack. When completely cool store in an airtight container.
As expected, these cookies were absolutely delicious and so nice that I've made them twice now. Best of all, my biscuit tin is full!
 
See you all again next week with some more baking from my kitchen.
 
Bye for now,
 
Jillian
 
 
PRINT RECIPE
© DELICIOUS BITES • Theme by Maira G.