SLIDER

the river cafe
Showing posts with label the river cafe. Show all posts

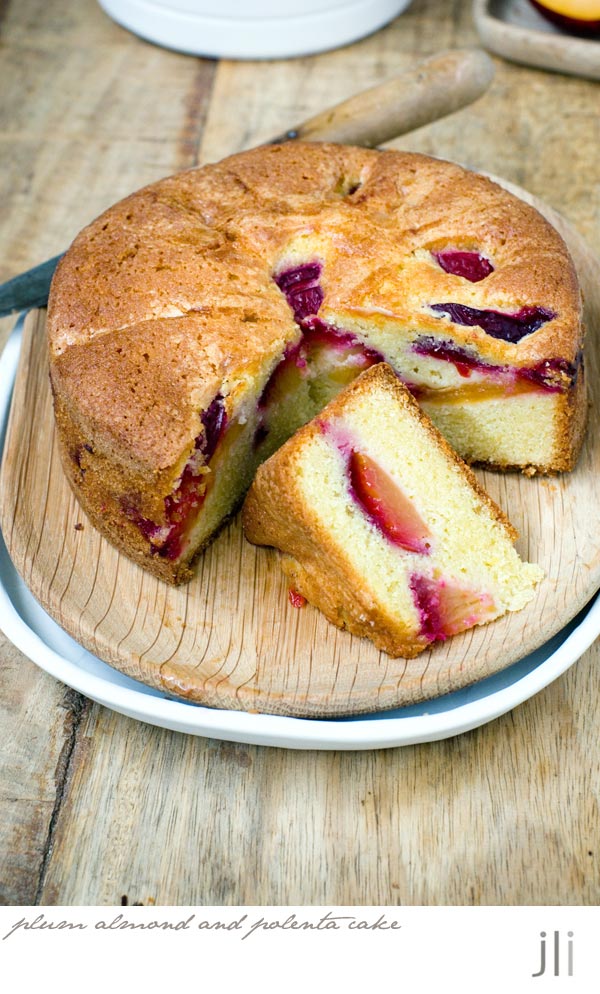
plum, almond and polenta cake

16 Apr 2023


I knew I had some rhubarb in the freezer and planned to use it to make 
Skye McAlpine rhubarb and almond cake. When I looked in the freezer I didn't have enough rhubarb to make the cake but I thought the recipe would work just as well, topped with plums.


Like Skye, I also adapted the River Cafe polenta, almond and lemon cake recipe to make this naturally gluten-free plum, almond and polenta cake. I tweaked the quantities to make the cake a little less dense and upped the baking powder to ensure the plums sank into the batter, part of the magic of plum cake.

Here's the recipe for you which makes a 17cm cake. For all my recipes I use a 250ml cup and a 20 ml tablespoon, unsalted butter and 60g eggs. My oven is a conventional gas oven so if your oven is fan forced you may need to reduce the oven temperature by 20°C.


Plum, almond and polenta cake
Ingredients
125g butter, softened, plus more for the tin
125g caster sugar 
1 tsp vanilla extract 
Grated rind of 1 lemon (3 tsp) 
2 eggs 
65g polenta or maize flour
1 tbs potato starch 
3/4 tsp baking powder 
110g ground almonds 
15 mls milk 
sea salt flakes 
2-3 plums, halved, pitted and sliced
1 tbs caster sugar 

Metho
Heat the oven to 190°C conventional. Butter a 17cm springform cake tin and line it with baking paper. 

Beat the butter and sugar, vanilla and lemon rind together until pale and light. Beat in the eggs, one at a time. Sift the polenta, the potato starch and the baking powder into a small bowl then stir through the ground almonds then add a pinch salt. Add the polenta mixture to the batter followed by the milk and stir to form a soft batter. The cake batter can also be made in a food processor. 


Spoon the batter into the prepared cake tin and then arrange the plum slices over the cake batter. Dredge the plums with a tablespoon of caster sugar before baking. Please note, the plums will sink into the batter as the cake bakes so don't have to be too precise with your arrangement of the slices. 


Place the cake on the centre rack and bake in the preheated oven for 45 minutes to 1 hour, or until the cake is cooked when tested with a skewer and brown on top. Let cool in the tin for about 10 minutes before loosening with a knife. Allow the cake to cool completely before turning out onto a wire rack. The cake will keep for two to three days in an airtight tin.


This cake was an absolute winner. I took my piece home and cut the piece in half to eat over 2 days but it was so yummy, I scoffed the piece in about 2 bites. Skye suggested topping the cake with either blackberries or raspberries but I could see the polenta cake would beautifully as the base for an upside down blood orange or rhubarb cake. Watch this space.


See you all again next week with some more baking from my kitchen.

Bye for now,

Jillian
PRINT RECIPE

hazelnut chocolate ricotta torta

31 Aug 2020


When I made the blueberry hazelnut ricotta cake last month I noted it was originally made with a chocolate topping the cake rather than blueberries. As hazelnut and chocolate is a match made in heaven I went on the hunt for a cake recipe that also included ricotta.


I found a hazelnut chocolate ricotta torta recipe from the River Cafe which ticked all the boxes. I changed the proportions to fit my tin and set to work.


The flavours and technique are quite similar to my Mum's almond cake, so I was keen to try the finished product. As the cake contains such a small amount of flour I decided to make the torta gluten free by using a GF flour mix. As I made this to bring to a work birthday morning tea, to make it look more celebratory I topped the cake with chocolate ganache and some extra toasted hazelnuts. None of these additional steps are necessary.


Here's the recipe for you which makes a 17 cm cake. For all my recipes I use a 250 ml cup, a 20 ml tablespoon, unsalted butter and 60 g eggs. My oven is a conventional oven so if you have a fan-forced oven you may need to reduce the temperature by 20ºC.


Hazelnut chocolate ricotta torta - inspired by a recipe from The River Cafe
Ingredients
100g skinned hazelnuts
85g unsalted butter, softened plus extra to grease
100g caster sugar
100g ricotta
1 tsp vanilla extract
2 tsp finely grated lemon rind
3 eggs, separated
70g dark chocolate (70% cocoa solids), grated
25g plain flour, sifted
a pinch of salt

Ganache
60mls cream
60g dark chocolate, finely chopped

To decorate
Extra roasted halved hazelnuts

Method
Preheat the oven to 180°C. Grease and flour a 17cm spring-form tin that is at least 5cm deep, and line the base with baking paper.

Spread the hazelnuts out in a small baking tin and toast in the oven for about 10 minutes until lightly golden. Coarsely chop the nuts in a food processor until they resemble rubble. Don’t blend them too far, you want them as quite identifiable chunks.

Beat the butter and sugar together with the ricotta, vanilla and the lemon zest until pale and light. Add the egg yolks, one by one, beating well. In a separate bowl, combine the chopped nuts, the grated chocolate and the flour. Fold the nut mixture into the ricotta mixture.

Whisk the egg whites with a pinch of salt in a clean dry bowl until they form soft peaks. Fold in the whisked egg whites, starting with one spoonful to loosen the mixture, then add the remainder, being careful not to over mix.

Spoon the batter into the prepared cake tin and bake for 40-45 minutes or until set. Place on a cooling rack and run a knife around the outside of the cake to loosen. Allow to cool completely before removing from the tin and discarding the paper. If desired, top with chocolate ganache before serving.


Ganache
In a small saucepan, heat the cream to boiling point. Place the chopped chocolate in a small bowl, then pour the hot cream over the chocolate and allow to stand for a few moments until the chocolate starts to melt. Stir the chocolate until its smooth then put ganache to one side to thicken a little. Reattach the spring-form ring to the base and pour the chocolate ganache over the top of the cake.  Gently smooth with a spatula then gently tap the cake to level the topping. Decorate with the halved hazelnuts. Allow the topping to completely set then run a knife around the cake before unmoulding.


The torta keeps for up to 2 days. Store covered in a cool place, or freeze for up to one month.


Despite it's appearance, the cake is deceptively light and tastes very grown up. t's definitely a keeper.

See you all again next week with some more baking from my kitchen.

Bye for now,

Jillian


PRINT RECIPE

raspberry sorbet

2 Mar 2020


While the weather is still warm I've been trying to get as much use as possible from my new ice cream maker. So far I've made frozen yoghurt and gelato, so this weekend I decided to make some sorbet. I've yet to tackle ice cream so that's next on my list.


This was going to be a strawberry sorbet inspired by the River Cafe recipe but the strawberries this year have been really disappointing. Instead with a bag of raspberries in the freezer I decided to make a raspberry sorbet.


This recipe really only has 3 ingredients - berries, sugar, lemon or lime with a touch of salt. You'll need a food processor or blender to make this and ideally an ice cream maker. If you don't have an ice cream maker never fear, as long as you use frozen berries you can still make sorbet as long as you don't mind raspberry seeds. I do mind raspberry seeds so I had to melt my sorbet a bit before I could pass the mixture through a sieve.

Here's the recipe for you, which serves 8.


Raspberry sorbet – inspired by the River Café strawberry sorbet recipe
Ingedients
1 lemon or lime
500g raspberries, fresh or frozen
A little pinch of sea salt
110g caster sugar


Method
Finely grate the lemon rind. Remove the white pith from the lemon and discard, de-seed the lemon and coarsely chop the pulp. Place the raspberries in a food processor with the salt, lemon rind, chopped lemon flesh and the caster sugar. Purée until smooth then strain the liquid through a sieve to remove the raspberry seeds. Pour the raspberry puree into an ice-cream maker and churn until frozen. Spoon into a container and place in the freezer.

If you don't own an ice-cream maker and don’t mind raspberry pips, you can make this sorbet using frozen raspberries. Instead of pureeing the lemon, grate the rind then juice the lemon and dissolve the sugar in the lemon juice. You might have to add a little warm water to the sugar to help it to dissolve. Place the frozen berries into the food processor with the salt, rind and sugary lemon juice and whiz. The frozen berries magically turn into sorbet before your eyes! Spoon the sorbet into a shallow container and put directly into the freezer.


I found the flavour of the sorbet very intense so to balance it out I served it with a scoop of fior di latte gelato. It was a match made in heaven.

See you all again next week with some more baking from my kitchen.

Bye for now,

Jillian
PRINT RECIPE

passover week 2019 - chocolate nemesis cake

17 Apr 2019


The recipe for the River Cafe's chocolate nemesis cake has been around for a long time but until now I'd never attempted it. With Passover just around the corner it seemed a perfect time to make this flourless chocolate cake but I won't say making this cake went smoothly. 


The recipe I followed recommended allowing the cake to cool whilst still in the water bath. Unfortunately despite my careful wrapping, the springform tin sprang a leak and when I unmoulded the cake I found the base very runny. I re-wrapped the cake tin in plastic wrap, followed by 2 layers of foil which I tied up with string and returned the cake to the oven and baked it for another hour until the base had reset.


The original recipe makes a huge cake so I've scaled the recipe down to make a 17cm cake. The original recipe can be found hereWhile I made the cake using butter I'm sure you could use a mild flavoured olive oil to make the cake, rendering it gluten free, dairy free and Passover friendly. 


Here's the recipe for you which makes a 17cm cake with my revised baking instructions. For all my recipes I use a 250 ml cup, a 20 ml tablespoon, unsalted butter and 60g eggs. My oven is a conventional gas oven so if your oven is fan forced you may need to reduce the oven temperature by 20°C.


The Chocolate Nemesis Cake – adapted from the River Cafe

Ingredients
220g dark chocolate 70%, broken into small pieces
100g unsalted butter, softened
3 whole eggs
Pinch salt
¾ cup caster sugar
¼ cup water

Method
Preheat the oven to 170°C. Grease a 17cm cake tin and dust it with cocoa powder tapping out any excess then line the base of the pan with baking paper. If using a spring form pan, wrap plastic wrap around the tin before taking a piece of aluminium foil and wrapping it around the cake tin making sure it goes all the way up to the outer rim. The cake will be baked in a bain marie and the plastic wrap and foil should stop any water leaking into the cake mixture.

Melt the chocolate and butter in a double boiler or in the microwave, removing as soon as the butter has melted. Stir until the chocolate has completely melted then set aside. In a small pan heat the remaining sugar with the water and cook gently until the sugar completely dissolves forming a syrup. Pour the hot syrup over the chocolate and butter mixture and stir to combine. Set aside and allow to cool slightly.

In a stand mixer, beat the eggs with a ¼ cup caster sugar and a pinch of salt for 10 minutes or until they've quadrupled in volume. Reduce the speed of the mixer and slowly add the warm chocolate and syrup mixture to the eggs and continue to beat gently until combined. The mixture will lose volume. Pour the mixture into the cake tin and rap firmly on the bench top to remove any air bubbles 

Cover the top of the cake with a piece of foil. Put a folded tea towel into the bottom of a deep sided oven dish and place the cake on top. This will prevent the cake moving around. Pour hot water into the pan so that it comes halfway up the sides of the pan. Bake for 1¼ hours or until set. Remove the cake from pan of water and let it completely cool (at least 2 hours) before turning out of the tin. Store in the fridge until needed but bring to room temperature before serving.


The cake is delicious but really rich so serve small slices with a dollop of cream and a few raspberries. It’s equally good a few days later.

See you all again tomorrow with some more Passover baking.

Bye for now,

Jillian
PRINT RECIPE

upside down blood orange, ricotta, almond and polenta cake

11 Sept 2017

While browsing through instagram a few weeks back, I spied a picture of an upside down blood orange, ricotta, almond and polenta cake adapted from the River Cafe's Lemon Polenta Cake.  


Blood oranges and ricotta are 2 of my favourite things and as I'd already made the River Cafe's lemon cake a few times before, I was keen to give this version a try. When I found that blood oranges were on special at the fruit shop this week I bought a few to make this cake.


Early on Sunday morning, I collected all the ingredients.


You need to use well drained ricotta from the deli for this recipe.


I used a combination of brown sugar and water at the base of the tin as suggested by Deb from Smitten Kitchen then arranged the orange slices over the base before carefully spooning the delicate batter over the fruit. 


Here's the recipe for you, which makes an 8 inch cake. For all my recipes I use a 250 ml cup and a 20 ml tablespoon. All eggs are 60 grams and my oven is a conventional gas oven not fan forced, so you may need to reduce your oven temperature by 20°C. 

Upside down blood orange, polenta and ricotta cake
½ cup brown sugar
1 tablespoon water
3 blood oranges
1 lemon
125g almond meal
50g polenta flour
115g unsalted butter, softened
135g caster sugar
3 large eggs, separated
165 grams ricotta, drained
75mls orange/lemon juice
Additional 1 tbs caster sugar
¼ cup apricot jam or marmalade

Method
Preheat oven to 170°C. Butter a 8-inch round cake pan and line the base and sides with baking paper. Stir brown sugar and water together. Pour into the base of the prepared cake pan and spread thinly. Set aside. Grate the zest of 1 of the oranges and the lemon. Using a small, sharp knife, slice off 1 cm from the top and bottom of 2 of the oranges. Standing each orange up on a board, carefully but neatly follow the natural curves of the orange with the knife to peel off the remaining skin and all the white pith. Cut each orange horizontally into thin slices. Remove the pips then arrange the slices over the brown sugar base in the cake pan. Juice the third orange then add sufficient lemon juice to make 75 mls.

In a small bowl, combine the almond meal with the polenta flour. Beat the butter, sugar and zests together in a mixer until pale and light. Add the egg yolks one by one. Put the ricotta in a bowl and lightly beat with a fork before adding the blood orange juice. Gently stir the ricotta mixture into the cake batter alternating with the almond mixture. In another bowl, beat the egg whites until they form soft peaks. Add the extra tablespoon of sugar and whisk until combined. Gently fold the egg whites into the almond mixture.

Spoon the mixture into the prepared tin and gently smooth the cake batter, trying not to disturb orange slices underneath then bake in the preheated oven for 1 hour or until set. Test by inserting a skewer, which should come out clean. Cool on a wire rack for 15 minutes before removing from the tin and inverting onto a cake plate. Don't leave the cake for too long before unmoulding or the topping will set and you'll find it impossible to get the cake out of the tin.

While the cake is cooling, heat the jam in the microwave until it melts then gently brush over the cake top. Let the cake cool completely before cutting into slices. Serve as is or with a dollop of double cream. 


This cake is best served on the day of making as the oranges tend to lose their shine. Store any leftover cake in the fridge.


The cake is almost more of a cheesecake than a regular cake and the addition of the orange slices does make this quite soft and a bit of a challenge to cut into neat slices. So don't do what I did and allow the cake to cool completely before cutting a slice. The blood orange version of the cake is much sweeter than the lemon version due to the brown sugar base, which isn't a bad thing. In case you're wondering, the unused blood orange rind didn't go to waste. I candied it in preparation for my Christmas baking and it's drying out on a rack while I type this.

See you all again next week with some more baking from my kitchen.

Bye for now,

Jillian

PRINT RECIPE

passover week - lemon almond ricotta cake

16 Apr 2016

Hi every-one,

I wrote and posted this recipe yesterday but there must have been a glitch in the system because the post disappeared. So here we go again. 


Have you ever made your own ricotta? I'm not going to give you a recipe for ricotta cheese as there are many on the web but if you can't buy passover friendly ricotta for this recipe (which you can't in Sydney) you may have to make your own. It's pretty simple to make though - just milk, salt, lemon juice, a thermometer, a way to drain the curds and a bit of time.


This cake is based on the famous lemon ricotta cake from the River Cafe. I made a version of this cake last weekend in a fluted tin even though I knew it was unlikely to come out cleanly and without a struggle.


In the battle of the cake vs tin, the tin won and I stuck the broken bits of cake back together and smothered it in icing sugar. It tasted great though and well worth making again.


So back to the kitchen I returned for round 2. To save time, I didn't make my own ricotta this time. Instead I used favourite brand, Paesanella and baked the cake in a more sensibly shaped tin. It came out of the tin without a problem and this time I decided to top the cake with some softly whipped cream and candied lemon rind.


Here's the recipe for you. For all my recipes, I use a 250 ml cup and a 20 ml tablespoon. All eggs are 60 grams and my oven is a conventional oven not fan forced, so you may need to reduce your oven temperature by 20°C.


Almond and Ricotta Cake - makes 1 x 17cm cake
Ingredients
125g almond meal
50g passover baking mix
150g fresh ricotta or white curd cheese
75mls strained lemon juice
110g unsalted butter, softened
125g caster sugar
finely grated zest of 3 lemons
3 eggs, separated

Method
Preheat oven to 170C. Butter a 17cm round cake tin and line with greaseproof paper.

In a small bowl, combine the almond meal with the passover baking mix. Place the ricotta in a separate bowl; lightly beat with a fork then add the lemon juice. 

In a large bowl, beat the butter, sugar and lemon zest together until pale and light. Add the egg yolks one by one, then add the almond mixture alternately with the ricotta mixture. In a separate bowl, beat the egg whites until they form soft peaks. Gently fold the egg whites into the almond mixture. Spoon the mixture into the prepared tin and bake in the preheated oven for 50 to 60 minutes until set. Test by inserting a skewer, which should come out clean. Cool on a cake rack.

Dust with icing sugar or top with softly whipped cream and candied lemon slices. Decorate just before serving.

Candied Lemon Slices
1 small lemon thinly sliced and seeds removed
⅔ cup caster sugar
⅔ cup water

In a frying pan, combine the sugar and water, place over a low heat stirring occasionally until the sugar dissolves. Bring to a gentle boil and cook for 5 - 8 minutes or until the toffee starts to turn golden. Add the lemon slices and turn frequently until the lemon slices are golden and well coated about 3 - 5 minutes. Remove the slices and place on baking paper. Allow to cool at room temperature.


The cake is lovely - light and moist and well worth the time and effort involved in making your own cheese.

Have a great weekend. See you next Monday with the final recipe (I think) for Passover Week.

Bye for now,


Jillian

PRINT RECIPE
© DELICIOUS BITES • Theme by Maira G.