SLIDER

bill granger
Showing posts with label bill granger. Show all posts

passover week 2024 - passover blackberry meringue tart and a tribute to bill granger

14 Apr 2024


I'm pleased to report that I've finally managed to make a successful passover pastry tart shell, although it took me 2 attempts. Thankfully the recipe makes enough pastry for a 9 inch tart shell so I had more than enough to play with. The pastry, which I adapted from an Aran Goyoaga recipe, is very fragile so treat it with care. On my first attempt, I blind baked the shell for 20 minutes but when I removed the paper the sides slumped and the base puffed up. 


Unbeaten, I learned from my mistakes and the second time around I baked the pastry shell for much longer before I removed the paper, which I did with extreme caution. It took about 45 minutes for the shell to cook through and I took the extra step of sealing the baked tart shell with egg white before I spooned in the filling. The other good news is the pastry shell keeps well in an airtight container so can be made some time in advance.


This was to be a lemon meringue pie but the filling made with potato starch was so gloopy, I binned it. Instead I turned to a 
recipe I'd bookmarked some time ago. It's a Bill Granger recipe and l
ike so many I was shocked and saddened by the news of Bill Granger's untimely passing. In part this post is a tribute to Bill's influence on the Australian restaurant scene and to my cooking.  Bill managed to make simple tasty food accessible to all and I was a regular at bills surry hillsI've slightly adapted the technique but the flavours are all Bill's and the tart is magnificent. The filling is not very sweet but is balanced out by the meringue topping.


Here's the recipe for you which makes a 16cm tart but to make a 23 cm tart, just double the filling and topping ingredients. You will have enough pastry. If you'd like to make this tart gluten free, dairy free and pareve, you can make the coconut crust from hereFor all my recipes I use a 250ml cup and a 20 ml tablespoon, unsalted butter and 60g eggs. My oven is a conventional gas oven so if your oven is fan forced you may need to reduce the oven temperature by 20°C.


Passover blackberry meringue tart 
Pastry 
1 scant cup (125g) superfine matzo meal
¼ cup (25g) almond meal
2 tbs tapioca starch
1 tbs caster sugar
pinch sea salt
110g unsalted butter, cut into 1cm pieces
1 egg yolk
2 - 4 tablespoons iced water
1 egg white, broken up with a fork

Filling
Finely grated rind and juice ½ lemon 
350g fresh or frozen blackberries
1 tbs water
1 tbs potato starch mixed with 1 tbs water
55g caster sugar

Topping
80g caster sugar
20mls water
45g egg whites
pinch salt
 
Pastry - this makes sufficient pastry to make a 
23cm tart. Any leftover pastry can be wrapped in plastic and frozen for later use.

Method
Combine the first 5 ingredients in the food processor and pulse to aerate. Add the diced butter and pulse ten times until butter is the size of peas. Whisk together the egg yolk and 2 tablespoons of ice water. Add it to the dough and pulse until it comes together. Add more ice water if needed. Knead the dough a couple of times and wrap it in plastic wrap forming it into a flat disc and refrigerate for 1 hour. 

Roll the pastry out to 5mm thickness on a sheet of baking paper and line a 2 cm deep 16 cm diameter tart ring. Trim and refrigerate for 30 minutes. Place a baking tray on the centre rack and preheat the oven to 180⁰C, conventional. Cover the pastry with a crumpled sheet of baking paper, then fill with pastry weights. Place the tart shell on the preheated oven tray and blind bake for 30 minutes. Carefully remove paper and the pastry weights and bake for a further 5-10 minutes or until the tart shell is golden.
 
Gently brush the still warm pastry with egg white and return to the switched off oven for 10 minutes or until the egg white has dried out. Remove from the oven and cool to room temperature on a wire rack. Unmould when cool.

Filling
Heat the lemon rind and juice, 190g berries, 55g caster sugar and 1 tbs water in a saucepan over medium-low heat for 2-3 minutes until berries start to release their juices. Cook, crushing with a spoon, for a further 3 minutes or until softened. Strain the berries, reserving the juice, before returning the berries to the saucepan. 


Mix the potato starch with the cold water, then add to the saucepan containing the berries and cook for 1-2 minutes until the berries have thickened and are shiny. Stir through the remaining berries, remove from heat then set aside to cool completely.

Meringue
Combine the remaining 80g sugar and 20 ml water in a saucepan. Heat gently over low heat for 1-2 minutes until sugar dissolves. Increase the heat to medium and cook until the temperature reaches 120°C on a sugar thermometer.

Meanwhile, in a stand mixer whisk the egg whites and salt to stiff peaks. Whisking constantly, add hot sugar syrup in a slow, steady stream. Continue to whisk for 10-15 minutes until meringue cools to room temperature and is thick and glossy.


Assembly
Just before serving, spoon the reserved berries into the tart case and top with meringue, making soft peaks with the back of a spoon. Gently brown the meringue using a kitchen blowtorch. (Alternatively, place the pie under a hot grill for just a few seconds.) Remove from the pan, place the tart shell onto a serving dish then slice and serve with the reserved berry sauce.


This is best served the day it's made although the tart will keep for a few hours stored in the fridge.


Edible crisp Passover pastry and I managed to cut a neat slice as well - a Passover miracle!

See you all again tomorrow with another bake for Passover Week 2024. 

Bye for now, 

Jillian
PRINT RECIPE

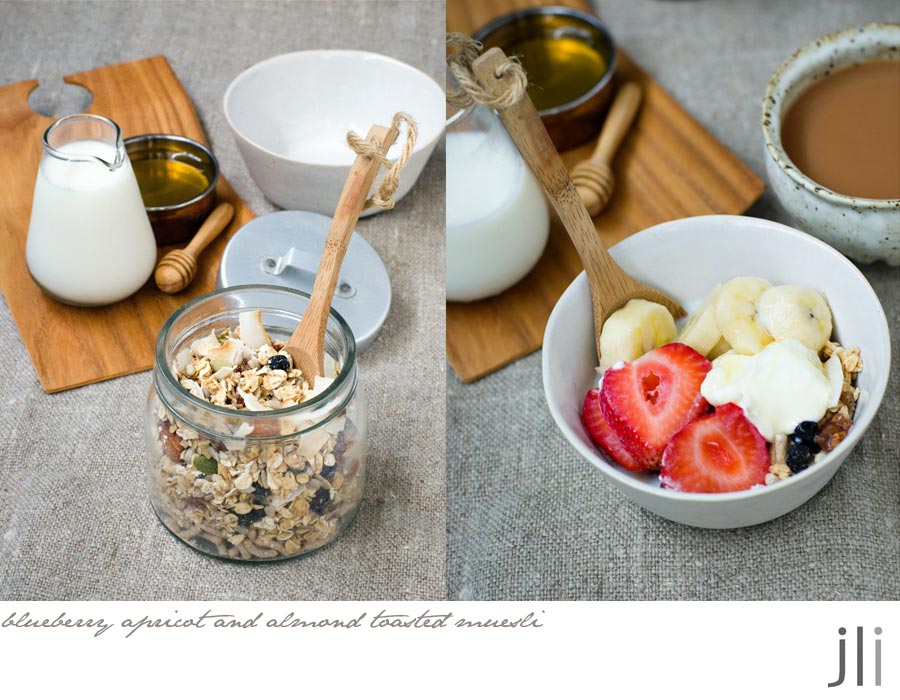
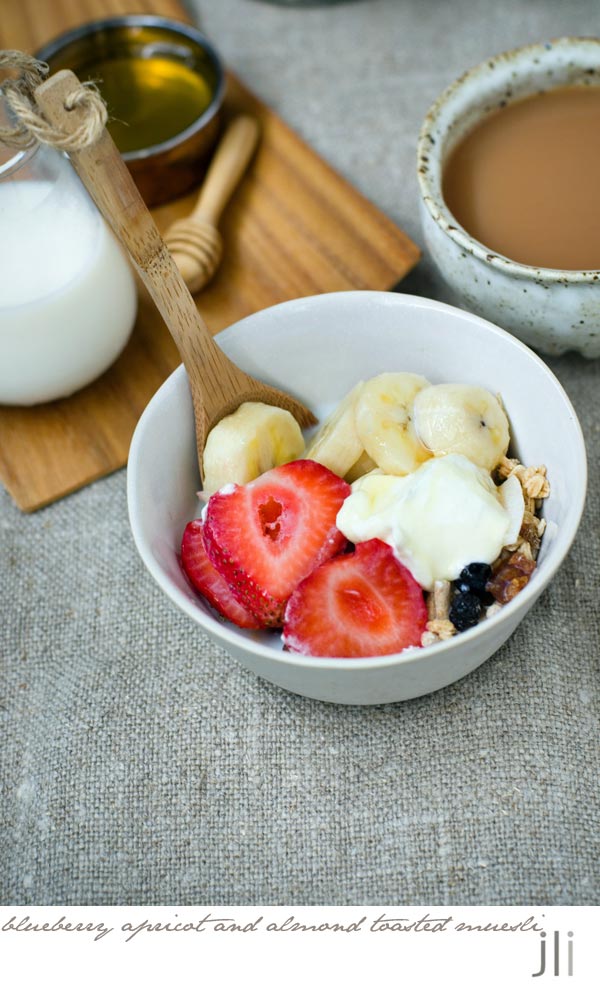
blueberry apricot and almond toasted muesli

26 Jan 2022


I'm such a creature of habit.
Every morning I have a bowl of muesli for breakfast unless I go out for breakfast, then it's eggs all the way. While I was home during the last lock-down, I spent a lot of time going through my old recipe books. Whilst looking through my copy of 'Bill's Open Kitchen' by Bill Granger I came across his recipe for blueberry and almond toasted muesli. I was just about out of muesli and I had everything I needed to make a batch, though not quite enough dried blueberries. I like dried apricots so I added a few to the mix.

The recipe is easy to customise so I made a few changes. The original recipe included sesame seeds, which I found their flavour a bit too assertive for breakfast so I left them out and added a little bit more of everything else. I also reduced the oil in the recipe because the olive oil spray seemed to do the trick. Once cold you add all the dried fruits then store in a sealed container. I normally throw in a spoon of bran cereal just before serving, then I like to top my muesli with sliced peaches or bananas, berries, yoghurt then either a drizzle of honey or maple syrup.


Here’s the recipe for you which the book says serves 4, but one batch does me for about 2 weeks. For all my recipes I use a 250ml cup and a 20ml tablespoon, unsalted butter and 60g eggs. My oven is a conventional gas oven so if your oven is fan forced you may need to reduce the oven temperature by 20°C.
 

Bill Granger Blueberry, Apricot and Almond Toasted Muesli
Ingredients
Olive oil spray
300g rolled oats
1 tbs vegetable oil
125ml apple juice
85g raw almonds
125g sunflower seeds
50g pumpkin seeds
35g flaked coconut
60g dried blueberries or currants
60g dried apricots, coarsely chopped

To serve
Fruit, yoghurt, honey and milk

Method

Preheat the oven to 160°C, conventional. Lightly spray a large baking tray with olive oil spray.

Place all the ingredients except for the dried blueberries and apricots in a large bowl and stir well to combine.

Spread the mixture evenly over the tray then lightly spray the top of the muesli with the olive oil spray. Place the tray in the preheated oven and bake for 30 minutes, stirring occasionally until lightly browned. Remove from the oven and allow to cool completely before stirring through the blueberries and dried apricots.


Home made toasted muesli that's low in sugar and fat and tastes good as well. Thanks Bill.

See you all again next week with some more baking from my kitchen. 

Bye for now,

Jillian

PRINT RECIPE

easy crustless lemon tart

18 May 2020


While trawling through the internet looking for something else I spied this recipe for a crustless lemon tart. The original recipe called for thickened cream but I'd just returned from Brisbane and I had creme fraiche in the fridge that needed to be used before it expired. I also had eggs and lemons so on the spur of the moment I thought I'd give this recipe a go as my work colleagues are big fans of lemon flavoured desserts.


It really couldn't be more simple. I threw all the ingredients into the food processor and whizzed them until combined and poured the batter into a spring form pan.


The original recipe called for just greasing the tin but a little of the very liquid batter ran while out it baked, welding the springform tin together. If I were to make this again I would definitely line the tin with baking paper and I think a simple shortbread base would be a great addition. 


Creme fraiche is too rich for me so I didn't try out this tart but I took this into work where it went down a treat. Here's the recipe for you which makes a 20cm/8 inch tart. For all my recipes I use a 250ml cup and a 20 ml tablespoon, unsalted butter and 60g eggs. My oven is a conventional gas oven so if your oven is fan forced you may need to reduce the oven temperature by 20ºC.


Easy Crustless Lemon Tart by Bill Granger 
Ingredients
3 whole large eggs
½ cup plain flour 
1 cup caster sugar
pinch of salt
100g unsalted butter, melted 
finely grated lemon zest of 2 large lemons
125 ml freshly squeezed lemon juice
1 cup thickened cream or creme fraiche 
1 teaspoon vanilla extract
icing sugar for dusting

Optional
Thick cream and berries

Instructions
Preheat oven to 180°C. Grease and line the base and sides of a 20 cm spring-form pan with baking paper.

Place the eggs, flour, sugar, salt, butter, lemon zest and juice, cream and vanilla into the bowl of a food processor. Whiz until combined.

Pour the liquid batter into the lined spring-form pan and bake for 35-40 minutes until lightly browned around the edges. The tart will still seem a little ‘wobbly’ at this stage but remove from oven and rest on a cake rack for 20 minutes. Refrigerate for 30 minutes or until cold before removing the tart from the spring-form base. 


Just before serving, sieve icing sugar lightly over tart. The tart can be served with a dollop of cream and some berries.

Now
 I have a hankering for a classic lemon tart!

See you all again next week with some more baking from my kitchen.

Bye for now,

Jillian
PRINT RECIPE

raspberry white chocolate and pistachio pavlova - xmas week 2019

16 Dec 2019


Welcome to Christmas Week 2019. This year I've made a range of items including a few slightly more ambitious dessert items which you could serve for dessert on Christmas Day.


Recently I watched an episode of Bill's Kitchen - Notting Hill in which Bill whipped up some individual strawberry white chocolate and pistachio pavlovas. For Christmas Day I thought it would be nice to make a larger pavlova to share and as raspberries are in season I swapped them for the strawberries that were in the original recipe.


I always have trouble cooking meringue in my gas oven as the oven tends to go out at lower temperatures. Every time I checked the pavlova the oven had gone out and after an hour of baking, the pavlova was no-where near cooked. In the end I needed to switch the oven on three times and baked this pavlova for 2 hours before it was firm. It seemed to be worth the effort because the pavlova disappeared in the blink of an eye.


Here's the recipe for you which makes a 7 inch pavlova. For all my recipes I use a 250 ml cup and a 20 ml tablespoon. All eggs are 60 grams and my oven is a conventional gas oven not fan forced, so you may need to reduce your oven temperature by 20°C. 


Raspberry pistachio and white chocolate pavlova – inspired by a Bill Granger recipe
Serves 6
Ingredients
4 large egg-whites 
200g caster sugar 
1 tsp cornflour 
1 tsp white vinegar
1 tsp vanilla
100g white chocolate, roughly chopped 
80g pistachio nuts, roughly chopped

To decorate
150g fresh raspberries 
1 tbsp icing sugar  
300 ml cream
1 tsp vanilla extract  
A few mint leaves
A few chopped pistachios

Method
Preheat oven to 160°C. Line a baking sheet with parchment paper. Trace a 7 inch circle onto the paper with a pencil then turn the paper upside down. You’ll use this as template for the Pavlova.

Place the egg whites into the clean dry bowl of a stand mixer with a pinch of salt and whisk to soft, shiny peaks. Gradually add the sugar, a tablespoon at a time. Whisk well after each spoon full of sugar. Whisk until the mixture is really stiff and very shiny - the mixture should stand up in peaks once you lift out the whisk. Using a metal spoon, gently fold through the cornflour, vinegar and vanilla followed by the white chocolate and most of the pistachios, reserving a few for decoration. 

Once folded together, pile or pipe the meringue mixture onto the baking tray, keeping within the marked circle. Smooth the top so it resembles a flat cake. It needs to be at least 5-6 cm (2-3 inches) high to get a marshmallow interior. Make a small dip in the centre of the Pavlova.

Reduce the oven temperature to 140°C. Bake the Pavlova for 1½ hours or until lightly coloured and dry to the touch, then switch off the oven. Open the door to allow the meringue to cool down completely in the switched off oven. When cold, remove the Pavlova from the baking tray and store in an airtight container until ready to serve.


Serving
Mash 7 of the raspberries with the icing sugar until the berries have broken down (you can use frozen berries for this). Whip the cream until thick, add the vanilla extract then swirl through the crushed raspberries. Dollop the cream over the top of the Pavlova, top with the remaining berries and then add the remainder of the pistachios and the mint leaves.


This is a delicious confection and one worthy of serving on Christmas Day.

See you all again tomorrow with Day 2 of Xmas week 2019,

Bye for now,

Jillian
PRINT RECIPE

chocolate crumpets with honeycomb butter

14 Aug 2017


A few months ago, I saw a photo of chocolate crumpets on instagram. I was immediately intrigued and decided I needed to make some. I didn't have a recipe so I hunted online but in the end decided to go it alone, adapting my regular crumpet recipe. In a moment of inspired genius I decided to make a small quantity of Bill Granger's honeycomb butter with which to top the finished product.


I kept my fingers crossed that all would go well. The chocolate crumpets weren't as bubbly as the regular crumpets but topped with the honeycomb butter were still mighty fine.


I promptly scoffed two and stored the rest in the freezer for later. J
ust in case you were wondering, these crumpets are not sweet, just chocolately.


If you'd like to make some of these chocolate crumpets at home, here's the recipe. If you don't feel like making the honeycomb butter, then I'm sure a chocolate crumpet topped with butter and maple syrup would be just as nice.

Chocolate Crumpets - makes 18 8.5cm crumpets

Ingredients
1½ cups of milk
50g dark chocolate (70%)
15 gm milk chocolate
1½ tsp sugar
7g dried yeast
355g plain flour
3 tbs cocoa
½ tsp salt
½ tsp baking soda
200ml water

Method
Coarsely chop the chocolates. Pour the milk into a saucepan and heat until just warm. Transfer into a bowl and add the chopped chocolate and sugar. Stir until the chocolate melts before adding the yeast. Make sure the milk is lukewarm because you don't want to kill the yeast. Allow to stand for 10-15 minutes or until the milk starts to bubble.

Sift the flour, cocoa and salt into a bowl and make a well in the centre. Add the chocolate milk/yeast mixture to the flour and beat until completely smooth. The mixture will be quite thick at this stage. Cover with plastic wrap and stand in a warm place for 1- 1½ hours until doubled in volume and full of air bubbles.

Mix the baking soda with the water and combine this with the crumpet mixture to make a kind of gloopy batter. Leave to stand for 30 minutes.

Heat a heavy based frying pan or griddle over a medium heat and grease with a little butter. Thoroughly grease the crumpet moulds and regrease them between batches. Place the crumpet rings on the hot surface and place 2 tbs of mixture inside the ring. Don’t overfill as the mixture will rise in the rings whilst cooking.

Within a short period of time your crumpets should get small bubbles all over the surface that begin to break. Cook for about 10 minutes until the surface is covered in broken bubbles and the top is dry.  Remove the crumpet rings, turn gently and cook on the other side until lightly browned. They normally take another 5 or so minutes to cook through. Remove from the pan and wrap the crumpets in a clean tea towel while you cook the rest. Any leftovers can be frozen for later; defrosted and toasted.

To serve, top with a slice of Bill Granger’s honeycomb butter


Bill Granger's Honeycomb Butter
250g unsalted butter, softened
100g sugar honeycomb, crushed with a rolling pin
2 tbs honey

Place all ingredients in a food processor and blend until smooth. Shape into a log on plastic wrap, roll, seal and chill in a refrigerator for 2 hours.

Store any leftover honeycomb butter in the freezer, it's great on toast.

btw, no need to thank me, just head into the kitchen and make some of these!

See you all again soon,

Jillian
PRINT RECIPE

home-made crumpets

5 Jun 2017


Growing up, my winter after school snack was always a toasted crumpet slathered with butter. A few months back I saw a photo of a chocolate crumpet on instagram and was immediately intrigued and vowed to make a batch. However as I'd not made crumpets before I thought I better make a batch of regular crumpets first.


I didn't have any crumpet rings though, so I found a set online, ordered them then waited 2 weeks for the crumpet rings to make the 7 km journey from the store to the local post office. Thanks Australia Post.


Since their arrival, I've made 2 batches of crumpets. I used the recipe on the back of the crumpet rings and also this Bill Granger recipe. The Bill Granger recipe took longer to make and had more steps but yielded a more consistent crumpet so that's the recipe I'm posting. 


The home-made crumpets are smaller, softer and definitely more tasty than the shop bought kind. They freeze very well and as I discovered, make an excellent midnight snack toasted and topped with butter and some home made blackberry jam.

Here's the recipe for you and just a reminder that I use a 250 ml cup for all my recipes.

English Crumpets - recipe from Sydney Food by Bill Granger  

Makes 16 8.5cm crumpets  

Ingredients 
1½ cups of milk 
1½ tsp sugar 
7g dried yeast 
375g plain flour 
½ tsp salt 
½ tsp baking soda 
200ml water 

Method 
Pour the milk into a saucepan and heat until just warm. Transfer into a bowl and add the sugar and yeast. Allow to stand for 10 minutes or until the milk starts to bubble. 

Sift the flour and salt into a bowl and make a well in the centre. Add the milk/yeast mixture to the flour and beat until completely smooth. The mixture will be quite thick at this stage. Cover with plastic wrap and stand in a warm place for 1- 1½ hours until doubled in volume and full of air bubbles. 

Mix the baking soda with the water and combine this with the crumpet mixture to make a kind of gloopy batter. Leave to stand for 30 minutes 

Heat a heavy based frying pan or griddle over a medium heat and grease with a little butter. Thoroughly grease the crumpet moulds and re-grease them between batches. Place the crumpet rings on the hot surface and place 2 tbs of mixture inside the ring. Don’t overfill as the mixture will rise in the rings whilst cooking. 

Within a short period of time your crumpets should get small bubbles all over the surface that begin to break. Cook for about 10 minutes until surface is covered in broken bubbles and the top is dry.  Remove the crumpet rings, turn gently and cook on the other side until lightly browned. Remove from the pan and wrap the crumpets in a clean tea towel while you cook the rest. Any leftovers can be frozen for later and toasted before serving.


I can't imagine buying shop bought crumpets again. Now that I have my crumpet rings, it's time to work on that chocolate crumpet recipe.

See you all again next week with some more baking from my kitchen.

Bye for now,

Jillian 
PRINT RECIPE

Passover week - chocolate, orange and hazelnut biscotti

14 Apr 2014

I thought I'd finished with Passover week, until I realised I had nothing in the cookie jar. I looked through my recipes and thought I'd try making some biscotti. I adapted an old Bill Granger recipe using ingredients I already had in the cupboards.


I'd run out of my usual superfine matzo meal and had to buy a different brand. It was much more coarse than the Solomon's superfine matzo and absorbed much more liquid so I found the dough very dry.


I added some orange juice to make the dough workable but you could try making the biscotti using half the baking mix and seeing how you go, then adding more of the baking mix if the mixture is too damp.


Chocolate, orange and hazelnut biscotti - makes 20
(adapted from this Bill Granger recipe)

Ingredients
⅓ cup caster sugar
1 egg
2 tsp grated orange rind
1 cup Passover baking mix (equal quantities superfine matzo meal and potato flour)
¼ cup cocoa
50 g coarsely chopped toasted hazelnuts
50g coarsely chopped dark chocolate
3 tbl orange juice (if required)

Method
Preheat oven to 180°C. 
Line a tray with baking paper.
In a stand mixer, beat together the egg, sugar and rind for a few minutes, until thick and pale. 
Sift over the baking mix and cocoa and stir through with a wooden spoon.
Add the nuts and mix well using a clean hand. If the mixture is too thick, add a few tablespoons orange juice to form a dough.
Form the dough into a flattish logs and bake for 20 minutes or until firm. 
Leave to cool on a wire rack.
Lower the oven to 120°C.  Using a serrated bread knife, cut the log into slices about 7mm thick.  Spread the slices out on the baking tray in a single layer and bake for about 20 minutes, turning over halfway.
Cool on a wire rack and store in an airtight container. These will keep for up to 2 weeks in a sealed container


These are tasty but as there is no raising agent, they're pretty crunchy so you'll definitely need to dunk these to avoid some expensive dental work.

I hope you enjoy tonight's Seder,

Jillian 


PRINT RECIPE

sweet corn fritters with avocado salsa

30 Sept 2013

Now you know how much I love Bill Granger, don't you? I regularly eat at bill's in Surry Hills and even though I only own one of his books, Bill's Open Kitchen, I've made quite a few of Bill Granger's recipes. Bill writes a column for Delicious magazine and generally his recipes are simple and don't require exotic, hard to source ingredients.


Going out for breakfast is really popular in Sydney and I've eaten these tasty little fritters a few times at bill's. As avocados and sweet corn are in season I decided to make sweet corn fritters with avocado salsa from Bill's Open Kitchen.


Apart from the avocado and sweet corn, all the other ingredients were already in the fridge and the pantry.


The best thing about these fritters apart from the taste? They're quick and easy to make and you can make the salsa while the fritters are in the oven. They're so yummy, they don't last long.

Here's the recipe for you.
Sweet corn fritters with avocado salsa
For the sweet corn cakes:
2 2/3 cup/525 g sweet corn (from 3 cobs of corn)
1 small red onion, chopped
2 eggs
15 g coriander leaves, chopped
1 cup plain flour
1 tsp baking powder
sea salt and freshly ground black pepper
vegetable oil, for frying

Preheat the oven to 120°C.  Put 2 cups/450g of the sweet corn, the onion, eggs, coriander, flour, baking powder, salt and pepper in a food processor and process until combined. Place the mixture into a bowl. Add the remaining sweetcorn and stir. 

Heat 1 tablespoon of the vegetable oil in a non-stick frying pan over a medium-high heat. When the oil is hot, drop 2 heaped tablespoons of mixture per sweetcorn cake into the pan and cook in batches of 3 for 1 minute on each side. Drain on paper towels and keep warm in the oven while you are making the rest of the cakes

For the avocado salsa:
2 ripe medium avocado, stones removed, flesh diced
15 g coriander leaves
2 tbsp lime or lemon juice
2 tbsp finely chopped spring onions
dash tabasco, optional
sea salt and freshly ground black pepper

Put all the ingredients in a bowl and stir very gently to combine. Serve with the warm sweetcorn cakes.


Did I tell you I'm going to Tasmania in 3 weeks? Unfortunately I'll only be there for a week so I'm going to Launceston, Freycinet National Park and Hobart, then back to Launceston. I've been to Tassie before but it was a long time ago. I have a pretty good idea of places to see, markets to visit and where to eat but I'd love some shopping suggestions, gardens to see and food producers to visit while I'm there.


Looking forward to all your suggestions,

Bye for now,

Jillian
PRINT RECIPE
© DELICIOUS BITES • Theme by Maira G.