SLIDER

copyright 2019
Showing posts with label copyright 2019. Show all posts

polka dot cheesecake - xmas week 2019

19 Dec 2019


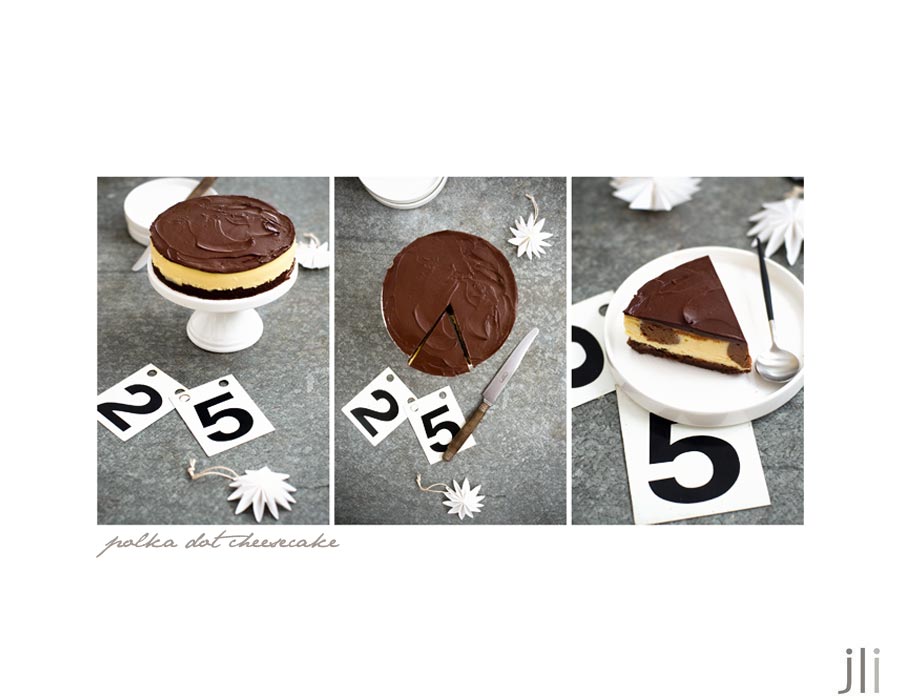
Welcome to Day 4 of Xmas Week 2019. A few months ago Zoebakes blog featured a bull's eye cheesecake adapted from a Maida Heatter recipe. Maida Heatter was a well known American cookbook author who recently passed away at the grand old age of 102. As cheesecake is always a popular dessert at Christmas, I thought I'd like to give it a try and whilst searching for recipes on the net, I found a recipe for a polka dot cheesecake.


I couldn't resist the temptation and gussied it up a bit with a chocolate shortbread base and an espresso flavoured chocolate ganache.


Yes, I won't deny making this cheesecake is a bit of a fiddle but the end result was absolutely spectacular - a crunchy chocolate flavoured base; a smooth as silk filling and the slightly bitter note from the ganache topping. The cheesecake needs plenty of cooling time though, so you'll have to start making the cheesecake the day before you plan to serve it.


Here's the recipe. For all my recipes I use a 250 ml cup and a 20 ml tablespoon. All eggs are 60 grams and my oven is a conventional gas oven not fan forced, so you may need to reduce your oven temperature by 20°C. If you'd like to make a larger version refer to the original recipe in the link for the filling quantities. If you make the cheesecake in an 8 inch tin, then increase everything by 50%. If making a 9 inch cheesecake then you'll need to double  the quantities.

Polka Dot Cheesecake inspired by a Maida Heatter recipe 
Base 
55 grams unsalted butter 
1 tbs caster sugar 
½ tsp vanilla
½ cup plain flour  
1½ tbs cocoa
Pinch salt

Filling
500g cream cheese
1-tbs yoghurt or sour cream
1 teaspoon vanilla extract 
2 large eggs
½ cup caster sugar
30g dark chocolate, melted
1 tsp cocoa powder, sifted

Topping
50mls cream
¼ tsp espresso powder
50g dark chocolate, finely chopped

Method
Preheat oven to 180°C, butter a 17cm-diameter spring form cake tin and line the base with baking paper. Cream the butter, sugar and vanilla together until light and creamy. Sift the flour with the cocoa and salt into a small bowl. Add to the butter mixture and combine until the mixture forms a soft dough. Press the mixture into the base of the greased spring-form tin, bringing it slightly up the sides. Bake 15 minutes or until the base is dry, then cool to room temperature. Once cool, wrap 2 layers of plastic wrap around the base and sides of the tin followed by 2 layers of foil and tie it firmly with a piece of kitchen string (this prevents water seeping into the pan while cooking in the water bath). Otherwise line the base and sides of a regular 17cm tin with baking paper leaving a few cms overhang to use as a handle to remove the cheesecake from the tin.

Filling
Lower the oven temperature to 160°C. In a food processor, combine the cheese, sour cream or yoghurt and vanilla extract. Process until the mixture is smooth before continuing. Add the eggs, one at a time. Remove ½ cup of the cheesecake mixture and place in a small bowl. Add the melted chocolate and sifted cocoa powder and beat until smooth. Place in the fridge until needed.

Regrease the sides of the springform pan then pour in the light-coloured mixture. Fit a large pastry bag with a plain 1cm tube. Place the chocolate mixture in the bag. Place the tip of the tube in the centre of the top of the cake, inserting it about 1 cm into the cake. Squeeze out enough of the chocolate mixture to form a perfectly round ball about 1'' wide. There will now be a dark polka dot in the centre of the cake. Then, using the same procedure, squeeze out 6 smaller balls around the rim spacing them evenly. The balls around the rim should be smaller than the one in the centre, and they should not touch each other or the centre ball. If you have some chocolate mixture left over, add it to the centre ball; if you still have some left over, add a bit to each of the other balls.

The top of the cake will not be smooth and level now, but it will level itself during baking. Place the cheesecake into a roasting pan and pour boiling water into the roasting pan to come halfway up the sides of the spring-form pan. Bake in the oven for about 1 hour. The cake will still have a slight wobble. Turn the oven off and leave in the oven for about 1 hour to cool. I removed the cake from the water bath after 30 minutes when it was cool enough to remove the foil and plastic wrap and placed it back in the oven for another 30 minutes. Place the cheesecake on a rack and when completely cold, refrigerate overnight. The next day make the topping.


Topping
In a small saucepan, heat the cream to boiling point. Stir in the espresso powder and mix until it dissolves. Place the chopped chocolate in a small bowl, then pour the hot cream over the chocolate and allow to stand for a few moments until the chocolate starts to melt. Stir the chocolate until its smooth then put ganache to one side to thicken a little. Reattach the spring-form ring to the base and pour the chocolate ganache over the top of the cheesecake.  Gently smooth with a spatula then gently tap the cheesecake to level the topping. Allow the topping to completely set then run a knife around the cake before unmoulding. Keep refrigerated until ready to cut and serve. 


This looks so impressive when cut, so expect to hear lots of oohas and aahs.

See you all tomorrow with another showstopper for your Christmas table.

Bye for now,

Jillian

PRINT RECIPE

browned butter fruit tarts - xmas week 2019

18 Dec 2019


Welcome to Day 3 of Xmas Week 2019. You may remember I made a mixed berry brown butter tart a few months ago. I wasn't happy with it at all so I went back to the drawing board and completely reworked the filing with much better results. I decided to make some individual tarts but for Christmas Day you could make one large tart to share. Wanting to give people choice I used some chopped rhubarb and a selection of berries to top the tarts. The rhubarb browned butter tart was particularly delicious.


I also made a test tart without pre-baking the pastry shell. It took 5 – 7 minutes longer to cook and the pastry was a little less golden but other wise it turned out very well. Anything that saves time in the kitchen is a good thing isn't it?


Here's the recipe for you which makes nine 6 cm tarts or one 23 cm tart. For all my recipes I use a 250 ml cup and a 20 ml tablespoon. All eggs are 60 grams and my oven is a conventional gas oven not fan forced, so you may need to reduce your oven temperature by 20°C.


Brown butter fruit tarts 
Crust
150g unsalted butter
⅓ cup caster sugar
1 tsp vanilla extract
1½ cups plain flour
Pinch of salt

Filling
75g unsalted butter, diced
90g caster sugar
½ teaspoon vanilla extract
1 large egg
pinch salt
½ cup plain flour
½ tsp baking powder
2 punnets ripe berries and 3 rhubarb stalks, sliced into small lengths

Optional 
1 tbs warmed apricot jam

Crust
Place all the crust ingredients into the bowl of a food processor. Whiz until a soft dough forms around the blade. Place the greased tart tins onto a baking tray. Roll the dough out thinly between 2 sheets of baking paper. Using one tart tin as a template cut out 9 small rounds placing one into the bottom of each of the tart forms. Re-roll the scraps and cut into lengths to form the sides of the tart shells. Press the dough evenly onto sides and bottom of the tins before placing in the fridge for 30 minutes. You may have a little bit of dough left over.

Meanwhile pre-heat the oven to 190ºC. Bake tart shells until golden, about 20 minutes (crust will puff slightly while baking). Transfer the tray to a rack and let the tart shells cool completely. This step can be done the day ahead with the tart shells stored in an airtight container. 

Filling
To make the browned butter, place the diced butter into a microwave safe bowl with a lid. Cook on high for about 5 minutes but start checking after 3 minutes. The butter will bubble madly but when ready will be darker in colour with some dark brown solids and should start to smell nutty. The butter will continue to darken while it’s cooling. Let the butter cool down to room temperature. You should have about 60g of brown butter. This step can also be done in advance, just remember to bring the butter back to room temperature before making the filling.

When the butter is cool, mix in the sugar and vanilla and beat until the colour lightens. Beat in the egg and mix thoroughly until incorporated. Sift the flour with the salt and baking powder into a small bowl. Mix the flour into the egg mixture and mix until well combined.

Spoon about 1 tablespoon of the brown butter mixture into the base of each of the cooled tart shells, about half full. Arrange the rhubarb slices decoratively over the filling and place the berries pointed side up and close together in concentric circles over the mixture. Return the filled shells to the baking sheet. Place the tray in the centre of the oven and baked for 30-35 minutes at 190ºC or until filling is puffed and golden. Cool tarts in pan on rack. While still warm, run a knife around the edge of the pastry to loosen from the tin, then remove tart pan sides when completely cool. If you like you can glaze the fruit with some warmed apricot jam.


They look pretty festive don't they, a little like Christmas baubles? 

See you all again tomorrow with some more baking for Xmas week 2019. 

Bye for now,

Jillian

PRINT RECIPE

peppermint candy cane brownies - xmas week 2019

17 Dec 2019


Welcome to Day 2 of Xmas Week 2019. Last year I saw a photo of some peppermint candy cane brownies and just knew I wanted to make a batch for this year's Xmas week. I made the brownie mixture, topped the mixture with crushed candy canes and while baking, the candy canes promptly melted in the oven resulting in a very unattractive looking mess. 


Undaunted I put on my thinking cap and worked on a way to get candy canes and peppermint flavouring into my brownies without making an unholy mess. In a stroke of genius I decided to make a peppermint flavoured chocolate ganache topping then topped the ganache with some chopped candy canes. 


I used dark mint chocolate I had in the cupboard, maybe it was Lindt, maybe it was from ALDI. I can't quite remember. If you don't have any mint chocolate you could always add some peppermint extract to the melted chocolate. Although I topped the brownies with a dark chocolate ganache, initially I was going to make a white chocolate topping. I thought a mint flavoured white chocolate ganache topped with crushed candy canes was such a great idea for Christmas brownies, I made a batch of those as well. 


I needed to make a double batch of white chocolate ganache to cover the brownies so if you make the white ganache version you'll need a 100 mls cream, 150g chopped white chocolate and 1 tsp of peppermint extract. I topped the ganache with crushed candy canes and added a sprinkle of sea salt flakes to balance out all that sweetness.


Here's the recipe for you which makes a 7 inch square tin of brownies. If you'd like to make a larger batch of brownies, increase everything by 50% and bake in an 8 inch square tin or double and bake in a 9 inch square tin. For all my recipes I use a 250 ml cup and a 20 ml tablespoon. All eggs are 60 grams and my oven is a conventional gas oven not fan forced, so you may need to reduce your oven temperature by 20°C. 

Peppermint candy cane brownies (inspired by a Claire Ptak recipe)
Ingredients
125g unsalted butter
135g 70% dark chocolate
¾ cup packed light brown sugar
2 eggs
1 tsp vanilla extract
⅓ cup plain flour
1½ tbs cocoa
pinch salt

Topping
50 mls cream
75g dark mint chocolate, finely chopped
4 candy canes, crushed

Preheat the oven to 190°C. Butter a 7 x 7-inch baking pan and line with parchment paper; allow 2 inches of overhang.

Melt the butter and the chocolate together in a bowl over simmering water or in the microwave.  Allow the chocolate butter mixture to cool to room temperature then stir in the brown sugar and the beaten eggs and the vanilla. Sift the flour and cocoa together with the salt. Add the flour mixture to the chocolate mixture and beat well until glossy. Spoon the mixture into the prepared tin.

Bake the brownies in the centre of the preheated oven for 25-30 minutes or until the edges are set and a toothpick inserted in the centre comes out with a few moist crumbs. Let the brownies cool in the pan before decorating.


Topping
In a small saucepan, heat the cream to boiling point. Place the chopped chocolate in a small bowl, then pour the hot cream over the chocolate and allow to stand for a few moments until the chocolate starts to melt. Add the peppermint extract at this stage if using and then put the ganache to one side to thicken. Spread the chocolate ganache over the cooled brownie and allow to partially set before sprinkling with the crushed candy canes. Allow the topping to set completely before cutting into squares to serve.


Brownies just the way I like them, all squidgy in the centre.

See you all again tomorrow with some more baking for Xmas week 2019.

Bye for now,

Jillian
PRINT RECIPE

raspberry white chocolate and pistachio pavlova - xmas week 2019

16 Dec 2019


Welcome to Christmas Week 2019. This year I've made a range of items including a few slightly more ambitious dessert items which you could serve for dessert on Christmas Day.


Recently I watched an episode of Bill's Kitchen - Notting Hill in which Bill whipped up some individual strawberry white chocolate and pistachio pavlovas. For Christmas Day I thought it would be nice to make a larger pavlova to share and as raspberries are in season I swapped them for the strawberries that were in the original recipe.


I always have trouble cooking meringue in my gas oven as the oven tends to go out at lower temperatures. Every time I checked the pavlova the oven had gone out and after an hour of baking, the pavlova was no-where near cooked. In the end I needed to switch the oven on three times and baked this pavlova for 2 hours before it was firm. It seemed to be worth the effort because the pavlova disappeared in the blink of an eye.


Here's the recipe for you which makes a 7 inch pavlova. For all my recipes I use a 250 ml cup and a 20 ml tablespoon. All eggs are 60 grams and my oven is a conventional gas oven not fan forced, so you may need to reduce your oven temperature by 20°C. 


Raspberry pistachio and white chocolate pavlova – inspired by a Bill Granger recipe
Serves 6
Ingredients
4 large egg-whites 
200g caster sugar 
1 tsp cornflour 
1 tsp white vinegar
1 tsp vanilla
100g white chocolate, roughly chopped 
80g pistachio nuts, roughly chopped

To decorate
150g fresh raspberries 
1 tbsp icing sugar  
300 ml cream
1 tsp vanilla extract  
A few mint leaves
A few chopped pistachios

Method
Preheat oven to 160°C. Line a baking sheet with parchment paper. Trace a 7 inch circle onto the paper with a pencil then turn the paper upside down. You’ll use this as template for the Pavlova.

Place the egg whites into the clean dry bowl of a stand mixer with a pinch of salt and whisk to soft, shiny peaks. Gradually add the sugar, a tablespoon at a time. Whisk well after each spoon full of sugar. Whisk until the mixture is really stiff and very shiny - the mixture should stand up in peaks once you lift out the whisk. Using a metal spoon, gently fold through the cornflour, vinegar and vanilla followed by the white chocolate and most of the pistachios, reserving a few for decoration. 

Once folded together, pile or pipe the meringue mixture onto the baking tray, keeping within the marked circle. Smooth the top so it resembles a flat cake. It needs to be at least 5-6 cm (2-3 inches) high to get a marshmallow interior. Make a small dip in the centre of the Pavlova.

Reduce the oven temperature to 140°C. Bake the Pavlova for 1½ hours or until lightly coloured and dry to the touch, then switch off the oven. Open the door to allow the meringue to cool down completely in the switched off oven. When cold, remove the Pavlova from the baking tray and store in an airtight container until ready to serve.


Serving
Mash 7 of the raspberries with the icing sugar until the berries have broken down (you can use frozen berries for this). Whip the cream until thick, add the vanilla extract then swirl through the crushed raspberries. Dollop the cream over the top of the Pavlova, top with the remaining berries and then add the remainder of the pistachios and the mint leaves.


This is a delicious confection and one worthy of serving on Christmas Day.

See you all again tomorrow with Day 2 of Xmas week 2019,

Bye for now,

Jillian
PRINT RECIPE

nectarine olive oil cake

9 Dec 2019


Nectarines have made their way into the fruit shop as have summer berries, watermelon and mangoes. I can't tell you how happy that makes me feel. With a bag of ripe nectarines in the fridge, I decided to make a nectarine version of Silvia Colloca's apricot cake.


This is a quick and easy to make cake. When I made the apricot cake I wrote a few notes in the margin of recipe book. Based on those notes I reduced both the quantity of sugar and milk in the cake batter and altered the method just a little. 


My olive oil was very fruity so I diluted it a little with some canola oil. As you can see even after reducing the quantity of milk, the batter was still very liquid.


Here's the recipe for you which makes an 8 inch square cake. For all my recipes I use a 250 ml cup and a 20 ml tablespoon. All eggs are 60 grams and my oven is a conventional gas oven not fan forced, so you may need to reduce your oven temperature by 20°C.


Nectarine and olive oil cake – makes 8 slices
Ingredients
3 large nectarines cut into eights
2/3 cup caster sugar, reserve 1 tbs
2 eggs, lightly beaten
finely grated zest of 1 lemon
1tsp vanilla extract
100 ml oil (I used a combination of extra virgin olive and canola oil)
1⅓ cups (200 g) self-raising flour   
½ tsp bicarbonate of soda
Pinch salt
⅓ cup milk
¼ cup flaked almonds, for sprinkling

Method
Preheat the oven to 180°C. Grease and line a 20 cm square tin with baking paper.

Sprinkle the sliced nectarines with the tbs of caster sugar and set to one side. In a medium bowl, using a balloon whisk combine the beaten eggs with the remaining sugar, lemon zest and vanilla extract. Slowly drizzle in the oil and whisk until well combined.

Sift the flour, the bicarbonate of soda and salt into a small bowl. Add to the egg mixture in batches alternating with the milk and whisk to form a smooth loose batter. Pour the batter into the prepared tin and arrange the nectarine slices on top any way you like. Sprinkle with the flaked almonds and bake for 45 minutes or until golden and a skewer inserted into the middle of the cake comes out clean. Cool in the tin for a few minutes, then turn out onto a wire rack and cool at room temperature for 1 hour before cutting into 8 slices.


I took the cake into work and it disappeared in a flash, which is always a good sign. When plums are in season I think I'll make another version using browned butter in the batter instead of olive oil. Watch this space.

I'll be back again next week with 5 offerings for Xmas week 2019. I hope you like what I've made for you.

Bye for now,

Jillian

PRINT RECIPE

white chocolate and raspberry cake

2 Dec 2019


Whenever I make my white chocolate raspberry brownies, they disappear in a flash so I tinkered with the recipe in an attempt to turn the brownies into a white chocolate raspberry cake. It should have been easy but I got a bit over confident and changed too many things. 


I reduced the amount of both the chocolate and the sugar; I swapped some of flour for almond meal and increased the quantity of berries. 


The cake was too moist and not quite sweet enough; the crumb was too open; the ganache wouldn't set and after looking through the images I discovered the raspberries I'd bought to decorate the cake were mouldy.


I returned to the kitchen and did what I should have done in the first place and this time it worked like a charm!


Here's the recipe for you which makes a 4 cup bundt cake or a 17cm round cake. For all my recipes I use a 250 ml cup, a 20 ml tablespoon, unsalted butter and 60g eggs. My oven is a conventional gas oven so if your oven is fan forced you may need to reduce the oven temperature by 20°C.


White chocolate and raspberry cake 
Ingredients
100 grams white chocolate, coarsely chopped
100 grams unsalted butter, chopped
2/3 cup caster sugar 
1 tsp vanilla 
2 eggs 
¾ cup SR flour
¼ cup Plain flour
Pinch salt
¼ cup milk
100g raspberries fresh or frozen

To decorate
75g white chocolate, roughly chopped
50 mls cream
¼ cup toasted flaked almonds
Few extra raspberries 
      
Method
Grease and flour a 4 cup bundt tin or 17cm round cake tin. Preheat oven to 180°C.

Melt white chocolate with the butter in an ovenproof bowl in the microwave. Leave to one side until cool. Add the sugar and vanilla and mix until well combined. Gradually add the eggs, beating until incorporated. Sift the flour with salt. Add the flour mixture in batches alternating with the milk until you have a soft batter. Gently fold through the raspberries then spread the batter in prepared pan. 
    
Bake in a 180°C oven for 45-50 minutes or till golden brown and a skewer comes out dry when tested. The bundt cake will take less time to cook than the round cake. Cool in the pan on a wire rack for about 10 minutes before unmoulding. When cool, drizzle the top of the cake with the white chocolate ganache. When the ganache has almost set, top with the raspberries and the flaked almonds.


White chocolate ganache
Place the chocolate in a heatproof bowl and bring the cream to the boil in a small saucepan. Pour the boiling cream over the chocolate and gently stir them together using a spatula until a shiny bubble-free ganache forms. Let cool a little to thicken before spooning over the cooled cake.


Serve as is or with a few extra berries on the side.


I'm making the last item for Christmas week this coming weekend. I can't wait to share everything with you starting Monday December 16.

See you all again next week witth some more baking from my kitchen.

Bye for now,

Jillian
PRINT RECIPE

mandarin olive oil cake

25 Nov 2019


I recently spent a few weeks at home in Brisbane. Just before I left, I discovered my Dad had polished off the last piece of pumpkin spice bundt cake. I didn't want to leave him with an empty cake tin before I returned to Sydney so I looked through the fridge and cupboards to see what I could come up with.


My Dad doesn't like sweet cakes and he likes the cake to be moist as well so with that in mind I decided to make an olive oil and yoghurt cake. To make sure it was really moist I swapped almond meal for some of the flour. Normally I'd make a lemon yoghurt and olive oil cake but Dad doesn't like the flavour of lemon. He just loves mandarins and as there were plenty of mandarins in the fruit bowl I made a mandarin flavoured olive oil and yoghurt cake.


Once everything was weighed out and measured, the cake didn't take long to prepare and Dad had a slice for his afternoon tea. He declared it was 'nice cake Jilly', which really is all I could ask for.


If you'd like to make a mandarin olive oil cake, here's the recipe for you which makes a medium (5 cup) bundt cake or an 8 inch cake. I've made variations of this recipe using lemons and blood oranges, so of course you could use any citrus you like. For all my recipes I use a 250 ml cup and a 20 ml tablespoon. All eggs are 60 grams and my oven is a conventional gas oven not fan forced, so you may need to reduce your oven temperature by 20°C.


Mandarin Olive Oil Cake 
Ingredients
2 small mandarins
1¼ cups self-raising flour 
pinch salt 
¼ cup almond meal
¾ cup caster sugar (might reduce this a bit next time) 
2 large eggs, beaten 
⅔ cup extra-virgin olive oil or a neutral tasting oil (I used a mix of olive oil and canola oil)
⅔ cup Greek yoghurt

To decorate - icing sugar 

Method
Finely grate the peel then juice the mandarins. You’ll need 50 mls of mandarin juice for this recipe.

Grease and flour a 5 cup bundt tin or an 8 inch round tin. Place the tin in the fridge until required. Preheat the oven to 180°C. Sift the flour and salt together into a medium size bowl and then stir through the almond meal. Set aside.

Place the sugar into a bowl. Using you fingers, rub the mandarin zest into the sugar until fragrant. Mix the eggs and sugar together then add the oil and mix until well combined. Add to the flour mix, then in thirds stir in the juice and yoghurt to the egg mixture; stir to combine. When just combined, pour the batter into the prepared cake pan. The batter will be quite soft


Bake for 35–40 minutes if using a bundt tin (it will take a bit longer in a regular cake tin), or until a toothpick inserted in the centre of the cake comes out clean and the cake is well risen and golden brown. Cool in the pan on a wire rack for 10 minutes and then invert the cake onto the rack to cool completely. When cool, dust with icing sugar.


The end result is a moist, vibrant sunshiny cake. With none of my styling products at hand, I had to focus simply on photographing the cake. I don't think that was a bad plan and I might continue to do so in the future.

See you all again next week with some more baking from my kitchen.

Bye for now,

Jillian
PRINT RECIPE

basque burnt cheesecake II

18 Nov 2019


Yes, you're absolutely right. I have made a basque burnt cheesecake before. When I made the cheesecake I used cream cheese but I wanted to remake it with cottage farmers cheese because that's what my Mum always used when she made her famous cheesecake. I bought some farm cheese during the weekend and almost fainted when I realised how much I'd paid for it. Who knew cottage farmers cheese was more than twice the price of cream cheese?


I cut the slab of farm cheese in half and
 stashed a portion in the freezer for later and used a mixture of 2 cheeses in the filling.


I also changed the base recipe. The past few months I've been trying to make a perfect sponge roll but so far have had nothing but disasters. The first one wouldn't detach from the baking paper so went straight into the compost bin. The second one was more successful but cracked when I rolled it. I put it in the freezer until I worked out the best way to use leftover sponge cake other than in a trifle. I read online that you could use spongecake crumbs to make a cheesecake base so that's what I did.


I can't get the perfectly burnished top I see online when I make the cheesecake. I think it's the combination of a slow gas oven and a much lower sugar content in the filling. Next time I might glaze the top of the cake with egg yolk halfway through the bake, but then again maybe I won't. 

Here's the recipe for you which makes a 17cm cheesecake. If you'd like to make a 23cm cheese cake, just double all the ingredients and bake for the same length of time. For all my recipes I use a 250 ml cup and a 20 ml tablespoon. All eggs are 60 grams and my oven is a conventional gas oven not fan forced, so you may need to reduce your oven temperature by 20°C. 

Basque Burnt Cheesecake II
Base
60g sponge cake, crumbled
¼ cup almond meal
15 gm unsalted butter, melted

Preheat oven to 180°C. Butter a 17cm spring-form pan, then line with baking paper making sure the paper comes at least 2" above top of pan on all sides. In a food processor whiz the sponge cake crumbs with the almond meal until combined. Drizzle in the butter and process until it forms a soft mixture. Press the mixture into the base of the tin, bringing it slightly up the sides. Bake for 15 minutes or until the base is lightly golden. Set aside to cool while you make the filling.

Filling
250g cottage farm cheese
125g cream cheese, at room temperature
½ cup caster sugar or to taste
Pinch salt 
1 tsp vanilla extract
1 tbs plain flour
3 large eggs 
100 mls  cream 

Method
Place a rack in middle of oven; increase the oven temperature to 200°C. Place pan on a baking sheet.

Place the cheeses, sugar, salt vanilla and plain flour in the bowl of a food processor and process. Add eggs and cream and process until the mixture is combined. The cottage cheese has quite a grainy texture so don’t expect the mixture to be perfectly smooth.

Pour the batter into prepared pan. Bake cheesecake until deeply golden brown on top and still jiggly in the centre ~ 50 minutes. If the top is a bit pale, increase the temperature to 220°C and bake for another 10 minutes. Remove from the oven and cool before unmoulding from the tin. The cheesecake will rise dramatically then fall, this is normal. Let cool completely before carefully peeling the baking paper from sides of cheesecake. 

The cheesecake can be made 1 day ahead. Cover and chill but be sure to let the cheesecake sit for several hours at room temperature to remove chill before serving.


I had a slice last night and it tasted just like Mum's so I'm glad I have a bit of the cottage cheese in reserve because I'll be making this again.

I can't believe how Christmas has snuck up on me. I've just started my Christmas shopping and I've been busily baking for Christmas Week.

See you all again next week with some more baking from my kitchen.

Bye for now,

Jillian

PRINT RECIPE
© DELICIOUS BITES • Theme by Maira G.